
- StumbleUpon. 08.09.09 | by Erik Anderson Whether it’s product branding, package design or projects for ourselves, we’re pleased when we find a solution that’s very effective and creative, while keeping resources to a minimum.

This idea is very inexpensive idea and it’s a great way to recycle a wine bottle. See how this simple idea inspired this brand and wine bottle design. It’s been a record year for mosquitoes here in Indianapolis, Indiana and I’d been wanting to add some Tiki-esque torches to the patio to combat the little buggers, and add a little ambiance. Print Hula Hoop Rug Page. I Heart Trees. Isn't this just the perfect little table lantern for an engagement party or wedding reception?

If you haven't run across Notonthehighstreet.com yet, you should definitely take a few minutes to have a peek. This online marketplace for handmade arts and crafts is a powerhouse in England. These cute little lanterns come to us from This is Pretty. Until next time... Mike Stumble this post. Crystal Enamel Drinking Glasses - StumbleUpon. My kids are old enough that we can all use glass to drink out of now.

However, it seems they haven’t outgrown using a million cups everyday to drink from. Beaded Chandelier Tutorial {Guest Post} I’m excited to share a crazy inventive tutorial for a diy beaded chandelier from Britt over at A Penny Saved.

She created this amazing diy beaded chandelier out of a hanging fruit basket, a ton of beads, and a simple light socket kit. Gather your materials: LOTS of beaded necklaces, cut into long strands (the Mardi Gras kind) Metal hanging garden basket A spool of thin-gauge wire Wire cutters Wire clothes hanger Pendant light kit (cord & socket) Metal chain to hang the fixture Light fixture mounting bracket, bolt & loop Light fixture ceiling cap Start with a hanging garden basket. Go ahead and paint it to blend with your beads (or the finished color of your chandelier if you plan to paint your beads). I used a ladder to suspend the chandelier while I worked on it. Top it off. Add a little structure. Start beading! Aaaaand bead some more.
Trim away the excess. Add a chain and ceiling cap. Paint it up. Hang it.Admire. Thank you Britt, for the awesome tutorial! Tags: guest posts, Tutorial. Iron Craft Challenge #1 - Iced Willow Branch Candleholder. The first challenge for Iron Craft was to create something to light the winter gloom.
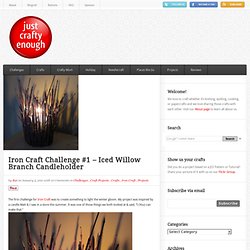
My project was inspired by a candle Matt & I saw in a store this summer. It was one of those things we both looked at & said, “I (You) can make that.” I covered a 3-inch glass pillar candleholder with willow branches & then “iced” the branches with slivery beads. When lit, the branches make fantastic shadows on the walls & the beads shimmer with the candlelight. It reminds me of bare winter trees covered with ice. Iced Willow Branch Candleholder How-to Supplies: Glass candleholder – I used a 3 inch tall pillar holder that I got for $3 at Michael’s. Cut your branches so they are the same height or taller than your candle holder. Using the glue gun, start gluing the branches around the candleholder. Use your tweezers to dip beads in a little craft glue & place them in the y’s of the branches or anywhere else you’d like a little shimmer.
Never leave unattended with when lit. Options: DIY: Blueprint-Inspired Holiday Project. Our own Angelica completed a DIY project over the holidays that's positively brilliant.

She writes: After a series of failed baking adventures I realized it was time for me to transfer my love for YumSugar and food magazines to CasaSugar and design magazines. In the spirit of the holidays I picked a Light Bright project from this month's Blueprint magazine. I must admit, I'm a much better painter and craftswoman than I am a baker so the project was definitely a confidence booster. The Blueprint picture is on the left, my replica is on the right. Best DIY Projects of 2011 Photo 6.
Get a Personalized Living Newsletter! Help us customize your newsletter by selecting your interests (optional): Share This Link Copy.