
Diy plate reverb. This was the easiest of all my machines to make.
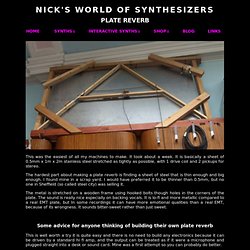
It took about a week. It is basically a sheet of 0.5mm x 1m x 2m stainless steel stretched as tightly as possible, with 1 drive coil and 2 pickups for stereo. The hardest part about making a plate reverb is finding a sheet of steel that is thin enough and big enough. I found mine in a scrap yard. I would have preferred it to be thinner than 0.5mm, but no one in Sheffield (so called steel city) was selling it. Hiding a Lavalier Mic. Today's lapel or "lav" mics are small and unobtrusive, but sometimes, you still need to hide one.

There are plenty of shoot situations where hiding the lav is helpful, but where to put it? Fortunately, there are lots of options and, if you'll stick with us for a few minutes, you will know how to use 10 of the most popular locations. You'll need some gaffer's tape, some clear medical tape and maybe a safety pin or two. Get your tools together, and let's go hide a lav mic. Polo Shirts. Schemas. SYNTH ZONE - MIDI, Synthesizer & Electronic Music Production Resource Guide. Vintage On The Cheap. There's no doubt that these days software is king.

And why not? It costs a fraction of what hardware does, the sound quality is improving all the time, and you can literally fit your entire studio in a laptop bag. But for all its distinct advantages, there are some areas where software falls short for synth geeks. WolframTones: An Experiment in a New Kind of Music. Acoustic Treatment and Design for Recording Studios and Listenin. Acoustic Treatment and Design for Recording Studios and Listening Rooms by Ethan Winer Ethan Winer is co-owner of RealTraps, a leading manufacturer of acoustic treatment products.
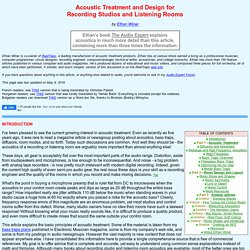
Ethan has at various times earned a living as a professional musician, computer programmer, circuit designer, recording engineer, composer/arranger, technical writer, acoustician, and college instructor. Ethan has more than 150 feature articles published in various computer and audio magazines. He’s produced dozens of educational and music videos, and composed three pieces for full orchestra, all of which have been performed. If you have questions about anything in this article, or anything else related to audio, you're welcome to ask in my Audio Expert Forum. Reverb Comparison: Convolution vs. Algorithmic. History of Sound Recording Technology. Five milestones in music technology. Last week an audio clip emerged that is apparently the oldest recording of the human voice in existence.

It's a ten-second clip of a woman singing a French folk song, and was recorded in 1860 on a device called a phonautograph. You can hear it here. The last two hundred years have seen huge advances in music technology, such as electronic music and even home recording software. Here are five of the key advances, in chronological order. 1. His device was called the Musical Telegraph and was based on a self-vibrating electromagnetic circuit. Make acoustic panels for your recording studio or home theater. Acoustic treatments are often used to help improve the acoustics of a room by taming "flutter echoes," "room modes," and other problems which arise from a room's dimensions and construction.
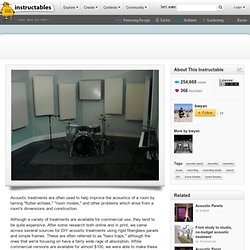
Although a variety of treatments are available for commercial use, they tend to be quite expensive. After some research both online and in print, we came across several sources for DIY acoustic treatments using rigid fiberglass panels and simple frames. S C O T T P E T E R S E N ∞ E L M U C O ∞ S C A C I N T O . C O M. In preparation for our instrument making workshop at Artspace New Haven on December 13th, your intrepid guides Brian and Scott spent a foggy Sunday afternoon making contact mics from scratch.

The below is both a how-to and an advertisement for the workshop. If you are around New Haven, please follow this link to the INI site and register now as seats are limited to 10 and they will go fast. So without further ado, lets make some contact mics! Tools: Wire stripper, X-acto knife, pliers, soldering iron, solder, helping hands (or a friend ;) ) Ingredients: Piezoelectric discs, audio cable (mono mini TS or your preferred kind), Plasti Dip, electrical tape. Step 1: Grab the audio cable and cut it in half. Step 2: Sequential Circuits Prophet 5. Arcade Button MIDI Controller. Below is a list of components used to create the MIDI controller.
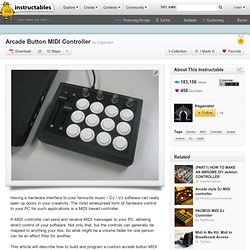
The cost for this project is based on the components needed for the MIDI controller. Other tools such as a soldering iron or a power drill, or common components such as solder and wire aren't included in the final cost. Tools which I did have to purchase are marking with italics , and their price is shown. How It's Made - turntables. Magnetic Tape History. Industry standards Technics SL-1200. There's some gear DJs expect to see in every club they walk into.

Our new series Industry Standards will look at the history, technology and personalities behind these classics of the craft. Cable Anatomy PT1: Microphone. What is impedance?
Impedance is the AC (alternating current) version of the DC (direct current) term resistance, which is the opposition to electron current flow in a circuit and is expressed in ohms. Impedance (often abbreviated as “Z”) includes capactive reactance and inductive reactance in addition to simple DC resistance. Reactance depends upon the frequency of the signal flowing in the circuit. Capactive reactance increases as frequency decreases: inductive reactance increases as frequency increases. Because of this frequency dependence, impedance is not directly measurable with a multimeter as DC resistance is. What are the differences between high- and low-impedance microphones? The lower output of low-Z mics required the equipment manufacturer to use input transformers in front of the mic preamplifiers to step up the strength of the signal, which substantially increased the cost of the circuitry.
Isn’t the use of balanced lines the biggest advantage of low-impedance microphones? Cable Anatomy PT3: Instrument. See Part 1, Microphone Cable here and Part 2, Loudspeaker Cable here. Are instrument cables used for high-impedance or low-impedance lines? Generally, the source impedance is the determining factor in cable selection. Instrument cables are used for a wide range of sources. Many keyboard instruments, mixers, and signal processors have very low (50 to 600 ohm) source impedances. On the other hand, typical electric guitar or bass pickups are very inductive, very high impedance (20,000 ohms and above) sources. SouthPole Expedition Part 3: Pattern Sequenced ADSR Envelopes. ADSR (Attack Decay Sustain Release) envelopes provide a way to specify how sound synthesis parameters such as filter cutoff and gain change over time.
They support the synthesis of evolving timbres and are commonly found in analog synthesizers where the envelopes are triggered by pressing keys on the keyboard. With three ADSR envelope generators, AudioMulch's SouthPole contraption provides plenty of scope for envelope controlled filter modulation. In this post I'll demonstrate triggering the envelopes from their built-in pattern sequencers to create rhythmic patterns of filtering and gating.
Cable Anatomy PT2: Loudspeaker Cable. See Part 1, Microphone Cable, here. What are the main parts of a loudspeaker cable, and what does each one do? Typically a loudspeaker cable has two stranded copper conductors, covered with insulation, twisted together with fillers and sheathed with an overall jacket. How big should the conductors be? How Vinyl Records Are Made PART 2 OF 2. How Vinyl Records Are Made PART 1 OF 2.