
I SPY DIY. {DIY} Fishtail Bracelet - Typical House Cat. These DIY fishtail bracelets were a product of my impatience.
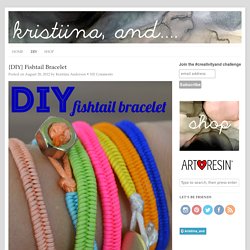
I ordered a bunch of Chinese knotting cord to make this necklace and the cord arrived a couple of days before the rest of the supplies I needed. I immediately became obsessed with it, making all sort of macramé and friendship bracelets. If you’ve been following DIY blogs then you’ve seen plenty of macramé lately but hopefully, this is the first time you are seeing the fishtail or herringbone weave. You will need: 30 inches of Rattail or faux-suede cord80 inches of .8mm Chinese knotting cord (for a six-inch wrist, if you have a larger wrist I would add 10-15 inches of knotting cord per inch.)A stand-out button or hex nutA thread burnerA small box lidSome scrap rattail or yarn. DIY : un bracelet tressé en cuir pour l'été ! (Si ça vous interesse, j’ai mis a jour mon vide dressing sur Facebook !)
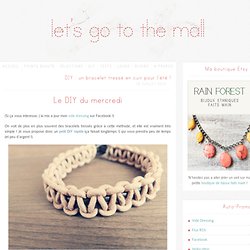
On voit de plus en plus souvent des bracelets tressés grâce à cette méthode, et elle est vraiment très simple ! Je vous propose donc un petit DIY rapide (ça faisait longtemps !) Qui vous prendra peu de temps (et peu d’argent !). DIY : bracelet coloré avec des perles ! Then she made...: Braided Bracelet Tutorial. So, this cute girl, who we all call Bug Wanted to say I'm hoping you remember that a few weeks back we had a little family craft fair.
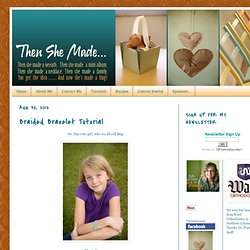
Do you remember? My girls were trying to earn a little bit of money to go towards school shopping. They did ok and each of them worked hard enough, and sold just enough of their products to buy something special. Thank you so much for supporting them! So, Bug, she sold enough braided bracelets and headbands to buy the boots she's wearing in the photos above. Color schemes - Adobe Kuler. The 200 Best Graphic, App & Web Design Tools & Resources (Categorized) This post is #21 in DailyTekk’s famous Top 100 series which explores the best startups, gadgets, apps, websites and services in a given category.

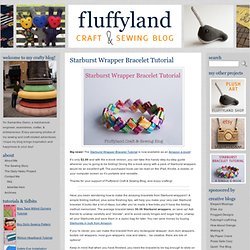
Fonts, typefaces and all things typographical — I love Typography (ILT) A pair and a spare . diy fashion. Starburst Wrapper Bracelet Tutorial - Fluffyland Craft & Sewing Blog. Big news!
My So Called Green Life...: How to Sew a Credit Card Wallet, Business, or Gift Card holder. DIY des vases ballons. Crédit Photo : Féesmaison Et si vous fabriquiez de jolis vases pour la fête des mères ou pour agrémenter votre décoration ?
C’est ce que je vous propose de faire aujourd’hui, en transformant de simple verres et de ballons. Originaux et design, ils s’intégreront parfaitement dans votre intérieur et pourront être sublimés par de délicieuses fleurs. C’est à partir du tuto de Family Chic, que j’ai eu envie d’essayer. Il suffit simplement de quelques minutes pour avoir de tout nouveaux vases colorés. Pour fabriquer ces petits vases, j’ai utilisé les verres de la maison, mais également quelques verrines. Pour les non anglophones, voici comment procéder : 1- Coupez le col du ballon, étirez le pour faire entrer le verre à l’intérieur.
Origami - le ballon gonflable. Bonjour!

Comme je vous le disais la semaine passée, des ciseaux j'étais passée aux pliages avec mes petits doigts :) A l'origine de cette envie d'origami, un week-end à la montagne en famille qui s'annonçait pluvieux; j'avais donc acheté un joli livre et des papiers dans le but de faire des origami avec un petit garçon sage... Finalement, et heureusement, la météo s'est annoncée bien plus souriante que prévu et les papiers sont restés dans le sac.
Une semaine plus tard, ma petite maman fêtait son anniversaire! Je ne sais pas pourquoi, elle a tout de suite freiné mes envies de prendre le contrôle du menu :), c'est la raison pour laquelle je me suis rabattue sur la déco de la table, en faisant deux sortes de pliages. Porte-monnaie en brique de lait. Les packs de lait, de jus de fruits, de thé ou de soupe peuvent devenir d’amusants porte-monnaies, portefeuilles ou même des porte-cartes.
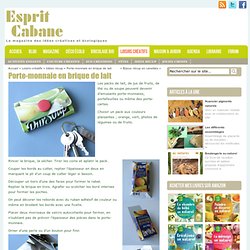
Choisir un pack aux couleurs plaisantes ; orange, vert, photos de légumes ou de fruits. Rincer la brique, la sécher. Tirer les coins et aplatir le pack. Couper les bords au cutter, replier l’épaisseur en deux en marquant le pli d’un coup de cutter léger si besoin. Découper un tiers d’une des faces pour former le rabat. On peut décorer les rebords avec du ruban adhésif de couleur ou même en brodant les bords avec une ficelle. Placer deux morceaux de velcro autocollants pour fermer, en n’oubliant pas de prévoir l’épaisseur des pièces dans le porte-monnaie. I Spy DIY. Piratecore: How to make a Soft Cover Wrap Around Notebook. How it was done:1.Cut the 25 sheets of paper to 5 x 8 inches.
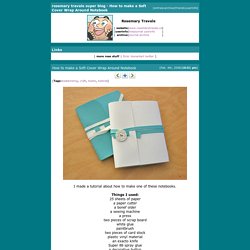
Put them into 5 stacks, with 5 sheets in each stack.2.Using the bone folder, fold each of the stacks in half.3.Using the sewing machine on the widest stitch setting, sew down the center of the crease on each of the five plies.4.This is what each of the piles will look like. 5.Fold the pages in half again and pile them up neatly, with the sewn side facing out.6.Using a press, or something to keep the pile of sewn papers together, put an old board on either side of the pile and insert it all into the press.7.You can see here the paper clamped inside of the press with the two pieces of scrap board on either side.8.With a brush, spread a generous amount of glue across the paper. 11.Now cut two pieces of card stock that measure 5 x 8 inches.
Fold them each in half with the bone folder. These will be the end papers for the book.12.Take the vinyl material and cut a 11 by 5.25 inch piece. Paint Sample Notebook Tutorial. These wee notebooks are super easy to make & you'll want to make, like, a million of them because they're so cute!!
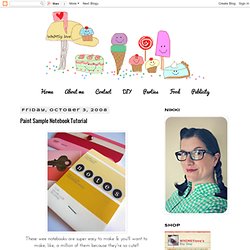
I recently received an awesome package of these mini notepads from the president of my Eastern Washington Etsy Street Team, Randi- a.k.a. Ragnazidnar. They're part of a swap our team has organized to promote each other's shops. As our orders go out, the little freebies get tucked inside each package. To see Randi's version of these notebooks, see the last photo in this post. The SUPPLIES you need are: various sized paint sample cards (found at Home Depot, Walmart, Lowe's, etc.), stapler, ruler, computer paper, scissors or paper cutter.
The first thing you'll want to do is fold & crease one end. Then , take the top edge & catch it under that little flap on the bottom to form your little matchbook-style notebook. Measure your book to see how big you need to cut your papers. Cut your papers. I used 20 pieces of paper inside the books. Sticky notes books or sticky notebooks - greetingarts. Using pads of sticky notes, scrapbook paper and a few other supplies, I made one of these books for each of Rebecca's classmates to celebrate the last day of Kindergarten. It didn't take that long, and I thought some of you might like the idea. Who knew this was going to turn into a book making blog? For the books I made this time, I used 3" x 3" Post-it Notes (in their Ultra colors), so all the measurements I'll give you will reflect that size. But I've made these before with the 1" x 2" pads and shipping tags that I decorated with rubber stamps instead of scrapbook paper, so use your imagination and see what you come up with.
I got this marvelous stack of 12" x 12" scrapbooking cardstock at 50% off, and cut pieces that were 3¼" x 7¾". Turn the paper over to the wrong side, with the large section on the left, the little flap on the right, as in the photo above. Protège-cahier en tissu. Elizabeth Abernathy: Tutorial: Playing Card Pocket Diary.