
Making a table from discarded pallets - SURVIVE FRANCE NETWORK. I have a number of quite decent pallets that have been stored outside since 2008, they are sturdy, the ones used to deliver concrete blocks rather than the lightweight type.

They''ve taken on a nice patina of age and yesterday I used a few of them to make a table. You should be able to pick up pallets at your local tip or 'decheterie'. If you decide to have a go, please post your projects on SFN as a blog post, or just here in the comments below! Here's how I did it; The raw materials, I actually used three in the end.
First I cut the pallets using a table saw, this isn't strictly necessary, you can disassemble them with a hammer and bolster. Then I tried removing the nails with a claw hammer, this was useless as most of the rusty heads stripped off and I was left with just the body of the nail still intact. It was much easier and faster to cut them off with an angle grinder. Still not decided on how the legs would look, I screwed some on anyway to make working on the table top easier. DIY pallet swing. - Journal - outdoor pallet table diy. A midweek hello to you!
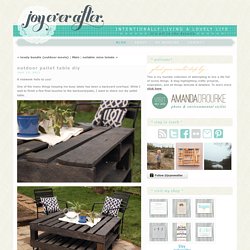
One of the many things keeping me busy lately has been a backyard overhaul. While I wait to finish a few final touches to the backyard/patio, I want to share our diy pallet table. To make the table, we used two wood pallets, one 4x4, 4 caster wheels with nuts & bolts, L-brackets & skrews, and then gray stain. First we determined the height we wanted (21"), subtracted the height of the casters and two pallets (15"), then cut the 4x4s for the additional 6" legs. We then attached the 4 legs to the top of the lower pallet and also the underside of the upper pallet. So there you have it! What do you think of the final product? // UPDATE // My apologies that this DIY is not a very clear step-by-step. Photo (2)550.jpg (Image JPEG, 550x413 pixels) How.to.do.it !! workshop small GREAT ideas !!
Réalisation d'un salon de jardin en palettes Instructi. ETAPE 1 - L'habillage de l'assise - -> Prendre votre partie de palette qui sert d'assise, la coucher sur le coté et y visser les planches concues pour l'habillage: -A l'avant: prendre la planche longue et fine et caler dessous la planche longue et large, cela rehaussera votre assise en cachant la palette; (voir photos); Vous pouvez vous servir des trous laissés par les anciens clous pour mettre vos nouvelles visses.
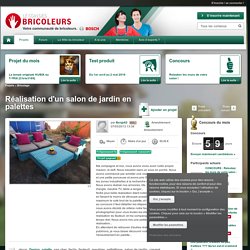
-A l'arriere: retourner votre assise et faite la même opération ETAPE 2 - Positionner l'habillage sur le coté, qui sera le support de l'acoudoir: -> Pour cela, positionnez le meuble sur sa tranche, puis visser les planches de l'habillage du coté: la petite de 40*14 sur le devant et la plus grande de 60*14 sur l'arriere, au niveau du futur dossier; Il faut visser dans le cube et dans la planche longue et large de l'habillage de devant (voir photos) -> Le morceau de planche de 40*14 avec la decoupe, orientez bien du bon coté, (voir photo) ETAPE 4 - Les acoudoirs - Un fauteuil ADIRONDACK pour l'été.