Diagrams. DIY Design Community « Keywords: DIY, pendant, lighting, paper. Remember those folded up fortune-tellers from your elementary school days?
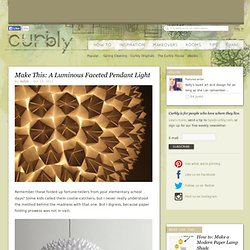
Some kids called them cootie-catchers, but I never really understood the method behind the madness with that one. But I digress, because paper folding prowess was not in vain. Take a longing glance at this beautiful DIY faceted pendant sphere, completely covered in small fortune tellers! This project requires little more than printer paper and patience to complete, and would look stunning in an entry, a hallway, or a dining room. Visit the 3 Rs blog for a full how-to and get to folding! Tagged : pendant, lighting, paper, DIY. Lucky Wishing Stars Tutorial. You’ve probably seen these little puffy origami stars before.
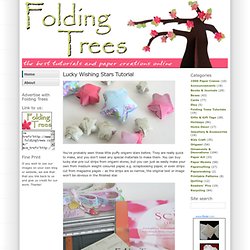
They are really quick to make, and you don’t need any special materials to make them. You can buy lucky star pre-cut strips from origami stores, but you can just as easily make your own from medium weight coloured paper, e.g. scrapbooking paper, or even strips cut from magazine pages – as the strips are so narrow, the original text or image won’t be obvious in the finished star. Anti-clockwise from top left: pre-cut strips, paper cutter, scrapbook paper, magazine page. Now on to the tutorial! To give you an idea of size, I’ve made stars in 3 different sizes to show you: blue stars (from pre-cut strips): 35cm x 1.25cmpink stars (from a magazine page): 30cm x 1cmgreen stars (scrapbook paper): 15cm x 0.6cm The finished star will be approx 1.5 x the width of your strip, so pick an appropriate size for the size of star you’d like to end up with. For the rest of this tutorial, I will be using a paper strip cut from a magazine page.
Paper Models of Polyhedra. Balloon lights tutorial. Here in New Zealand we are now in the middle of winter, and when playing around with some LED fairy lights I thought I would combine my love for origami and bringing some winter sparkle to our house.
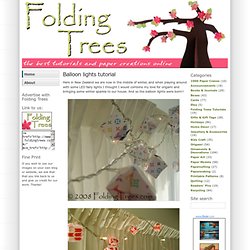
And so the balloon lights were born!! Ok let’s get started with the tutorial! This is what you need for this project: Pretty paper (appr. 20 sheets, mine were 90 x 90mm) on a white or light background. I went to Canon Chiyogami patterns and printed off Ya-mon in red. Here are my 20pcs of paper after I cut them with my guillotine. Now first make a water-bomb base. With the printed side of the paper facing up, valley fold in half. After that turn 90 degrees and valley fold in half again. Now turn the paper over and do the same diagonally. Now for the last part of the water-bomb base. Use the creases you have made so far and the paper should naturally fall into this shape. Here is your finished water-bomb base.
Now to make the actual balloon. Now turn over and do the other side. Pre-crease as above. Kusudama Tutorial part 2. Today I am showing you part 2 of how to make a kusudama ball.

You can find the first part here. In part 1, I showed you have to make the individual flowers; you should now have 12 flowers made from 60 individual petals. For part 2 you will need: 12 flowers (made from 60 petals)GlueString or a ribbonBead(s) As you might be able to see from the finished kusudama at the top of the page, I made 6 flowers from blue paper and 6 flowers from a recycled map. Start to glue the flowers together one petal at the time – this will give the nicest result. When you add the 3rd flower, there are 3 petals to connect.
Carambola Flowers by Carmen Sprung. If you’ve been following me on Flickr for a while, you’ve probably seen this picture of Carambola Flowers before – I folded them ages ago!

But since my Pro account is going to expire in a few days time (and I don’t feel like upgrading it again), a lot of my old photos won’t be displayed anymore. So I decided it would be a good idea to share the very best of them on my blog! Origami Jewelry: delicate jewerly for that special lady in your life. If you have come to this page of the web site, then you must want to make origami jewelry!
The good news is that you can easily transform your origami into wearable jewelry with minimal skill. However, you do need quite a few supplies (see list below). Quick-and-easy jewelry can be made in an hour, but jewelry that is intended for extended wear or for selling will take at least half a day to complete. Most of the time is spent waiting for glue or coatings to dry before proceeding. (see tips and techniques below). Tips and Hints on Making Origami Jewelry Never made jewelry before? Tools, Supplies, and Terminology Don't know the difference between a head pin and a eye pin?