
davide ruzzenenti
Beeple - the work of mike winkelmann (cinema 4d project files, free vj loops etc.) Upscaling to 1080P. Come scegliere le inquadrature giuste? 8 consigli pratici per non sbagliare. Spesso nel nostro lavoro capita di dover realizzare dei rendering di un progetto ideato da qualcun altro, nella maggior parte dei casi partendo da un modello 3D già fatto.

La difficoltà maggiore in questo tipo di lavoro (oltre a quella di dover correggere e ottimizzare il modello ricevuto) è quella riuscire a comunicare in maniera efficace il progetto fotografando con maestria i suoi punti più interessanti e suggestivi. Una buona comunicazione può rendere interessante e gradevole anche un progetto mediocre, e viceversa una cattiva comunicazione può rendere banale e insignificante anche un progetto eccezionale. In questa parte della guida cercherò di darvi qualche consiglio per trovare le inquadrature giuste, in particolare su come scegliere la posizione della camera, la distanza focale, la prospettiva, il taglio dell'inquadratura e lo stile dell'immagine. Regola numero 1: non improvvisare mai. La cosa che può aiutarvi di più nella scelta dei vostri scatti è l'ispirazione. Black Haus. Studio Tools Pro. The studio tools is a set of HDR lights , tools , studio presets and rigs for Cinema 4D , with the Studio Tools you are able to create photo-real studio situations for product renderings and animations The New Studio Tools PRO is simple and easy to use lighting option for Cinema 4D’ Physical Renderer , with it you produce high quality renders in Cinema 4D .
The 15 new High dynamic range light textures are photographed from real studio lights with different variations and high resolutions ( More than 3000px per texture ) and can provide accurate reflections and GI shadows for realistic renders . The new Studio HDRI Presets are bundled with the Studio Tools as a free Product, with more than 94 Studio HDR files , now you have even more options to lighten your scenes with the help of simple new HDR loader rig for C4D .
EMOTION Mocap Data - AXYZ design - Store. eMOTION | MOTION CAPTURE ANIMATION: There are two ways to animate Metropoly 3d characters: The first one, and for expert animators is using traditional keyframe animation.
Keyframe animation is a technique that works a little like storyboarding (a comic strip series of images illustrating a sequence of events). It enables us to choreograph and build an animation by arranging the character poses and taking snapshots of them at key moments during a sequence of movement or change. 3D models of crystal chandeliers 3D Model Download. C o m: 3D Process / Post Process: tricks revealed! Many of you have asked for my post production process…so here it is. I typically use AE (Adobe After Effects) for my post work, but for this post I’m demonstrating in PS (Photoshop) because most people use PS over AE for stills.
However the principles apply to all software. Also, I’m trying to keep it “out-of-the-box”, rather than show a lot of plug-ins. I always suggest learning the techniques with the software, then after understanding how to create them, go get the plug-ins to make your job faster-not better. Some of you already know, but I do most of my modeling in SU ( SketchUp ). I also start materials and texturing in SU. Using Max 2011 has been great, because I can import SU files straight from Max without needing to export models from SU. During import I opt not to import the SU cameras. Photoshop post-processing master - tutorial. TUTORIALS. A lot of people have been asking me how I create my renderings. Since I am finished with grad school, I decided to develop some tutorials that explain techniques I used throughout architecture school. Many of the techniques only require Sketchup and Photoshop. Others later on will be a little more advanced and involve rendering programs that can be downloaded for free. .
A l o n e - The Trailer. Quick Tip 05: How to affect any parameter with the Inheritance Effector in Cinema 4D. Bending Objects Along Paths. Download Graphics - Templates and Vectors free. Untitled. Tutorial: DIY Projection Mapping with After Effects Thanks for the interest regarding this test I posted on youtube.
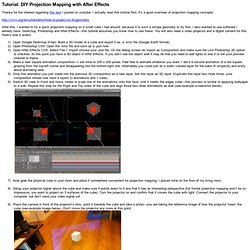
I actually read this tutorial first; it's a good overview of projection mapping concepts: After this, I wanted to try a quick projection mapping on a small cube I had around, because it is such a simple geometry to try first. I also wanted to use software I already have: Sketchup, Photoshop and After Effects—this tutorial assumes you know how to use these. You will also need a video projector and a digital camera for this. 1) Open Google Sketchup (Free): Build a 3D model of a cube and export it as a .kmz file (Google Earth format) 2) Open Photoshop CS5: Open the .kmz file and save as a .psd now. 3) Open After Effects CS5: Select File > Import choose your .psd file. 4) Make a new square animation composition—I set mine to 200 x 200 pixels. 5) Drop this animation you just made into the previous 3D composition as a new layer.
This is the basic theory of how this works. Tutorial mapping 1. Nicola D'Amore. Map Data Map data ©2014 Google Map Opera principalmente nel settore video/televisivo ed è specializzato su servizi di video/brand identity, concept design, channel branding, campagne pubblicitarie, declinazione di idee su ogni piattaforma.
Grazie! After Effects + MadMapper and How to map a building… In this tutorial, we’ll use After Effects to produce a QuickTime movie that we will remap on a building.
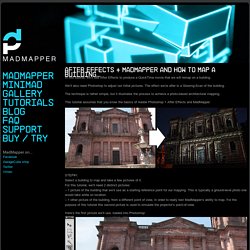
We’ll also need Photoshop to adjust our initial pictures. Cinema 4D and RealFlow - Water Freeze Tutorial. Windows 8 /// Top & Tail /// Real Time.
Tuto c4d Fugoo Origami > Onskin - 480p in Motion Design Tut. CG Education. Facebook Fan Page Cover : Facebook Cover Maker. Sicurezza. Audio. 3d. Ventuz.