
Quick fix grocery bag. We had grapes this weekend.
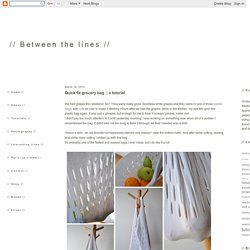
So? They were really good. Seedless white grapes and they came in one of those plastic bags, with cuts all over to make it stretchy. Hours after we had the grapes, while in the kitchen, my eye fell upon the plastic bag again. It was just a glimpse, but enough for me to hear it scream: please, make me! I found a shirt - an old favorite but hopelessly stained one (bleach* near the bottom hem). In case you want to give this super fast and easy grocery bag a try as well, keep on reading as I wrote down some instructions for you. What you need: - an old T-shirt- scissors- matching thread- a button- a piece of ribbon- sewing machine Instructions: 1. 2. 3. 4. 5. 6. 7. 8. 9. 10. Take one sleeve and cut to size, such that the folded bag fits inside the sleeve (make sure to add seam allowance). As with all of my tutorials, please note, this tutorial is intended for personal use only. . * the bleach stains ended up the in hem and one of the boxed corners!!
Purse Organizer Insert With Adjustable Dividers. This is a last minute sewing project just before my departure to Taiwan, a purse organizer insert with adjustable divider for my camera and belongings during the traveling.

Actually, I can just buy a ready-made camera bag from the store, but I find them a little bulky. Well, because they give better protection with all the padded sponge which is good, the drawback of being excessively padded is that it can only offer limited storage space with it size. If I am going to put my camera, lenses & accessories, maps, passport, water tumbler, purse, scarf, cardigan and other necessities for a day-trip out, I will need quite a big camera bag to cater. After thinking thoroughly, I need to design something good for a bag to keep everything in place, organized, yet light-weight and with some degree of protection during the traveling.
Due to the photography equipment I need to carry through-out my 6-day trip, a lighter bag is a must so that it won’t add more burden to my shoulder. Pages: 1 2. The Tohoku Tote. Today I am publicly posting the full pattern and tutorial for the Tohoku Tote.

I have chosen to do this for a few reasons. 1) Kari from UCreate asked if it could be used for her monthly "Create With Me" and Kari rocks. I'm thrilled about this. 2) I think we raised what we could selling if for charity. It was "purchased" by over 400 people. Thank you SO much to those of you who donated to the cause. Please don't feel unhappy that everyone gets the pattern now. So, anyhow....here's the full pattern and tutorial. I have tried to be extremely thorough in this tutorial for those of you who are new to sewing. Print off the PDF pattern pieces and tape them together. Assemble your supplies. ½ a yard of fabric for the outer part½ a yard for the inside½ a year for the bow, stripe, and straps2 yards of fusable interfacing1 magnetic snapcoordinating thread Both of the bags (version 1 and 2) require the same supplies. If you are new to sewing, you might not know about interfacing.
Now you're here.