
Is not available. Starting with HTML + CSS. This short tutorial is meant for people who want to start using CSS and have never written a CSS style sheet before.
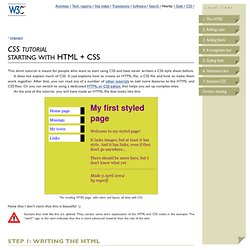
It does not explain much of CSS. It just explains how to create an HTML file, a CSS file and how to make them work together. After that, you can read any of a number of other tutorials to add more features to the HTML and CSS files. Or you can switch to using a dedicated HTML or CSS editor, that helps you set up complex sites. At the end of the tutorial, you will have made an HTML file that looks like this: The resulting HTML page, with colors and layout, all done with CSS.
Note that I don't claim that this is beautiful ☺ Sections that look like this are optional. Step 1: writing the HTML For this tutorial, I suggest you use only the very simplest of tools. Don't use a wordprocessor, such as Microsoft Word or OpenOffice. Step 1 is to open your text editor (Notepad, TextEdit, KEdit, or whatever is your favorite), start with an empty window and type the following: <! <! Css Zen Garden: The Beauty in CSS Design. CSS Tutorial. Comparison of HTML editors. The following tables compare general and technical information for a number of HTML editors.
Please see the individual products' articles for further information, and comparison of text editors for information on text editors, and comparison of word processors or information on word processors, many of which have features to assist with writing HTML. General information[edit] Operating system support[edit] Editor features[edit] Web technology support[edit] HTML/XHTML specification support[edit] Early HTML comparisons[edit] The following is a comparison of early HTML editors.
Mintert, Stefan (1995). Image format support[edit] See also[edit] References[edit] External links[edit] mw:WYSIWYG editor - WYSIWYG editing and software for MediaWiki and some wiki farms. From PSD to HTML: Building a Set of Website Designs Step by Step. Twice a month, we revisit some of our readers’ favorite posts from throughout the history of Nettuts+.
Today I'm going to take you through my entire process of getting from Photoshop to completed HTML. We're going to build out a set of 4 PSD mockups of a website that eventually will become a WordPress theme. It's a massive tutorial, so if you're going to follow through to the end, make sure you have a few hours to spare! Demos If you're like me, you like to see the end before beginning. Download the Files Additionally you can download the full HTML/CSS/Image source files here.
How To Create a Sleek Grid Based Website Design. Want to get your teeth stuck into a website design project to sharpen your skills?

Follow this step by step tutorial to create a sleek website design for a fictional eyewear company. In part one of the tutorial we’ll build the Photoshop design concept with a dark colour scheme and lay out the content to a solid underlying grid. Here’s the complete website we’ll be creating. It’s a sleek design with subtle gradients and eye catching imagery based on an overall dark black/grey colour scheme.
The whole website is laid out according to a solid grid which helps balance the page elements. View the large scale website design concept The fictional client I’ve made up for this tutorial project is a small eyewear brand named OPTIK. The design we’ll be creating as part of this tutorial begins on paper as a sketch along with simple notes. Fill the background with black, then use the zig-zag pattern from my Line25 pixel patterns freebie to fill a new layer. Learn how to create the website in HTML/CSS.