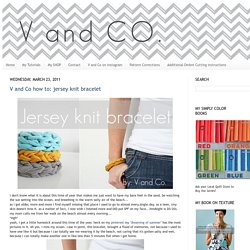

V and Co how to: jersey knit bracelet. I don't know what it is about this time of year that makes me just want to have my bare feet in the sand, be watching the sun setting into the ocean, and breathing in the warm salty air of the beach...as i get older, more and more i find myself missing that place i used to go to almost every.single.day. as a teen.

(my skin doesn't miss it. as a matter of fact, i now wish i listened more and DID put SPF on my face...hindsight is 20/20). my mom calls me from her walk on the beach almost every morning... *sigh*yeah, i get a little homesick around this time of the year. heck on my pinterest my "dreaming of summer" has the most pictures in it. ah yes. i miss my ocean. case in point. this bracelet, brought a flood of memories, not because i used to have one like it but because i can totally see me wearing it by the beach, not caring that it's gotten salty and wet, because i can totally make another one in like less than 5 minutes flat when i get home.
*sigh* okay... *cut off excess tails! Soap Making Recipes and Tutorials. DIY Solar Lamp: Make Your Own Eco-Friendly Sun Jars. The principle is simple and seductively clever: solar lights that store energy during the day and release light at night.

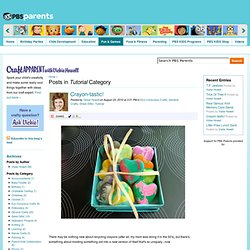
These can be purchased ready-made in a variety of colors (yellow, blue and red) but they can also be built at home. A simple, less-technical approach involves buying a conventional solar-powered yard lamp and then essentially harvesting it for key pieces to put in a jar. This is simply a way of taking an existing solar lamp design and appropriating its parts to make something more attractive for display around a house or home. A more electronically-savvy individual can take the more complex route and built a solar lamp from the ground up using small solar panels – though the aesthetic result may not be as impressive. Whatever route you choose to go, these are fun and sustainable gadgets that make it easy to go green, automate the process of turning on lights at night and can add some color to your porch, patio, garden or windowsill. Tutorial Archives . Craft Apparent with Vickie Howell . PBS Parents. There may be nothing new about recycling crayons (after all, my mom was doing it in the 50's), but there's something about molding something old into a new version of itself that's so uniquely...now.

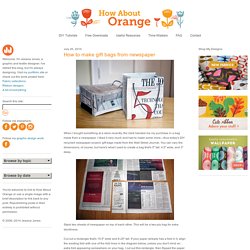
This project is a usable, versatile craft for all ages. The finished product makes great teacher gifts, favors for birthday parties, or back-to-school treats for the kids. Have fun experimenting with different color combos and tray shapes--I personally, have my eye on on a robot ice tray for our next batch--and use this opportunity to chat with your children about everything from the basic chemistry of wax properties changing, to where colors fall on a color wheel. Have fun! MaterialsUnwanted Wax Crayons (wrappers removed)Silicon Ice Cube Trays ORCandy Molds. How to make gift bags from newspaper. When I bought something at a store recently, the clerk handed me my purchase in a bag made from a newspaper.

I liked it very much and had to make some more—thus today's DIY recycled newspaper project: gift bags made from the Wall Street Journal. You can vary the dimensions, of course, but here's what I used to create a bag that's 5" tall, 4.5" wide, and 3" deep. Stack two sheets of newspaper on top of each other. This will be a two-ply bag for extra sturdiness. Cut out a rectangle that's 15.5" wide and 8.25" tall. Fold a flap 1.25" down from the top. Cut two pieces of cardstock or chipboard to 4.25" x 1", then glue them on the widest two panels just under the top fold. Put glue on the outside of the 0.5" tab and bring the left-most panel over to form the body of the bag, aligning the cut edge of the panel with the folded edge of the flap. Upend the bag so the 2" flap is now up. Put glue on both flaps and fold them inward to form the bottom of the bag.