
Sailor's Knot Bracelets. With fall days of colored leaves, chunky sweaters and spiced cider in our future, it’s just about time to pack up the beach gear until next year.
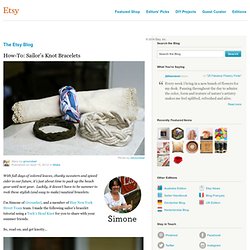
Luckily, it doesn’t have to be summer to rock these stylish (and easy to make) nautical bracelets. I’m Simone of Groundsel, and a member of Etsy New York Street Team team. I made the following sailor’s bracelet tutorial using a Turk’s Head Knot for you to share with your summer friends. So, read on, and get knotty… Supplies you’ll need: 3.5 yards of twine14 ounce can for a smaller bracelet or a 20 ounce can for a larger bracelet. Directions: Step 1: Wrap one end of the twine around the can to shape an X.
Step 2: Wrap the long end of the twine around the can again and bring it up to the middle of the X. Step 3: Next, move the upper left leg of the X over the right leg of the X to create an oval shape. Step 4: Pull the long end of the twine through the oval shaped opening you just set up. Step 7: You will now find a three-stranded braid. Free sewing patterns, how to sew, new sewing quilting techniques, sewing machines and sergers. Fabric Origami Workshop. Directory of Free Sewing Patterns, Tutorials and Projects. Casting On - Channel Islands Cast On - Knitting Community. This cast on requires three lengths of yarn and leaves behind a picot edging.
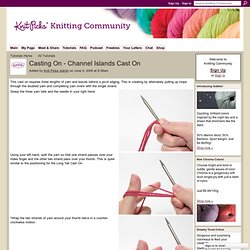
This is creating by alternately pulling up loops through the doubled yarn and completing yarn overs with the single strand. Grasp the three yarn tails and the needle in your right hand. Using your left hand, split the yarn so that one strand passes over your index finger and the other two strand pass over your thumb. This is quite similar to the positioning for the Long Tail Cast On. *Wrap the two strands of yarn around your thumb twice in a counter-clockwise motion. Insert the needle under the strands that are wrapped around your thumb. Pass the needle over the top of the single strand of yarn from your index finger and draw a loop through all of the strands on your thumb. Tug on the three strands of yarn with your left hand to snug them up. Pass the needle over the top of the index finger strand from front to back to create a yarn over. Repeat from * until you have the desired number of stitches cast on. Design*Sponge » Blog Archive » diy project: renske’s minimalist tote bag.
A talented seamstress with a mission, Renske Solkesz decided to create her own wardrobe after finding herself frustrated with high fashion prices.

When we saw her chic and modern wardrobe creations, we asked if she’d be willing to create and share a fun accessory tutorial with us. I’m super excited about what she’s come up with: an amazing self-closing utilitarian tote! I’m a huge fan of the graphic contrast and the leather and rivet details. Like her fashion designs, this tote is made from inexpensive materials, yet looks totally luxe. I’m halfway out the door to the fabric store already! CLICK HERE for the full how-to after the jump! When I designed this bag, I wanted to integrate the grip/straps in a more functional way with the rest of the bag. A friend of mine called it a “yin yang bag,” which is pretty accurate, I think. Materials Tools HammerSewing machineScissorsPinsChalkMeasuring tapeIronPattern template Instructions 1. 2. 3. 4. 5. 6. 7. 8. 9. 10. 11. 12.
Finished! Pattern Drafting.