
Fusion Beads, bead, beading, sterling, seed beads, charm, swarovski, lampwork, glass, jewelry, pearls. Step 1 Cut the cord to twice the length of the desired bracelet size PLUS 12 inches.

For example, a 7.5-inch bracelet will require 27 inches of cord. Slide a button to the center of the piece. Tie both lengths into an overhand knot beneath the button. Step 2 If the hole in the button is a bit too small for the cord, cut the cord at an angle to make it easier to string on. Step 3 Clip the button into a clip board. Step 4 Cut the thread about 8 feet long, thread the needle, slide it to the center to double the thread. Step 5 Tie the thread around the cord on the left using a lark’s head knot. Step 6. Flower origami ball. OutsaPop Trashion recycled style DIY fashion eco sustainable refashion... Magnetic Makeup Holder. Bird and Text Collage Wall Art. There are currently no images from other crafters. close Terms & Conditions You must enter into this Agreement if you want to submit digital images or other content to Prime Publishing through Sharing Customer Images (the "Service").
More Design Please - MoreDesignPlease - DIY : Sailors Knot Bracelet& Eighteen25. Punched Out Font. C.R.A.F.T.: C.R.A.F.T. #21: Mini Scrapbook.
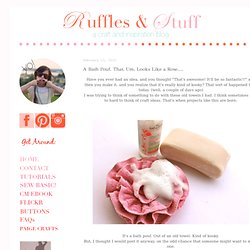
Paper Projects. Gifts (Cards/Wrapping) Home Projects. Jewlery. Flowers. Clothes. A Bath Pouf. That, Um, Looks Like a Rose.... Have you ever had an idea, and you thought "That's awesome!

It'll be so fantastic!! " and then you make it, and you realize that it's really kind of kooky? That sort of happened here today. (well, a couple of days ago) I was trying to think of something to do with these old towels I had. It's a bath pouf. But, I thought I would post it anyway, on the odd chance that someone might want to make one.
And if not, please enjoy a laugh at my expense :o) What you do, is cut about 1.5 inches off one side of towel (to get that finished edge), and two circles out of the middle. Gently pull the bottom thread to gather your strip, pretty tightly.Sew it onto one of the circles in a spiral shape, starting on the outside. Cut a 1.5"x6" strip, and finish the edges with a tight zig-zag stitch. Then pin the two circles together, with your 7" strip laid across the bottom.Sew a tight zig-zag around the two circles, sewing right over each side of the strip on the bottom. David Graham: The Move-it Kit. Entirely made of cardboard this DIY Move-it Kit designed by David Graham is a brilliant idea to help with all of those moving woes. I think I need of these when I go shopping in the future.
[youtube] The kit itself comes with several adhesive cardboard parts that stick to the package, ultimately turning it into a durable trolley that can transform to fit virtually almost any size and shape. The parts stay bonded through a strong contact adhesive that can hold up to 20 kg. The project as well as others were made for the James Dyson Award. images from James Dyson Award. How to make a little bow with a fork. How to Make Leaf Skeletons. Tutorial: Homemade Sidewalk Chalk. By Michelle Vackar, Modern Handmade Child One of our favorite outside activities at our home is drawing with chalk on the driveway.

You can play hopscotch, four-square, and of course draw and create silly stories. My daughters and I were talking one day as we played hopscotch about how to make chalk and I thought to myself, let’s try it! It ended up being quite a lot of fun. What you will need: • Toilet paper or paper towel tubes • Scissors • Duct tape • Wax paper • Small bucket or disposable container to make the recipe • ¾ cup of warm water • 1 ½ cups Plaster of Paris • 2-3 tablespoons of tempera paint • Paper bag or a “mess mat” ** we made six tubes of chalk – we simply doubled the above recipe Step 1: If you are using paper towel tubes, cut each tube in half, so it is roughly the length of a toilet paper roll tube. Step 2: Cover one end of each tube with duct table to hold the contents within. Pretty Doily Poms: DIY Kits. Posted February 3, 2011 | 29 Comments If you’re looking for a twist on the tissue pom, these doily poms may be perfect for you.

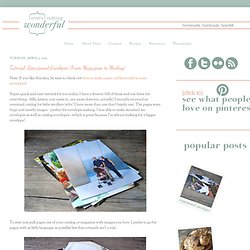
{every}nothing wonderful: Tutorial: Repurposed Envelopes (From Magazines to... Note: If you like this idea, be sure to check out how to make paper ruffles to add to your envelopes!

Super quick and easy tutorial for you today. I have a drawer full of these and use them for everything - bills, letters, you name it...my mom does too, actually! I recently received an oversized catalog for baby strollers (why? Whatimade.com. DIY Sweat-sacoche diy-laptop-sweat – the Trendy Girl. Not martha - to make: marble magnets. DIY Doily&Lamp - StumbleUpon.