
Arduino Character LCD Tutorial. See the LCD Shield for Arduino for a pre-assembled LCD+ Keypad shield.
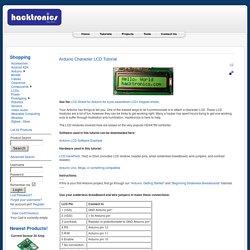
Your Arduino has things to tell you. One of the easiest ways to let it communicate is to attach a character LCD. These LCD modules are a lot of fun, however they can be tricky to get working right. Many a hacker has spent hours trying to get one working, only to suffer through frustration and humiliation. Arduino – Getting my LCD Screen to work. I’ve gotten hold of what I assumed was a compatible 16×2 LCD screen with my Arduino board – it’s a Powertip PC1602F and uses a compatible display driver for the Hitachi HD44780 display chip.
This is essentially what the Arduino LCD libraries are built around, so when I failed to get a display this is the first thing that I checked out. I also downloaded and installed Arduino 0017 which has a better and more up to date library for LCD stuff but you can update version 0015 with this library I think. Unfortunately this LCD screen also cost me my first Arduino board, not sure if it was coindence or not, but the USB chip burnt out when I was connecting the LCD screen via various guides and the manufacturers pin layouts. Also turns out that you don’t actually need to use all the pins – for a start my screen isn’t back lit and you only need 4 out of the 8 jumpers.
Now I just have to figure out what to do with the LCD screen! Arduino. Authors: TRONIXSTUFF In this article we go back to the past via the use of push-wheel/thumb-wheel switches with out Arduino systems. Here are some examples sourced from somewhere on eBay: Arduino Tutorial - Lesson 5. We've done a lot so far, blinking lights, printing messages...all of that stuff is output: signals coming from the Arduino.
The next step is to start playing with input, with the Arduino responding to outside events. In this lesson we will begin with the most basic kind of input, a push-button switch! You're probably familiar with switches, there's tons of them in your house. One kind of switch you use every day is a light switch. A light switch is a simple device with two positions, on and off. On the left, the switch is open and no current flows. (thanks wikipedia!)
In this photo, you can see the internals of a light switch. Light switches are great but we need something smaller. These little switches are a 1/4" on each side, cost about 25 cents, and can plug directly into a breadboard. Normally, the two wires are disconnected (normally open) but when you press the little button on top, they are mechanically connected. Find 5 things around the house that have switches. Switch capability. Scratch, Enchanting y S4A tres herramientas para divertirse. Arduino – Computer Boards & Starter Kits - RS Components UK. Computer Science Student Network. CS2N Learn is the center for all of CS2N's courses.
We offer courses that teach you how to program robots (physical or virtual), make animations, and also courses that are specific to our partners like 4-H. Education and Secondary 11-18 years. Educational Robots. Educational Robots.

Sure, robots are amazing all on their own. But several designers have made it a mission to incorporate a most important feature in their machines. Aside from companion robots, pet robots, industrial robots and household robots, there are robots that teach. Now, these educational robots will not soon possess the sinister quality of Hal, the super-intelligent computer that took over the spaceship in “2001: A Space Odyssey,” but they sure are smarter than a lot of humans we know.
Androbot's Topo by Nolan Bushnell In the 1980’s a robot aimed at the consumer and educational robots' market called Topo was designed by Androbot Inc, a Nolan Bushnell Company. Click HERE to Learn More about Androbot and Topo and Bob Heathkit's Hero Robots Another robot in the educational robots field that was also released in the 1980’s was the Heathkit Educational Robot, or HERO.
Click HERE to Learn More about HERO Robots Leaf AI Robot Click HERE to learn more about the Leaf AI Robot The BOE-Bot. NASA Robotics - Robotics Alliance Project. Arduino Arts » Archive » Tutorials with Arduino: (F1 RC Car) DC motor driven by MOS Transistor. Hi there!
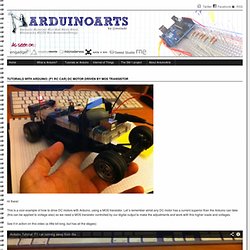
This is a cool example of how to drive DC motors with Arduino, using a MOS transistor. Let´s remember almst any DC motor has a current superior than the Arduino can take (this can be applied to voltage also) so we need a MOS transistor controlled by our digital output to make the adjustments and work with this higher loads and voltages. See it in action on this video (a little bit long, but has all the stages): The part list: 1 x DC motor (can be a toy car)1 x MOS IRF5201 x 10k potenciometer1 x photoresistor (10k)1 x 10k resistor1 diode1 x arduino1 x 9v battery (apart from the arduino power supply) Part 1: The basic circuit with DC motor. The assembly is simple. We are controlling the DC motor with the MOS transistor and the 10k Pot. The MOS is controlled by and digital output to send the information of how much current we are giving to the DC Motor, and the MOS receives the power from the 9v battery and gives just what is told from the arduino to the DC Motor.
The Source Code: Wiki.medialab-prado.es/images/b/b8/3.-_Introducción_a_Arduino._Circuitos_básicos_de_entrada-salida.pdf. Webots: robot simulator - Download - Windows. Gmail. Disposable Cameras. There are lots of disposable camera Instructables on the site.
It was hard to choose, but I've included some great ones! Need a taser, a coil gun, a flash grenade? Well then, this disposable camera guide is for you! From simple everyday parts you can make this glove which has two modes. Mode 1 is a constant output of slightly over 300 v. while Mode 2 takes a few seconds to charge, but gives off a much more painfu... Learn how to make a simple but extremely effective Coil gun using only a "few" parts that are fairly easy to obtain by only going to a few places and possibly online. I've come up with a project that i've been contemplating for a long time. Are you tired of having your Ni-Cad batteries that refused to charge and simply die? Well... Caution I'm not liable if your shock yourself and injury or kill your self, working with high voltages can be dangerous!! Before I get too far in this instructable, I would like to say that this was not my original idea.
Curso de Arduino com Álvaro Justen. Arduino Examples. Arduino Examples These examples are designed to demonstrate how to use our modules with the Arduino.
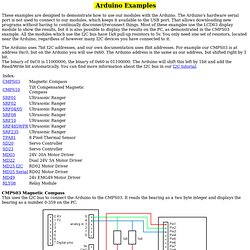
The Arduino's hardware serial port is not used to connect to our modules, which keeps it available to the USB port. That allows downloading new programs without having to continually disconnect/reconnect things. Most of these examples use the LCD03 display module to show the results, but it is also possible to display the results on the PC, as demonstrated in the CMPS03 example. All the modules which use the I2C bus have 1k8 pull-up resistors to 5v. The Arduino uses 7bit I2C addresses, and our own documentation uses 8bit addresses. Guía de usuario de Arduino. Www.robotshop.com/content/PDF/making-robots-with-arduino.pdf. Tutorial: Robot 4x4 con Arduino. Platea.pntic.mec.es/~mhidalgo/cursorobotica/01_RoboticaEducativa.pdf. La mejor guia para construir tu primer robot. Www.reciclemos.net/docs/Manual Final Robotica.pdf. Robótica Educativa - Descargas. Www.drep.gob.pe/01_RoboticaEducativa.pdf.
Tienda de Robótica Educativa - Robots educativos - Educación. Tienda de Robótica Educativa · Sistema LEGO® Education WeDo · Scratch. ¿Conoces el Arduino? ¿Qué es Arduino?
Arduino es una herramienta para hacer que los ordenadores puedan sentir y controlar el mundo físico a través de tu ordenador personal. Es una plataforma de desarrollo de computación física (physical computing) de código abierto, basada en una placa con un sencillo microcontrolador y un entorno de desarrollo para crear software (programas) para la placa. Puedes usar Arduino para crear objetos interactivos, leyendo datos de una gran variedad de interruptores y sensores y controlar multitud de tipos de luces, motores y otros actuadores físicos. Los proyecto de Arduino pueden ser autónomos o comunicarse con un programa (software) que se ejecute en tu ordenador (ej. Flash, Processing, MaxMSP). Descargar tutorial de Arduino en Español.