
Tumblr_n6oeauN6rY1qb5gkjo4_500. Tumblr_n71s2ySPXS1rmi33ao1_400. How to Make Towel Animals. Perfume tray. IMG_0051_zps415bbb9e. Dremel carved clock. Dremel carved clock While my design didn't turn out exactly the same as the one I saw, I'm sure I pretty much got it as close as possible. 1.

Transfer the design I know it's a bit difficult to see, but I used a pencil to transfer the design that I wanted to cut out onto the vinyl. You have to be careful because any mistakes will scratch the record and be difficult to hide. 2. Using my Dremel MultiTool and a high speed cutting bit, I slowly started to carve out the shape. The trick is to cut and quickly pull alway melted bits before they cool down and stick again, which means that you have to carve the same spot twice! After cutting out I used an emery board (padded nail file) to clean off and neaten up the edges. There is no specific cutting tool that you need to use - they all work well to cut vinyl. If you have a select few, give them a try and see which one works best for you. 3. The shaft of the clock mechanism is pushed through the hole in the vinyl from back to front.
Tumblr_n7olu7G6I21qzq0r7o1_500. Paint samples calender. Magnetic Board DIY. Hey friends!

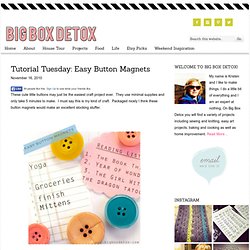
As many of you know, one of our very favorite things to do is to find an old item, ‘shanty’ it up a bit, and give it a whole new life. It really is what started our whole site. I always like keeping my eyes out for old frames! There are so many fun ways to revamp an old frame. Button Magnets. These cute little buttons may just be the easiest craft project ever.

They use minimal supplies and only take 5 minutes to make. I must say this is my kind of craft. Packaged nicely I think these button magnets would make an excellent stocking stuffer. You will need: Hot Glue GunMagnetsPretty Buttons Believe it or not this project is as simple as gluing buttons to magnets!
Here is one more picture of the finished project. Check out this post and other great craft ideas at: Magnet rocks. Hot air balloon light bulb. Incandescent light bulbs have lit the world since the late 1800s, and for just as long a light bulb's journey has ultimately led to the waste bin.

Every year, Americans throw away more than a billion of these miraculous little orbs of glass, inert gas and tungsten filament. Recently I came across a brilliant little sculpture by artist Souther Salazar on Pinterest. Titled "Lightbulb Balloon (orange)" the piece uses an incandescent bulb as the basis to create a whimsical hot air balloon. Genius! For my part in this week's Elmer's Glue 'n Glitter project for Collective Bias, I took my inspiration from Salazar's work and created a sweet and simple trio of light bulb balloons of my own.
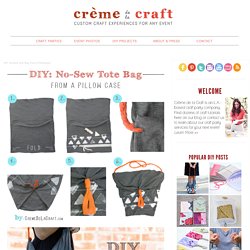
What I love most about this project is that it repurposes items that might otherwise be destined for the trash: water bottle caps, light bulbs, and fabric and trim scraps. Next time a light bulb in your home emits its last dying flicker, don't toss it -- transform it! Here's how... Hot Air Balloon DIY. Animal pot. Pillow case bag. I was inspired to make this DIY tote bag after I took a trip to the farmer's market and realized I needed a comfortable and lightweight bag to carry all my goodies.

I love the way this DIY project turned out and, more importantly, there was no sewing involved! A pillowcase already has all the stitching you need to create this easy and stylish tote bag. The cross-body shoulder strap also makes it super comfortable to carry around all day. Just grab a pillowcase from your dresser, stamp it, give it a couple snips and you've got a custom carry-all tote for your next trip to the market! Follow the steps below to make your very own. Old Board Games box. Cool Copper Projects Warm metallic hues are easy to love but often pricey.

When you create the look... Easy Doily Bowl Craft a decorative bowl from a doily picked up from a flea market, antique... Camper Birdhouse Encourage birds to stay awhile with an adorable vintage birdhouse. Crayon art melt. Search results for melted crayon on imgfave.