
DIY Macrame Bracelet. Growing up by the beach in Southern California, the ability to knot a macrame bracelet was practically a right of passage.

Although those days are long behind us, we’ve never forgotten the ever-so-simple square knot technique. This time, however, we’re replacing hemp and wooden beads for more updated elements like colorful nylon cord and glossy metal charms. Happy knotting! You’ll need: Start by cutting the knotting cord into two 30 inch, two 20 inch and one 10 inch lengths. Center the 30 inch cord under the two middle strands. Pull tightly and slide the knot up to the top. Finish the 2nd half of the square knot by folding the left cord over the middle strands and under the right cord. Pull tightly and repeat the steps – left, right, left, right . . . To finish the knots, thread one of the cords onto a needle and sew up the center of 3-4 knots along the backside.
Repeat the same step on the other cord. After sewing up both knotting cords, trim away any excess. DIY Elbow Patch. While perusing Pinterest one evening, I came across an intriguing tutorial on the wonderful art of needle felting.
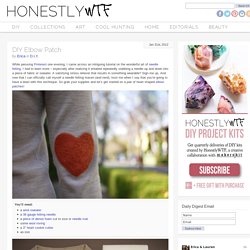
I had to learn more – especially after realizing it entailed repeatedly stabbing a needle up and down into a piece of fabric or sweater. A satisfying stress reliever that results in something wearable? 20 Awesome Do It Yourself Projects. Thursday, June 14, 2012 4:30 am, Posted by Chris Groves | Internet 20 Awesome Do It Yourself Projects Topics: At Home Project Ideas , Creative DIY Home Projects , Do It Yourself Projects for 2012 , Fun How To Projects , What to Do with Extra Stuff Are you bored and have a bunch of extra little items hanging around here and there?
Well we were in the same boat so we decided to round up 20 different awesome at home projects you can do. Anything from soda pop cap lids to spoons and more. You honestly don’t know some of the creative things you can do with what could possible be junk. Pop up flower. How to Copy Music from Your iPod to Your Computer. How to cut glass. I posted a picture about 1 week ago on Instagram, Facebook and Twitter of me cutting glass using just string.

Starting an Etsy Shop? Here are 8 Articles You Must Read First. Gypsy earrings – handmade chandelier earrings – Gypsy, Yellow Article by: Jenny Hoople Lots of people have been asking me lately what they should know about setting up a shop on Etsy.

Here I’ve gathered together the articles that have been golden nuggets of advice for me in a sea of information. Know at the beginning that making amazing products is only half the battle, the other half of your time will be making sure that the right people are aware of them. I’ve found that the marketing part of owning an indie craft business is just as fun and creative as the making part.
If you start reading these articles and it all seems boring and you’re disappointed that there are no quick-fixes, then you’ll want to take aside some time to really evaluate what you want to do with your creative impulse. The first set of articles that you want to bookmark and begin your reading adventure with is the Etsy Seller’s Handbook. Faux Painted Oxfords DIY. I’m really digging the whole oxford trend right now.
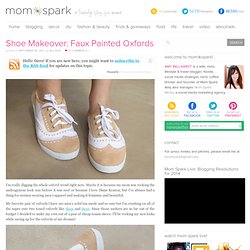
Maybe it is because my mom was rocking the androgynous look way before it was cool or because I love Diane Keaton, but I’ve always had a thing for women wearing men’s apparel and making it feminine and beautiful. My favorite pair of oxfords I have are men’s solid tan suede and so cute but I’m crushing on all of the super cute two toned oxfords like these and these. Since those suckers are so far out of the budget I decided to make my own out of a pair of cheap tennis shoes. I’ll be rocking my new kicks while saving up for the oxfords of my dreams! Want to make your own faux painted oxfords? White Tennis ShoesWater Soluble Fabric Marking PenFabric Paint OR Acrylic Paint + Fabric MediumPaint Brushes, Small and Medium SizedWet Rag Step 1: Purchase cheap white tennis shoes.
Step 2: Use a water soluble fabric marking pen to draw out the oxford design on your shoes. To get some ideas, do a Google image search for “oxford shoes”. Toilet Paper Roll Wall Art. Well that’s a mouthful!

So the time has come, it’s Pinterest Challenge time again! Every season Sherry from YHL and Katie from Bower Power throw a little link party to get people to stop pinning things and actually start making. This couldn’t have come at a better time because I have wanted to start this project forever and once Miss Kelly made her way into my kitchen I knew it was time to start it. This was the image I saw that sparked me to start saving my toilet paper rolls. You can find the post here. DIY Chan Luu Bracelet. My goal this holiday season was to really try my best to make some homemade gifts.

So far I’m doing pretty well with my wreath, some burlap covered candles, some personalized coasters and this past weekend I gave a try at some jewelry. You may have noticed how wrap bracelets are everywhere lately. Chan Luu bracelets are extremely popular these days. They come in singles and also in wraps. I love love the look of these bracelets.
I did the top bracelet by simply following this tutorial. 1. 2.Bring your needle up under the right cord through the center and pull the thread through. 3. 4. The Forge: {she made it} jersey weave sweatshirt. 25 Ways 2 Make Money 4 Teens. 31 Insanely Easy And Clever DIY Projects.