
Mozilla Firefox Start Page. Crafts. Make Your Own Bubble Jet–Printing on Fabric. Swapping blogs with one of my favorites…Beckie from Infarrantly Creative.
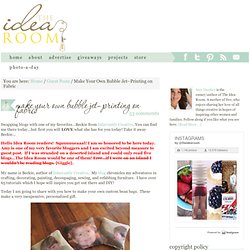
You can find me there today…but first you will LOVE what she has for you today! Take it away Beckie… Hello Idea Room readers! Squuuuueaaal! I am so honored to be here today. Today I am going to share with you how to make your own custom bean bags. Did you know you don’t have to buy those fancy schmancy fabric printer sheets to have quality printed fabric? Mix 2 tablespoons of Alum (found in the spice section of your grocery store), 2 1/2 teaspoons of Washing Soda (found in the laundry section) and 1/2 teaspoon of liquid fabric softener. Mix it in a bowl bigger than you think because it foams up when you add the water.
After fifteen minutes is up wring out all the excess liquid. Wait!!! Store the remaining solution in a container and mark it well to use at a later date. Next dry your fabric. Once your fabric is stuck to the freezer paper cut it into 8 1/2” x 11” rectangles. Cut out your printed fabric to size. Tutorial: Homemade Bubble Jet Set *Edited with new recipe* *Edited using inks* I made this bag last night (the pictures show each side of the bag - the pictures are of my gorgeous boys!!!)
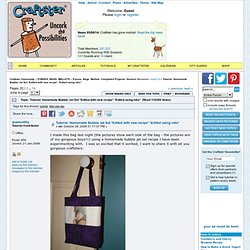
Using a homemade bubble jet set recipe I have been experimenting with. I was so excited that it worked, I want to share it with all you gorgeous craftsters: I also made this cosmetic bag using the same process: ****Now been edited to change the recipe - the new one is better!! **** Here's how I did it. Firstly choose your fabric. Then get your equipment. Here's the recipe (the percentages are by weight - NOT volume): Collecting the Moments... one by one. Friendship Bracelets. Water Blob: Tutorial. A few weeks ago I saw this idea for water blobs floating around online and decided to try it ourselves the next time we were having friends over to play.

Can I just say that this “water blob” was amazing amounts of fun. I layed on it, the kids jumped on it, slid across it and spent the entire day doing all sorts of crazy acrobatics. We loved it so much that I almost can’t wait to do another one. Mini eco. DIY Photo Light Box // Take Better Photos! One thing I've learned during my blogging adventures: You eat with your eyes first!
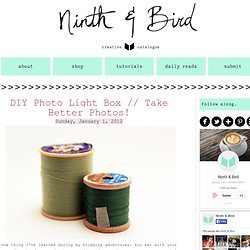
Photography is everything when trying to capture a tutorial for your readers, or make your products look desirable on Etsy.com. And what's the most important part? Lighting! Follow this little tutorial to make your own Photo Light Box for the perfect lighting. Cut a border of 2 inches on each side of the tri-fold display board (the two sides and the back). Use a ruler and an exacto knife to make straight edges. Use masking tape to attach the two pieces to form a box. Finally, cover the two sides and the back with white muslin fabric, attaching it with masking tape. Ta-Dah! Fork Bows - How To Tie A Bow Using A Fork. Yesterday I posted about how to use a fork to make pom-poms to decorate your knitting and craft projects.

The next instalment in my cutlery embellishment series brings you Fork Bows. Using a simple four-pronged dining fork you can tie easy miniature bows which look perfect every time. 1. Gather a fork and a length of ribbon about 6″/15cm long and hold around the left side of the fork. 2. BerninaCentral.com - A Bernina Community. DIY Macrame Bracelet. Growing up by the beach in Southern California, the ability to knot a macrame bracelet was practically a right of passage.

Although those days are long behind us, we’ve never forgotten the ever-so-simple square knot technique. This time, however, we’re replacing hemp and wooden beads for more updated elements like colorful nylon cord and glossy metal charms. Happy knotting! You’ll need: Start by cutting the knotting cord into two 30 inch, two 20 inch and one 10 inch lengths. Center the 30 inch cord under the two middle strands. Pull tightly and slide the knot up to the top. Finish the 2nd half of the square knot by folding the left cord over the middle strands and under the right cord. Pull tightly and repeat the steps – left, right, left, right . . . How to make a 3D origami heart: page 1. Guest blogger: lindsey of pleated poppy.
By day i'm a mom to 3 littles and a part time home schooler. by night i'm a blogger and shop keeper, working away into the wee hours in my little sweat shop. i have a deep love for all things fabric: drooling over it online, buying, sewing, organizing, pairing up favorites. i am really thankful that my business allows me the excuse to buy all the fabric i want!

One of the long time staples in my shop has been crayon rolls. these are perfect for gifts! Each of my girls have one and silas (2 1/2) has been begging for one, so i made up this adorable one for him. these are great for throwing in your purse, for keeping the littles busy in the car, waiting rooms, restaurants... and when they're done, they love that each crayon has its own little home and they can roll it up themselves and secure it with the elastic.so, are you ready for the tutorial?
Supplies: 2 pieces of same fabric for outside and inside - 5" x 16 1/2" 1 piece of coordinating fabric for pocket - 6" x 16 1/2" 1 button trim threads.
Quilting. Crochet. Knitting. Cross Stitch. Inspiration. Paper Crafts.