

Reference. Perspective. This next set Calisthenic Exercises usually follows our Point to Point and Ellipse warm ups.

Things to note, sketch on big paper (I used cheap Newsprint 11 x 17), keep loose and free (some people like to start with a ruler, but you have to work your way towards sketching freehand straight lines), and most importantly work on that mileage (practice, practice, practice). I am quickly going to go through this for your times sake (if you want more detailed notes on constructing a box I suggest a perspective drawing book). The book I used for reference is “Design Sketching” by Erik Olofsson and Klara Sjolen (this book is from Umea Institution of Design and is worth its weight in gold, filled with inspiration). 1) Always warm up with calisthenics I always try to warm up first before I sketch. 2) Two Point Perspective So here’s a basic construction of a box in two point perspective. 3) Three Point Perspective 4) Practice, practice, practice 5) Basic Lineweight 6) Choose your perspective Like this:
Hatching. People. Portrait/heads. The most important part of a drawing is the start, not the finish.

This tutorial will focus on how to start a portrait drawing, using basic blocking-in techniques. When drawing a portrait from life, you don’t want to just jump-in and draw. I always walk around the model to get a better understanding of the model and plan out my composition. In addition, whenever I do a head study, or a portrait, I don’t start out by trying to capture a “likeness.” Instead, I try to construct a solid head, focusing on the volumetric forms. Here is my process for drawing portraits: 1.
Heads. It's important that you take the time to walk through and complete the Understanding 3D Form tutorial before you're ready to take this next step.
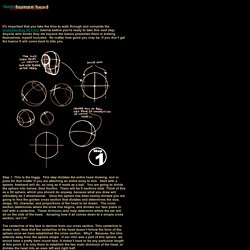
Anyone who thinks they are beyond the basics presented there is kidding themselves, myself included. No matter how good you may be, if you don’t get the basics it will come back to bite you. Step 1. This is the biggy. This step dictates the entire head drawing, and or pose for that matter if you are attaching an entire body to this. The centerline of the face is derived from our cross section. With a minimal degree of shifting of one feature or another, all faces are fairly symmetrical.
Once you know the tilt, have found the cross section, and laid in the centerline of the head, your next step is to shave to two side of our sphere on either side of the cross section. Step 2-Now that you have the cross section established, the next thing you will do is divide the head into thirds. Next Page> Heads (angles) The Basic Forms To draw the head from any angle you must first understand its basic structure.

Look past all the distracting details and visualize the underlying forms. This ability to simplify can be applied to the features of the face, but when starting the drawing you could look even further. Ignore even the features and simplify to the most basic form of the head. I use a method taught by Andrew Loomis in his book, “Drawing the Head & Hands”. The head deconstructed into its basic forms, is a sphere as the cranium and a block as the jaw and cheek bones.
A Sphere as the Cranium The sides of the head are flat, so we can slice off a piece from both sides of the ball. People (but mostly men) People ( mostly women) Girls. As the founder of Dr. Sketchy’s Anti-Art School, I’m besieged by newbies who want to attend, but have the terror they’re not good enough. Here’s an basic guide to the complex art of figure drawing, so you can show up to your local alt.drawing salon and wield you pencil with pride. 1.) Don’t be precious with materials. I’m rocking a sharpie and dip pen on a Fresh Direct box. 2.) 3.) 4.) 5.) 6.) 7.) EXTRA CREDIT: Get a copy of Drawing the Head and Figure , a simple-to-follow guide to making stuff look right Most importantly, draw! Words and Art by Molly Crabapple with modeling by Katelan Foisy and photos by Lauren Goldberg. Follow us @ChinaShopMag Molly Crabapple and Katelan Foisy Molly Crabapple Katelan Foisy and art by Molly Crabapple Katelan Foisy how to draw like molly volume 1 A picture Speaks 1000 words Molly Gets down.
Realistic Eyes. Have trouble drawing eyes?

Well, you’re probably not alone. Eyes are the first thing that the viewer is drawn to in a portrait. To make sure you create a lasting impression, you need a few techniques to create a sense of realism. A quick rundown on the basics of drawing realistic eyes after the jump! What you’ll need:HB (#2) Pencil, 4B pencilEraserDrawing paperDrawing surface.