
Granny's Garret - Symbol Crochet www.grannys-garret.com. Symbol Crochet How to follow a diagram top Every stitch has it's own definite symbol.
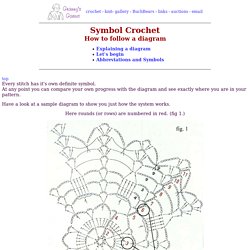
At any point you can compare your own progress with the diagram and see exactly where you are in your pattern. Have a look at a sample diagram to show you just how the system works. Here rounds (or rows) are numbered in red. (fig 1.) top A boldface number inside a chain loop tells you how many chain stitches you need for that loop. Top In this sample diagram, a loop in round 7 has 5 stitches, while on round 8 it has 9 stitches. As of round 5, only part of each round is shown because the same sequence of stitches is repeated all around. Top Now lets begin Look in the middle of the green circle (fig. 3). In the diagram) and join it to a ring with a slst ( 3 ch (= 1 dc), * 3ch, 1 dc in next sc, 3ch *, repeat from * to * 4 times, join with slst. Now continue in the same manner with the other rounds. !!!
Top Abbreviations - Symbols. Crochet Abbreviations and Terms. Reading Crochet: How to Count Chains and Stitches and Where to Put Your Hook. I go by Katie: DIY Tunisian Crochet. The sloppy slip knot: how to work in the round with no hole If you're new here, you may want to subscribe to my RSS feed.

Thanks for visiting! The typical way of starting to work in the round is less than ideal for amigurumi. The standard way is to make a slip knot, chain 2, and then single crochet six times into the first stitch. Why isn’t this the best? It leaves an icky hole that lets stuffing poke through, as shown in the photo above. A number of ways have been devised to solve this problem, one of which is the magic ring. To begin, don’t make a slip knot. Now, continue on as usual. Here’s the magic part. It’s easy! Guess what? Download my free e-book:The Beginner’s Guide to Amigurumi! Christina Lowry Designs: Crochet flower tutorial... Thanks for the lovely comments about the crochet flowers I've been making.
Their purpose is a bit of a secret, but I thought I would share the pattern here with you so that you can use them as you wish. Perhaps for pretty hair clips, a flowery garland or stitched to a blanket? Fiona's flowers I'm using bella baby layette bamboo and wool mix, which is an 8ply, and a 3.5mm steel crochet hook. Start by making 4 chain stitches. Chain 3 stitches, which will be counted as 1 double crochet.
Slip stitch to join circle of double crochet stitches and bind off. Skipping next stitch, slip stitch into the top of the 2nd double crochet stitch, chain 3, skip next stitch and slip stitch into second stitch, continue until end. (So you are chaining three and anchoring your chains at every second stitch to make the gap that you will be working the petals into.) To make flower petals work into the gap and not the chain stitches. (So 1 single, 3 double, 1 single = one petal. I hope that makes sense! Carina's Craftblog: Granny square joining tutorial. Just a warning before we get started with the tutorial, there's LOTS of pictures and I may go into too much detail, but that's just what I do. ;-) By the way, this is the yarn I use.
Dc/treble: this refers to the same stitch. Dc if you use US crochet terms and treble if you use UK terms. July 2012 - Please note: these days I do very little crochet because I'm working on an embroidery book. The book writing also means I may not have time to help with any crochet-y questions/problems. There are loads of methods of joining (granny) squares, my method is just one, and may not even be the best. If you have particular layout for your blanket in mind, lay out your squares in that pattern. Then stack your squares so you can keep track of what goes where. Because of how this method works, it is best to have as few squares in each stack as possible.
Take the top square and put it on the left and then the next square and keep that on the right. Lay the rows together with backs facing each other. Crochet Instructions - Crochet basics and Crochet abbreviations.