
Customizable Paint Deck. Do you ever find yourself shopping for furniture or textiles for your home and wish that you had a your paint colors with you to refer to?

I know I do. Here's an quick, portable, $2 project to remedy that. Start by taping off a group of paint stirrer sticks from the hardware store. Grab your different wall colors. Thrifty and Chic: Headboard upgrade...for cheap! I loved my bedroom before but it just always felt like something was missing....maybe color on the walls?

Well, I'm not quite ready to take that big step, so as you can see below, I figured I would add my own color via a sheet draped over my headboard. It worked for a little bit, until I got tired of the dang thing always moving. So, I made my own headboard sans moving the sheet :) Supplies needed: A Tweed Pouf Ottoman - an Easy Chunky Knit. Yippee!
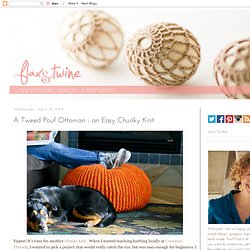
It's time for another chunky knit. When I started teaching knitting locally at Common Threads, I wanted to pick a project that would really catch the eye, but was easy enough for beginners. I thought a knitted pouf was perfect. Puff Daddy - knitted stool. Puff is the Norwegian word for stool.

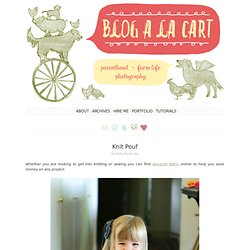
We really liked the pouf from Christien Meinderstsma, but it´s way out of our price range. This simple pattern for a knitted stool has much thinner yarn, but the budget is just as thin;) Nice to rest your legs on, and very popular for the kids. What we used:Eskimo, 18 balls (Or yarn suitable for US #13 needles)Acrylic yarn would probably be a really good alternative, as it´s a piece of furnitureUS #19 circular needles2 cheap duves (feather and down) How we did it:Cast on 35 stitches using three threads.Knit the garter stitch until you´ve knitted all the balls, and there is just enough yarn left to asseble the stool. You now have ONE rectangular piece.Cast off loosely. Assemble the first long side. Stuff the duves into the stool. Knit Pouf. Whether you are looking to get into knitting or sewing you can find discount fabric online to help you save money on any project.
Sitting Pretty: 25 Perfect DIY Pouf Tutorials. By Jaime Morrison Curtis | What is round and puffy and doubles as a foot rest, pet bed, floor cushion, throw pillow, reading nook, landing and launching pad?

How to make a jumper pouffe. MaterialsA very large jumper, with a front body area at least 56cm x 74cm and an arm 42cm around.

If you can't find one this big, buy two. Make the pattern pieces (steps 1-7) before you go jumper hunting 120cm x 120cm of cotton fabric for lining; an old bed sheet would be idealSewing threadLots of stuffing such old pillows, towels, clothes, bedding etc, or you can buy foam pieces or polyester fibre fillTwo A2-size pieces of thin paper, such as newsprint Tools50cm piece of string RulerTape measureSewing machine Scissors Dressmakers' pins. Sewing 101: fabric boxes. It seems no matter what I do, I can never get a handle on all the tiny odds and ends that accumulate around my house.
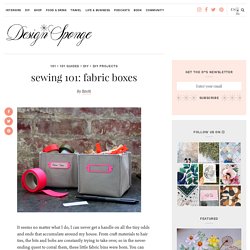
From craft materials to hair ties, the bits and bobs are constantly trying to take over, so in the never-ending quest to corral them, these little fabric bins were born. You can make one of these soft boxes in almost no time, and in almost any size, so you can customize them to perfectly fit whatever you need to hold. Top each one off with a label holder (also customizable in any shade of the rainbow, thanks to nail polish), and you’ll have a leg up on clutter . . . for a little while, at least. — Brett Bara Read the full how-to after the jump . . .
Materials a sturdy fabric, such as canvasthread to matchsewing machine, iron and basic sewing supplieslabel holdersnail polish (optional) Fabric Storage Bag. Easy DIY Lamp Shades. Adding color, pattern & texture to a room is easy, with these self decorated lamp shades.
I will teach you the techniques & tricks to creating your own retro, modern, country, chic, & eclectic lamp shade. 1. Cut pressure-sensitive styrene into panels slightly larger than the sides of the lampshade frame using a rotary cutter and cutting mat. Iron the fabric. 2. Peel the backing off the styrene and press onto the wrong side of the fabric. Shoeexplosion.png 745×1,668 pixels. Upholstered Headboard Tutorial. Things move a little slower around these parts, with newborn twins and the corresponding 16 diaper changes a day… but I’ve finally finished the upholstered headboard!

I know you’re thrilled! Well this headboard was a no-brainer… we had leftover damask fabric (from the nursery curtains) that I’m totally in love with. And the pattern fit perfectly with the 10″ x 10″ squares of wood that we already had pre-cut and lying around. DIY Chair Upholstery Step-By-Step Guide - Better Homes and Gardens - BHG.com. DIY: Using IKEA Shelf Unit as Storage Bench Better Homes & Gardens. How to Reupholster a Chair - Step by Step.
Step 1: Gather materials and prep the seat board If you have upholstered chair seats that are stained, worn out or just plain ugly, there's no need to call a pro. You can do a first-class upholstery job yourself, even if you have zero experience. Don't worry about making mistakes; you can correct them by prying out staples and starting over. If the chair is fairly new, you can simply cover the existing fabric with new material. But it usually makes sense to tear off the old fabric and replace the foam padding, since most foam has a life span of only five to 10 years. Turn the chair upside down and remove the screws that fasten the seat to the chair frame. Step 2: Reupholster the seat 1 of 4 Photo 1: Cut the foam, batting and fabric. Piped Bench Cushion–{Pretty Handy Girl} More inspiration for a sewing room « Handmade with joy. Posted by Lova on February 29, 2008 I finally made time to take pictures of my beloved sewing studio but the weather was tipically english (grey and rainy!)
Float Rope Baskets. This whole project began over a casual meeting in Somesville, Maine between a lobster fisherman (Eric), a basket weaver (Richard), a retailer (Sue), and an administrative pro (Heather). Totally spontaneous and unplanned - an extended family getting together for dinner. Grandparents, children, grandchildren ! Many of us are aware of the government ban on the use of floating rope (float rope) in the lower part of lobster-trap gear to Save the Whales. Crocheted Sisal Rug. How to make a doormat out of recycled ROPE! Hello Everyone! Rag bath mat tutorial - A Common Thread. I’ll start my first post back with a finished project/tutorial! A few weeks ago, my boyfriend and i were planning to throw out this huge king size comforter. it was just so much fabric though, that i couldn’t bear to part with it. so it sat beside the doorway for about a week, before it came to me. rag bath mat. so, i bought the gigantic knitting needles - size 19! Ripped the comforter, made yarn from the fabric strips, and knit it up into a mat for my bathroom floor!
Before  After i followed the tutorial by cocoknits, but here’s what i did.i started by cutting little slits at every 1.5” increment. then, i ripped with my hands each strip until i had a whole bunch of strips. ripping with your hands is MUCH easier than actually cutting the strips, and more accurate too. it rips right along the grainline perfectly so you have very even strips…and it’s FAST. it also makes a very gratifying noise. Leaning Tower of Shelves - Summary. Getting started This shelf unit may look lightweight and easy to topple. Cologne Bookcase, Dark Oak Veneer - Tesco.Direct. How to Build a Mini Laptop Desk - Furniture Projects. Chalk It To Me! Again! Custom Color Chalkboard Paint - Martha Stewart Organizing Crafts.
Thanks to paint that dries into a chalkboard finish, your board can be whatever size you desire and placed wherever you like. Store-bought formulas come in traditional green and black. DIY Tufted Headboard with Wings and Nailhead Trim! After stumbling across her blog and finding her DIY headboard, I knew I wanted her to share it with you! SK8R Boyz Room Redux: DIY Headboard. I have fallen way behind on the deadline to finish my boys’ room redux . There are still many projects planned and I have committed to getting them finished before Spring Break.
Hello Gorgeous! The Story of our DIY Headboard. Roping In Style: Discard Bench Makeover. How to make a chicken doorstop - a great Easter present. Want to give your friends and family something to keep, not eat, this Easter? Fed up of feeling sick after having too much chocolate?