
DIY Fringe String Lights for Halloween. By Kelly on Sep 18, 2012 So, I compromised on my Must Post Halloween Projects Now desire.

A DIY in Halloween colors but one that could be adapted for any and every party: DIY fringe string lights! Oh, if only I could tell you how long I’ve been wanting to do this. It’s so simple and, yes, removable so you can switch it out for any holiday, birthday or other bash you may be throwing. Nothing like pulling those Christmas lights out of storage before December rolls around, right? Supply List: LED String Lights (These don’t get as hot, see note at the bottom!) To Make: If using crepe paper folds, cut strips off the bottom about 2″ wide. DIY Glitter Vases. Inspired by many reader requests for a DIY tutorial to recreate the glittery mason jar vases from this New Year’s Eve party, today we’re playing with glitter.
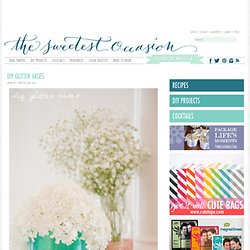
A whole lot of glitter! I whipped up two different versions of these glitter vasses, both of which are quick and easy. They’re perfect for parties, weddings or just to add a touch of sparkle to your dining room table. DIY Organizer from Old Window « My so called crafty life. Today I have a fun and versatile craft for you all, we’re going to make an organizer from an old window!
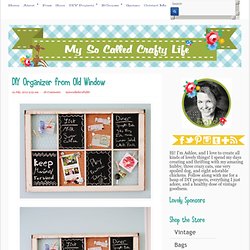
I made mine with some cork, chicken wire and chalkboard painted wood. It’s fairly simple to do, and the best part is that it doesn’t take long at all to make, you could craft one in an afternoon. Here’s What You Need: * An Old Window *Cork Squares. Mirror Design. You all know we love a good Anthropologie knockoff around here – so a couple of days ago when I was browsing online I came across this mirror.
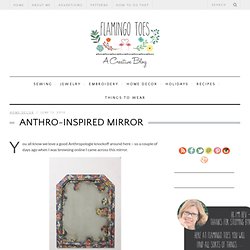
Oh I definitely need that. Hold the presses – did that say $498??? Huh. We can do better than that. :) So after scouring the thrift shops, cutting myself on mirror glass, and overcoming an unreasonable fear of Mod Podge, here is my version! Dream Catchers. I’m really diggin the whole hippy thing.
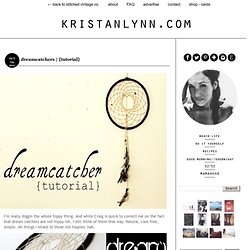
And while Craig is quick to correct me on the fact that dream catchers are not hippy-ish, I still think of them that way. Natural, care free, simple. "Dew" It Yourself Jewelry Stand. Given that title and my penchant for puns, I'm guessing it will take you guys exactly 3.7 seconds to guess what my new jewelry stand is made from: Aw, you only needed two seconds, didn't you?

I knew it. Yep, this pretty green number is made from four plastic Mountain Dew bottles and exactly $3.72 worth of materials from the hardware store. Not too shabby. It also only took about two hours to make, so let's get to it! First, collect your bottles. If you happen to have a Diet 'Dew addict for a spouse like me, this will take less than three days. I found it easiest to cut the bottoms off my bottles with a strong utility knife, and then trim them down further with scissors. Glitter Jar D.I.Y. Hi friends!

Today our lovely contributer, Amanda, is sharing how to make these insanely cute glittery jars for Valentine's Day... or just any ole' day! 1. 007_A_Cup_Of_Tea.jpg (800×518) DIY Tiered Dessert Trays. How To Mix Chalkboard Paint in Any Color. Kitty Coasters from Fieldguided. Modern Wall Art with Paint Swatches! Looking for a way to fill that blank wall but don't have permission to paint?

All you need is a trip to a major hardware store and an afternoon in front of a good movie to take care of that little dilemma. Supplies Needed: Large frame with paper insert, a ton of pretty paint chips, double-sided tape squares, and vinyl letters appropriate to the size of your frame or phrase (4" - 6"). I went with a color scheme that involved a variety of tones from some of my favorite colors. Geometric Photo Art Project. Amanda, of Indie Jane, and I have been dreaming up extra pretty projects for you this coming season.

When the idea of a geometic photo collage was tossed around we both got really excited about it! What we love about this project is how personal it can become. I'm thinking of making one with wedding photos for my bedroom... how sweet would that be? Supplies Needed: Poster board (cut slightly larger than the frame you wish to use), glue or double-sided tape, scissors, triangle template to trace (mine was 2.5 inches on each side of the triangle using a ruler), paint swatches in colors you love, vintage book pages, and a few of your favorite photos. 1. Dry erase board out of a picture frame - StumbleUpon. 133.2K Flares Twitter 7 Facebook 69 Pin It Share 3.9K 3K+ StumbleUpon 129.2K Filament.io Made with Flare More Info 133.2K Flares ×
