
The Top Ten Tips of Texturing. One way to create dirt has already been covered, and that's photo overlays.

Those are great for general wear and tear on your texture. If you want small specific details, you'll need to use other techniques. Below are a two techniques I frequently use, one for dust and dirt, and one for rust. Dust and dirt can be done very quickly with a solid brownish layer and a layer mask. Simply put the dirt layer at the top of your stack, and paint with a low opacity and flow.
Rust is a bit more tricky. I used to handpaint rust, but it always had a bit of a cartoony look, and I was never able to get crispy rust that looks convincing and real. That was until DennisPls shared his technique with me, which I've been using ever since. Good damage placement only requires one thing: logical thinking. That can be chipped paint, scratches, rust, etc. Texturing tutorials. Ben Mathis - tutorials.
Static text and image based instructional material.

PDF's require Adobe Acrobat. Comb map creation *new* Create "comb maps" to control anisotropy direction on a per pixel basis. Next-Gen Eyes *new* How to construct more realistic eyes using per-pixel shaders and transparent shells. Programs, Plugins, and Scripts The 3D, 2D, and miscellaneous programs I use, as well as plugins and scripts. Links included. Tip JPGs Folder of random examples made for students and online forums.
DDS types Explanation of the different settings in the Nvidia DDS plugin for Photoshop with example images. Normal Map Deepening Use multiple layers to augment baked normal maps with real depth in your overlays. Painting Ears A short demonstration of painting ears. 3ds Max Settings Tools I most commonly use in 3ds Max. Photoshop Settings Tools I most commonly use in Photoshop. Normal Map Workflow Covers all the things you need to know to start using normal maps in 3DSMax 7. Jarrod Christman - Realtime Rendering Texture Guide For Video Games and Architectural Rendering. Update 30-JUL-2008: Proofreading and editing by Sean Timarco Baggaley.

Beautiful, Yet Friendly Part 1: Stop Hitting the Bottleneck. Beautiful, Yet Friendly Part 1: Stop Hitting the BottleneckBeautiful, Yet Friendly Part 2: Maximizing Efficiency by Guillaume Provost A couple of years ago I was driving home to Quebec when I stopped near the Ontario border to gas up.

I got out of my car to stretch and noticed two other travelers engaged in a complicated mish-mash of hand waving and broken English. I approached, thinking I could help the poor fellows by acting as a translator between both parties, when I realized that not only were they both French Canadians but neither of them knew it. If I found the situation amusing at the time, I've since come to realize that specialized jargons aren't so different from languages as different as French and English. Likc languages, jargon plays a key role in communicating information about a given discipline: but like languages, jargon can also erect artificial barriers between initiates and neophytes. It’s Not Art’s Fault, It’s Level Design’s! Lighting tips from the Masters. What do I know about lighting after all?

After my previous post on setting up a three layer SSS shader, a few people asked for tips on how to light their characters to best show them off. As it happens, this something I’m rather interested in, and I’ve had a blog post on the subject brewing for a while, so I’ve finally found the motivation to finally write it up. I didn’t want to spend too much time talking about specific settings for this tutorial, so instead you can download this blendfile from BlendSwap.com for some ideas on the specifics of how to set up your scene.
Lighting in portraits is key to how you want your character to be seen. The exact same character with the same pose and expression can be seen in completely different ways depending on how they are lit. I don’t get it right every time, so when I’m looking for inspiration for lighting I usually turn to those who know better. Three Point Lighting: Conrad Veidt as Major Strasser in Casablanca Hollywood! High-key Lighting Colour. Hand Modeling in 3d. Your hand model should look like the below pictures, please check in all viewports Finally our hand model has finished, now you can clean the topology.
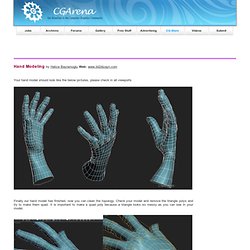
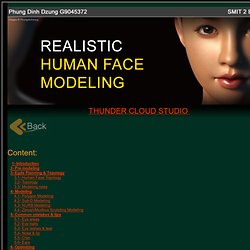
Check your model and remove the triangle polys and try to make them quad. It is important to make a quad poly because a triangle looks so messy as you can see in your model.Here is the final modeled hand. I cleared all the triangles. Now your model should look like this and if it is not, keep trying, it will soon!. Related Links Head Modeling Detailed Tutorial Female Face Modeling Video Tutorial Head Modeling in Blender Ear Modeling in Blender. 3d Tutorial. Realistic face modeling by PhungDinhDzung. Content:
After Effects Tutorials, Plug-ins and Stock Footage for Post Production Professionals. Richard Rosenman Advertising & Design - Free Photoshop plugins for professionals. This page features a growing set of free Adobe Photoshop® filters / plugins coded by myself for 3D production, 2D design, and technical research. These filters are only compatible with Windows, NOT Macintosh. This is not a developer decision but rather a compiler limitation. 64bit versions will be coming soon.
While these filters were created primarily for Adobe Photoshop®, they also work with many free applications such Gimp, Pixoid, IrfanView, Ultimatepaint, Photo-Editor, and QFX LE. For a complete compatibility list, please click here. The latest filter to have been added is Highpass Sharpen. Poles and Loops. Thanks for the sticky Loops are important when modeling in particular when you are doing organic modeling. An organic form should have smooth and sharp features alike and this all can be achieved with proper placement of loops.From now on I will focus on face loops rather than edge loops. An edge loop exists because it is 'drawn' on a face loop. When explaining topology, it is far easier to comprehend the situation when you are looking at face loops. When you create a loop, you are creating poles too.
Poles will play a big role soon in organic modeling because they control the flow of the loops. After filling the quads, you are left with a standard extrusion topology.KNIFE TOOL:The knife tool is the topology tool of choice. Curso Como Dibujar, Videos de Dibujo. Ctrl+Paint - Digital Painting Simplified.