
Arduinotehniq: AC light dimmer with Arduino. A very interesting device is a AC light dimmer.
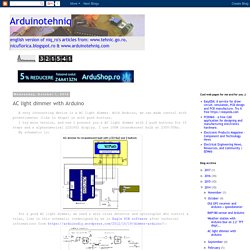
With Arduino, we can made control with potentiometer (like in shops) or with push buttons. I try more version, and now I present you a AC light dimmer with 2 push buttons for 16 steps and a alphanumerical LCD1602 display. I use 100W incandescent bulb at 230V/50Hz. Arduino - Display OLED via I2C (SH1106) Hardware.
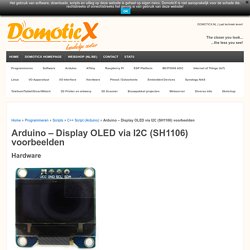
Arduino - Display OLED via I2C (SH1106) Convert serial.read() into a useable string using Arduino? 4. Serial Communications - Arduino Cookbook, 2nd Edition [Book] Chapter 4.
![4. Serial Communications - Arduino Cookbook, 2nd Edition [Book]](http://cdn.pearltrees.com/s/pic/th/communications-cookbook-147971484)
Serial Communications Serial communications provide an easy and flexible way for your Arduino board to interact with your computer and other devices. Generic STM32F103C8T6 Board with SSD1306 OLED Display – Wifi4Things. Keeping moving forward with these cheap STM32F103C8T6 little boards… Today, the challenge is to hook up a tiny 0.91″ 128×32 OLED displays featuring an SSD1306 controller that you can find on AliExpress for $3.
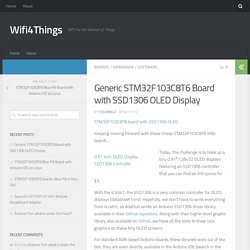
With the IL9341, the SSD1306 is a very common controller for OLED displays (datasheet here). Hopefully, we don’t have to write everything from scratch, as Adafruit wrote an Arduino SSD1306 driver library available in their Github repository. Along with their higher level graphic library also available on Github, we have all the tools to draw nice graphics on these tiny OLED screens. For standard AVR-based Arduino boards, these libraries work out of the box, they are even directly available in the Arduino IDE (search in the Library Manager for “SSD1306” and “GFX”): For the Generic STM32F103C8T6 boards, making these work is a little bit more involved, though (we are sitting on the bleeding edge, are we?). 48 Projects tagged with "NodeMCU" Arduino-er: u8glib. This example show a Arduino Nano, connect with GY-271 Digital Compass module and 0.96" 128x64 OLED via a common I2C bus.
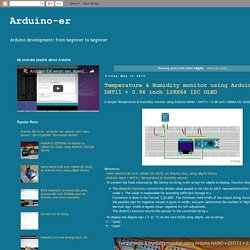
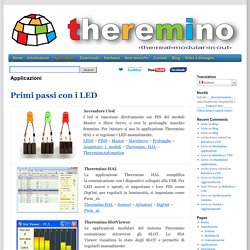
GY-271 is a Digital Compass module using HMC5883L, a 3-Axis Digital Compass IC. The reading from GY-271 (x, y, abd z) is display on the OLED. Arduino Nano communicate with GY-271 via I2C bus using Wire library. Arduino Nano communicate with 0.96" 128x64 OLED via the same I2C bus, using u8glib library. I'm not sure is it 100% compatible to use both Wire and u8glib libraries, both share the common I2C bus. Mis primeros pasos con Arduino. Veamos entonces como podemos controlar un servo.
Cualquier aficionado al radiomodelismo de aviones, coches o buques, o bien aquellos que han trabajado en robótica o sistemas automáticos, saben que es un servo. En esencia es un dispositivo electromecánico que dispone de un brazo o actuador, el cual se moverá a una posición determinada mediante una señal de mando, y será capaz de abrir o cerrar válvulas, mover compuertas, controlar el timón de un pequeño buque o los planos de control de un aeromodelo. 3 Ways to Use Arduino as USB Serial Adapter Converter - Oscar Liang.
Arduino uses FTDI chips to create serial port connection between computer and the chip, so you can program the Atmel chip inside the Arduino board, without the need of any ISP programmers.
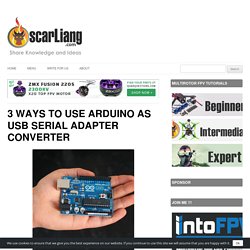
If we look at the schematic of Arduino, we will see that the RX and TX pins are connected to the FTDI chip (as we expected) (on Arduino board as pin 0 and pin 1) That means we can use those pins for using the FTDI chip itself. There are 3 ways I know you can turn your Arduino Board into a USB Serial Adapter. 1 – Connect RESET pin to GND As shown in picture above. 2 – Remove the Atmel Chip.
Arduino Projects: Digital Audio Recorder. Being able to capture sound, store it and play it over and over again never fails to leave me in awe of its pioneers, from Thomas Edison to Alan Blumlein, the British electrical engineer who, in 1931, invented ‘binaural recording’ – what we now call ‘stereo’.
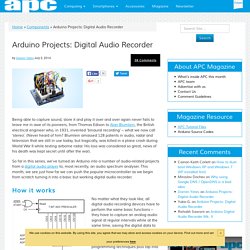
(Never heard of him? Blumlein amassed 128 patents in audio, radar and television that are still in use today, but tragically, was killed in a plane crash during World War II while testing airborne radar. His loss was considered so great, news of his death was kept secret until after the war). So far in this series, we’ve turned an Arduino into a number of audio-related projects from a digital audio player to, most recently, an audio spectrum analyser. This month, we see just how far we can push the popular microcontroller as we begin from scratch turning it into a basic but working digital audio recorder. Applicazioni. Ottenere i moduli del sistema Il team del sistema Theremino si occupa solo di ricerca e non vende hardware.
Il sistema è completamente “Freeware”, “Open Source”, “No Profit” e “DIY”, ma esistono produttori che possono fornire i moduli assemblati e collaudati a un ottimo prezzo. Difficilmente si potrebbe auto-costruirli spendendo meno. Un elenco dei produttori in questa pagina: www.theremino.com/contacts/producers Donazioni. Wireless Lighting Control Using Arduino and Vixen. A lot of people ask me about how to control and sequence lighting, either for installations, displays, or wearable designs so I figured I'd put together this tutorial.

There's both a 2-part video tutorial and a text-based tutorial for people that prefer either style. The videos and text tutorial are after the jump. Timing Summary: VixenLights. ArduinoFFT - Open Music Labs Wiki. Arduino FFT Library Notes: For a faster frequency analysis library, check out the FHT! The serial output of the examples is in binary, not ASCII. This means it will not be human readable on the serial port. Change serial.write() to serial.print() to fix this. Conectar Arduino con paneles y tiras LED RGB WS2812B. Los WS2811, WS2812 y WS2812B son LED que disponen de lógica integrada, por lo que es posible variar el color de cada LED de forma individual (a diferencia de las tiras RGB convencionales en las que todos los LED cambian de color de forma simultánea). Están basados en el LED 5050, llamado así porque tiene un tamaño de 5.0 x 5.0 mm. Es un LED de bajo consumo y alto brillo, que incorpora en un único encapsulado los 3 colores RGB.
Stepper Arduino Library, connecting Stepper Motors to Teensy. The Stepper library allows you to connect stepper motors, which move in small individual steps that makes slow and precise movement easy. Download: Stepper is included with Arduino Hardware Requirements Stepper is compatible with all Teensy boards. StepperUnipolar. This page shows two examples on how to drive a unipolar stepper motor. These motors can be found in old floppy drives and are easy to control. The one we use has 6 connectors of which one is power (VCC) and the other four are used to drive the motor sending synchronous signals. The first example is the basic code to make the motor spin in one direction.
It is aiming those that have no knowledge in how to control stepper motors. The second example is coded in a more complex way, but allows to make the motor spin at different speeds, in both directions, and controlling both from a potentiometer. Arduino Pitch Detection Algorithm (using AMDF) - All. Credit: I am not sure who invented the algorithm but from what google tells me a British statistician by the name of George Udny Yule had published a paper in the late 1800's in reference to partial autocorrelation algorithm. Additionally there a bunch of papers published by the IEEE starting in the early 1900's citing improvements to the method for use in electronics.
Raspberry Pi Measures 0~5V Voltage via Arduino. Home / Showcase / Raspberry Pi Measures 0~5V Voltage via Arduino Raspberry Pi sadly doesn’t have any analog input, which means you could not connect an analog signal source to the GPIO pin on Raspberry Pi, and monitor its real-time output voltage in your application. Well, that’s not always true. You can wire your Pi with an external ADC (analog/digital converter), and measure the analog value via that. However that’s kind of complicated and expensive. Arduino usually has 10-bit ADC on board, and can measure voltage with resolution: 5V/1024=0.0049V, which is quite good in most scenarios.
Wp279. Microcontroller tutorial series: AVR and Arduino timer interrupts. Does your program seem like it’s trying to do too much at once? Are you using a lot of delay() or while() loops that are holding other things up? If so, your project is a good candidate to use timers. In this tutorial, we’ll discuss AVR and Arduino timers and how to use them to write better code. In our prior article, we covered interrupt basics and how to use external interrupts that are triggered by a pin change or similar event. Check it out if you’re looking to brush up on interrupts in general. This chapter moves on to timer interrupts and talks about their applications in Arduino projects or custom AVR circuits. What is a timer? You’re probably familiar with the general concept of a timer: something used to measure a given time interval. The beauty of timers is that just like external interrupts, they run asynchronously, or independently from your main program.
For example, say you’re building a security robot. Arduino Frequency Counter Tutorial with Circuit Diagrams & Code. Almost every electronic hobbyist must have faced a scenario where he or she must measure the frequency of signal generated by a clock or a counter or a timer. We can use oscilloscope to do the job, but not all of us can afford an oscilloscope. We can buy equipment for measuring the frequency but all these devices are costly and are not for everyone. With that in mind we are going to design a simple yet efficient Frequency Counter using Arduino Uno and Schmitt trigger gate. This Frequency Counter is cost effective and can be easily made, we are going to use ARDUINO UNO for the measuring the frequency of signal, UNO is the heart of project here.
To test the Frequency Meter, we are going to make a dummy signal generator. Dimmer-Arduino – Arduino&stuff. Zero-Crossing Detectors Circuits and Applications. Fig. 1 by Lewis Loflin A zero-crossing detector is used to generate a sync pulse related to the AC voltage phase angle often used in power control circuits. Fig. 1 shows the relationship of a zero-crossing pulse to a sine wave. The pulse occurs at 0, 180, and 360 degrees.
Frequency Measurement using Arduino. Definition Frequency is the number of complete cycles per second in alternating current direction. Frequency Measurement using Arduino.