
Made By Rae: (Free!) Buttercup Bag Sewing Pattern This pattern uses a mere fat quarter of fabric for the outer + a little less of another fabric for lining. If you’re using quilting cotton for the outer fabric, I recommend using a fusible interfacing to strengthen it. You’ll also need a magnetic snap and (optionally) a couple of buttons, although it looks pretty cute without the buttons too. I think this would also look great with some piping or ric-rac over the pleats…I can’t wait to see what y’all do with this one! While I appreciate links to this post (but not directly to the pattern), please don’t “borrow” my pictures without permission. Thanks and enjoy! TERMS OF USE: This pattern is offered for free with the understanding that my readers will use it for personal use only. ARE YOU A HOME SEWIST WHO IS INTERESTED IN SELLING BUTTERCUP BAGS? WOULD YOU PREFER TO PURCHASE A BUTTERCUP BAG FROM A TALENTED LICENSED BUTTERCUP SELLER? After reading the Terms of Use (above), This blog is proudly sponsored by Smaller Buttercup’s measurements:
Pattern Runway: Fold-over Clutch - Free Pattern You may have noticed that clutches, especially oversized ones seem to be around in abundance lately, and I couldn’t help giving one a go seeing as they are basically a square with a zip! This little project is quick to make, suitable for beginners and good for using up left over fabrics! My sample is made in some left over beaded silk georgette, which I laid over a fused sturdy cotton. If your fabric is a little on the light side you may want to try a heavier weight fusing. To make this project, download the free Fold-over Clutch pattern here. All patterns are able to be printed at home and are sized to fit on both US letter and International A4 size. You will need the following materials and trims: • 1 x 30cm (11 3/4″) Dress Zip • 0.4m (16″) Fabric for the shell (the outside of your clutch) • 0.4m (16″)Medium weight Fusing • 0.3m (12″) 10mm (3/8″) Wide Cotton Tape, grosgrain Ribbon or similar.Enjoy, xxx.
Valentine's Day Wall Art I loved how my Valentine's Day garland and wreath looked so I decided to make another Valentine's Day decoration. In our living room we have a big blank wall that is patiently waiting for us to finish the wall art we plan on hanging. I decided to use that space and try to make a simple, cheap wall art. Supplies: Card stock, pattern to print (I did sheet music), scissors, tapeCost: $0 (I already had all of the supplies) I started off by printing off sheet music. Then I found a heart shape that I liked (via google images). I cut out the hearts by hand - I'm very jealous of people with cricuts or other similar machines that do it for you. :-) I had originally planned on just taping the hearts to the wall (I was going for very simple wall art) but decided it might look neat if the hearts stood a little bit off of the wall. Does that make sense? I printed the outline with the folding lines (light grey) onto card stock and cut them out. Then I taped them to the backs of the hearts. All done!
Viking shoes Edited to add: Due to alle the comments regarding the title of this instruction, I've changed the name to 'iron age shoes' which might be more historycally correct. I learned to make these by using my own foot as a template. Therefore, all the measures given here are highly approximate. elm street life: DIY: Bow clutch sewing tutorial. And fiiiinally... the tutorial you've been waiting for. This is my first real sewing tutorial - which scares me a bit, because I've never actually taken a sewing class, so I don't know all the terminology. What I do know is that I've learned to sew lots of things by reading tutorials, so hopefully I can make this simple enough that even you beginners can feel confident making a bag. And yes, a bag with a zipper! **Also, please note except where I say, "Sew close to the edge," I am using a 1/2" seam allowance throughout. Ok, let's get started! Supplies you'll need: 1/2 yard exterior fabric* 1/4 yard interior fabric (I recommend a quilting cotton) 9" zipper that matches your exterior fabric 1/4 yard #808 Pellon Craft Fuse interfacing Sewing thread that matches your exterior fabric Sewing machine Scissors Pins Iron & ironing board *I recommend a medium to heavier weight cotton for this. 1. 2. 3. 4. 5. 6. 7. 8. 9. 10. 11. 12. WHEW!
Project 21 Week 23 – Crayon Alphabet I have been really excited about this project for a while, ever since I spotted it here. I thought this was the cutest idea, and immediately rushed off to research where I could find nice cheap shadow boxes and crayons. Flash forward a few weeks once I had assembled all my supplies, and this is what you get: I chose the letter B to start in honor of my little guy Basel, my adorable long-haired dachshund puppy. Then once I had the letter sized appropriately I printed it out, cut the paper to size for my shadow box (purchased at Michaels, though I have my eye on some square frames at Ikea) and started cutting up my crayons. The original poster had also broken her crayons into pieces, but I like clean straight lines and edges so I cut mine with my Olfa blade. I don’t know about anyone else, but I grew up watching Sesame Street religiously and they did a segment about crayon production that still, to this day, is so vividly in my memory it is a bit scary. Like this: Like Loading...
Sewing 101 with Gwen, Mitered corners What a fabulous way to start the new year...a fun new Sewing 101 Guest. Please enjoy Gwen's tutorial on making a mitered corner. Hey! I'm Gwen from Gwenny Penny. I was so excited when Chris asked me to write a post for her Sewing 101 series. I love to sew! Whichever method you choose, make sure you start with a nicely squared up piece of fabric... Method 1: The first method is used when you don't care about finishing the hemmed edge. Step 1: Take your piece of fabric and fold one side over using whatever hem width you plan to use. Step 2: Unfold your hems that you just pressed. Step 3: With your corners pressed in, fold each side in again as you did in step 1 and press again, lining up your mitered corners as you go. You now have four nicely mitered corners! I use this method to create little fabric patches to sew onto my daughters' shirts. Method 2: The second method is used when you need a nicely finished hemmed edge. Step 2: Repeat step 1 for the other three sides. Thank you, Gwen.
Accordion Addiction It's been a while since I posted anything but that doesn't mean I haven't been doing anything. In fact, quite a few things have happened around here lately. Between that last post and now I've gotten my own sewing machine(!), I've been trying to get serious about my Etsy shop, and I'm also starting to plan a trip to Canada for early July to visit my family and friends back home. Back in April I gave Napkitten's accordion wallet pattern my first try(check it out here), and wrote up a review of it(here). Behind the card slots there is a thin pocket that is the perfect depth for paper currency. Another thing I changed was the idea of the loop on the side to allow a wristlet strap to be attached. I do a few more things my own way but they are just in the construction and are mainly to make things a little easier or a little quicker for me while sewing. Thanks for looking, and all three of these wallets are available in my Etsy shop. Comments/Criticisms welcome :)
Two Zip Hipster bag My mum just tried out Erin Erickson's Two Zip Hipster sewing pattern and sent over the result. And now we have a problem on our hands, because I love it so much I want a dozen of them in different fabrics. Is that greedy? It's my new favorite bag design. It's got a zipper closure so no worries about your wallet falling out. There's a pocket on the inside, plus two more on the outside. The 9" x 11" size is exactly what I like in a bag. Here are Mum's thoughts on the process of sewing it: "This pattern looks intimidating at first glance because it contains 32 pages, 17 of which are pattern pieces. The bag has two zippers. One of the things I liked best about making this bag was cutting it out (which I normally hate). So yeah. Update: Erin has now added tips for making an optional iPad pocket.Another update: Mom made another one!
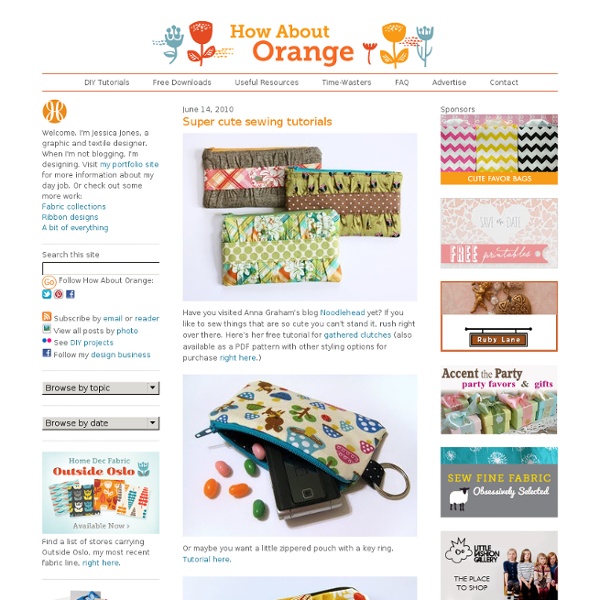
Gathered Clutch Tutorial Anna of Noodlehead is sharing the most beautiful gathered pouch tutorial. What a perfect gift! Anna has plenty of gorgeous gift giving inspiration at her blog. Don’t miss her tutorials! If you love pouches you might also like these zippered pouch tutorials! Pleated Zippered Pouch Lined Zippered Pouch How To Make A Gathered Zippered Pouch Materials needed: 1/4 yard each of three coordinating fabrics (you’ll definitely have scraps leftover)8″ zipper (you can always purchase a longer zipper and shorten it, just follow the directions on the packagescraps of medium weight fusible interfacing Cutting the pieces: For the main exterior, cut two pieces, one 5.5″ tall by 9″ wide, and one 5.5″ tall by 13″ wide (this will be the gathered front) Pieces of medium weight fusible interfacing for exterior pieces of clutch: (2) 5.5″ tall by 9″ wide For the front band, cut one piece 4″ tall by 9″ wide. Turn tube right side out and press with seam in the middle. Grab the 13″ wide main exterior piece.
My So Called Green Life...: How to Sew a Credit Card Wallet, Business, or Gift Card holder Update: I've finally created a Flickr group where you can upload photos of the credit card wallets you've made. I've seen some really fun versions out there, so please share them with us here~ I'm a huge purse-lover, but I always find myself grabbing my driver's license and credit card when running into the grocery store, post office, out to drop the kids off at school, etc., so I love having these little wallets in a multitude of colors and patterns. They're light enough to grab and go and compact enough to slide in my back pocket. They're also great way to personalize giving a gift card. The tutorial I did for this version has been the most popular post on my blog every week since I put it up in November of 2008. Credit Card / Business Card / Gift Card Holder Tutorial Here you see the pink lining piece and my blue floral outer piece, with interfacing attached. Take your 6 x 4" pocket piece and fold it down about 1/4 inch, then 1/4 inch again.
HOME OWNER'S MANUAL | How to take care of your home: expert tips, advice, warnings, information and diagrams Home on the Range Did you know that one of the most common problems with home cooling units is blockage to cooling fins caused by dirty filters? With tips such as this one, the Home Owner's Manual can provide you with all you need to know to make your house a home - and save some cash in the long run. This item has been discontinued. DIY+Pregnant Brain Without getting into too many details-the baby is going to be a little longer than we thought. We were afraid that she was going to be early, and now that she isn't, I sort of feel like I'm living life in limbo.I don't know if it's just me, or women in general, who find the strangest tasks to pass time until a baby arrives. Suddenly, the weirdest things pop on to our 'to do' lists, and become oddly important. And the tasks seem to grow weirder and weirder with each baby. Right before I had Reuben, for some reason, I decided that my living room futon needed a new cover. Before I had Zeke, I needed to get all my Christmas cards done early-not just written, that wasn't good enough. My mom also contributes to this fun little routine-I think that she nests right along with us. That, and that's what her Mom always did to "help". Well, maybe not stranger than the salad dressing. Mom had suddenly decided that it was time to pair my family's odd socks.