
Tutorial: Scrap Buster Fall Pillow This is my favorite thing to do with my little scraps, and since its Scrap Buster month over at Sew, Mama, Sew, I made a quick tutorial so you can make your own. This pillow cover is 16" square with an envelope back & the design possibilities are endless! I added some pillows I’ve previously made with this same method at the end of this post. Happy Sewing! You’ll Need: 1. 2. 3. 4. Iron your fabric scraps onto your appliqué material according to the directions on the appliqué material. Now with scissors cut out your trunk and leaf shapes. When you get all your leaves cut out, tear the backing appliqué paper off the leaves and trunk. Then you can arrange them how you want on your pillow front. Once your design is how you like it, press with an iron over each spot for a few seconds making sure not to bump anything out of place. Now you can sew either along the inside edges of your leaves, or you can do a zig zag stitch or blanket stitch around the edges if you prefer.
guest blogger - Sasha from The Guilded Bee: Here's another DIY project from our sweet friend, Sasha - from the The Gilded Bee. Be sure to check out her awesome shop full of handmade packaging lovelies. Thanks for being here with us Sasha! I'm delighted to share my book tutorial with you today: Supplies you’ll need to make this project: • One—8.5 x 5.5 sheet of cardstock • One---1/2 x 3 inch piece of cardstock or paper • Two---2 5/8 x 3 1/8 inch pieces of cardboard, chipboard or matboard (not corrugated) • Hot glue gun and glue sticks • 25---3 x 5 inch ruled or blank index cards • Two---3 x 5 inch sheets cardstock • 2 rubber bands • Pencil • ¼ inch wide Ribbon: One-6 inch piece, plus two-1 inch pieces To make the page block: * 1. * 2. * 3. * 4. * 5. * 6. To make the cover: * 1. Make a little mark at the center of each side of your paper (4.25 inches on center). On each side of those center marks, draw three lines paralleling each other (6 lines total): 5/16”, 5/8”, 13/16” inch from the center mark. * 3. * 4. * 5. * 6. * 8. * 9. * 10.
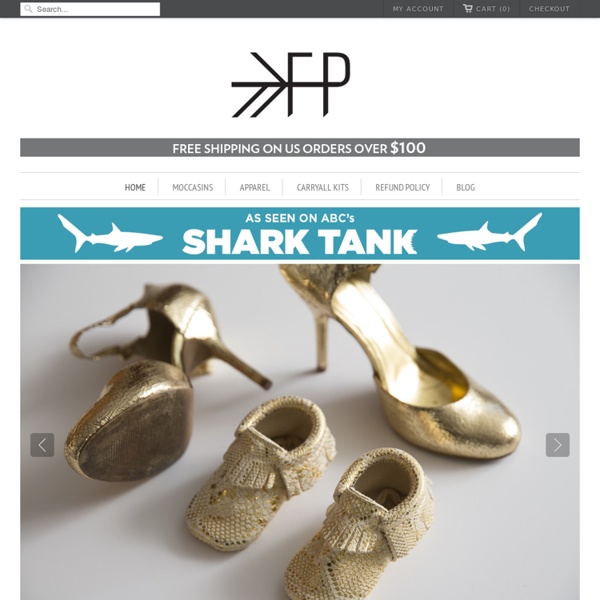
10 Free Tote Bag Patterns and Tutorials Totes make great handmade gifts. Here is a Tuesday Ten that shows a round-up of lovely totes. If you love to sew you might also like these free sewing tutorials right here on Skip to my Lou! Every tote needs a matching pouch. Pleated Zippered Pouch Lined Zippered Pouch 1. 2. 3. 4. 5. 6. 7. 8. 9. 10. Mozilla Firefox bEING pERFECT iS hARD: Reupholstering Some Shoes First I got together an old pair of shoes that I wasn't too fond of, a bottle of Sobo fabric glue, a pair of scissors, and about a yard of fabric ( I used fabric from a long dress I had cut into a mini dress ). I wasn't really sure where to start. So I just started cutting random pieces of fabric and then sort of molding them to the shoe (cutting off excess as I went). I slathered the fabric glue straight onto the shoe in some cases, and sometimes onto the fabric, then gently pressed it down onto the shoe. I recommend a busy pattern like this one because you can't even tell that I layered different pieces of fabric almost like a paper mache.
The Crafting Chicks — Friends Sharing Crafty Ideas Large T-Shirt to Fitted Tee Tutorial | a.steeds.life - StumbleUpon I have these two t-shirts that I love. They're soft, comfortable, and have good worn (and sentimental) designs on them. But, I never wear them for anything other than around the house because they are large men's t-shirts and look completely shapeless on me. Then I found this great tutorial on YouTube for how to make a big t-shirt a fitted shirt! - T-Shirt Surgery: How to Make a Shirt Fit So, while I was staying with my mom at her camper this summer (she lives & travels in an RV), I asked her to help me try it out. First, a before & after look at the t-shirt we did. So, here's how it's done. Start with a t-shirt you love that's just too big Turn the shirt inside out and lay a shirt that DOES fit you on top of it, lining up the collars so that you can be sure it is centered over your large t-shirt. Thanks to brianagayle for the video tutorial & tips! No time to make your own?
DIY Father’s Day Ties In case you found good ideas to help your kids make a good gift for their dad you might still need some ideas to make a gift for your own father. If you have some sewing skills you can make a tie or several ties for him. They are quite simple to sew and you won’t need many materials to do that. tutorial: how to sew a simple maxi dress The Plan. Fabric. You will be making a maxi dress so buy fabric accordingly. I stand 5′ tall (I know, I know, I am tiny) and I needed 2.5 meters of fabric with a 45-inch width. Preparation and Cutting. Sewing. Don’t forget the banana. Instructions for making the rosettes are HERE.
Crazy 'bout wallets TUTE...FINALLY! First off, my apologies for taking forever to get this done! I'm one of those people who have a habit of taking on too many responsibilities at one time. Anyway, this is the tutorial for the wallets I made in this post: You will need:1/4 yd. of the main fabric1/4 yd. of the accent fabric1/4 yd. stabilizer (or medium weight fusible interfacing)9 in. zippersm. round velcro patch 1. A. Cut 1-Main Fabric, 1-Accent Fabric, 2-Interfacing B. Slot A: 8.5"W x 3"H. 2. C. Top Piece: 8.5"W x 1.5"H. 4. 5. 6.Sew FOLDED EDGE of Back Piece to SEWN EDGE of Bttm Piece. 7. 8. 9. 10. 11. 12. 13. 14. 15. 16. 17. 18. Should look like this when you pull the flap open. Viola! Hope you are able to follow this tute easily Tutorials for Recycling T-Shirts So way way back, in June, I wrote this Studio Organization post, about starting the process of organizing my studio by cleaning out the closet full of junk. Well, it's September and...let's just say the closet is a work in progress. Some of the things that are taking up space in the closet are shirts that I never wear anymore. I realized I could repurpose them into something else! Here are some tutorials for recycling shirts: Check out these t-shirt scarves! Create cute little bows for accessories or packaging with this tutorial. Gorgeous ruffled pillow tutorial here. Looks like I have a lot of projects ahead of me to keep me from cleaning out my closet!
Watermark Tee by Sweet Verbana Hello U-Create readers! I am so excited to be guest posting here today. It just so happens to be my first guest post and I'm still a little shocked that it's here at Ucreate, one of my favorite blogs! A little bit about me.. I'm from a little town called Keller, Texas. I'm a junior at Texas A&M University (whoop!). I'm working on my education degree and expect to be an elementary school teacher in just two short years. When I'm not busy studying for classes, I love to sew. I just started blogging in May and have already met all kinds of wonderful women, I hope you'll stop by and say hi too! Watermark Tee Tutorial What I love about this project is that it's completely customizable. Materials: Elmer's Blue Gel Glue (it must be the blue gel, white won't work) Fabric Dye (RIT is my tried and true brand) A white cotton Tee, Tank, Dress etc. Tutorial: If you're unfamiliar with Batiking, it's a method of dyeing fabric in which you create a design with a dye- resist. Step 1: Prepare Step 2: Design
t-shirt latch hook rug tutorial I really love flokati rugs. I have two that are safely tucked away in my parents basement awaiting our reunion. When I learned that I would be having a child and building a nursery for him, I wanted a flokati. A gray one. Being a flokati snob though, I knew that I couldn’t afford the price tag ( ), and I knew that I would be too precious about the rug ( ). I’m going to show you how it’s done, but let me warn you- while this rug was super inexpensive to make with the resource of money- it was very costly in the resource of time. And now, this is how to make your very own latch hook rug. Supplies: Latch hook canvas latch hook tool old t-shirts scissors or rotary cutting tool/mat seam binding masking tape dye (optional) All of these things should be available at your local craft store, with the exception of the old t-shirts. On to the making! Once you have all of the strips cut, it’s time to dye them if you’d like. Now you’re ready to hook! good luck and happy hooking! xo elle
DIY of the Month: Braided T-shirt Bracelet How To: Give your old t-shirts a second life. Sorry dust rag pile! photos: kirsten for we heart this I love using simple materials to make something fun and innovative. The supplies for this bracelet DIY are really basic, so there’s a REALLY good chance you own all of them already. I mean, who doesn’t have a stack of soft old T’s you can’t wear outside of the house, but love to much to toss in the rag pile? As with most of my DIY’s for wht, this is very customizable. Supplies: • T-shirt scraps • 2 keychain rings • Scissors • Needles and thread • Glue gun • Ruler 1. 2. 3. 4. 5. 6. 7. More Options: • Add a strand of metallic thread into the braid • Add charms to the key rings or actual strips of fabric • Use the colors of your school or favorite sports team, or coordinate it with your latest spring outfit Readers – do you have an favorite T just waiting to be turned into a new bracelet?