
Урок фотошоп: профессиональная ретушь кожи лица с сохранением естественной текстуры » Фотожурналы, книги и учебники по фотографии, уроки фотошоп, журналы о фото, фотографы, обзоры фотоаппаратов, photoshop Урок фотошоп: профессиональная ретушь кожи лица с сохранением естественной текстуры В этом уроке по Photoshop вы узнаете, как ретушируют кожу профессионалы. Кожа будет выглядеть здоровой, без пластикового эффекта или неприятного размытия. 1. 2. Слой ”Blur” мы будем использовать для размытия кожи. 3. 4. 5. 6. Ниже приведён пример полученного результата. 7. 8. 9. 10. Выберете образец цвета кожи, который Вам кажется более подходящим, вы можете быть не очень точными, поскольку окончательно настраивать цвет мы будем далее в уроке. 11. 12. 13. Увеличьте изображение до 100% и закрасьте кожу. • Уменьшение размера кисти: [ • Увеличение размера кисти: ] • Уменьшить мягкость кисти на 25%: Shift + [ • Увеличить мягкость кисти на 25%: Shift + ] В тех местах, где вы закрашивали кожу, ваша маска слоя должна иметь области белого цвета, а кожа выглядеть гладкой. Теперь мы собираемся исправить цвет кожи, как мы и говорили ранее в этом уроке. В "Цветовом тоне" настройки обычно правильные. Итоги: Конец.
4 Tips To Speed Up Photoshop Almost everyone complains that Photoshop takes a lot of time to load and is very slow at times. The obvious way to resolve the Photoshop performance issues is to buy more RAM, or a faster computer ;). Spending money may be an option for some but its possible to to make Photoshop faster without spending a dime. Change Photoshop History States Ever wondered how Photoshop allows you to undo things again and again? Forcing Photoshop to remember a lot of things will make it slower. To change this history setting, go to, Edit > Preferences > Performance. Change Photoshop Cache Level To 1 Cache levels help Photoshop in rendering and redrawing on screen. • Use higher cache level value for files with less layers • Use lower cache level value for files with more layers Photoshop uses same cache level for all files which makes it slower. Keep it smaller for more speed. Turn Off Image Preview Saving This change will improve Photoshop’s performance instantly.
Create Light Leaks & Lomo Effects Using Actions in Photoshop In this quick tip tutorial, we will explain how to create light leaks and lomo effects for you photos using actions in Photoshop. Let's get started! Tutorial Assets The following assets were used during the production of this tutorial. Step 1 Begin by opening your images and navigating to the Window Tab of Photoshop. Step 2 Now that you have the actions panel open, we can begin our first light leak. Step 3 For the first effect we will add Curves. Next add a Gradient from the "fill or adjustment layer". Change the color to "fc2c2c", then change the angle to -100. Now change the layer style to Screen and lower the opacity to 90%. Step 4 Now to wrap the action up, group the two adjustment layers, and name them "Effects". Step 5 You can now run this action on any photo. Conclusion Add this action to your own photos and experiment with different colors to create beautiful light leaks and lomo effects!
Уроки создания сайта - бесплатные шаблоны, иконки для сайта, скачать скрипты, уроки Photoshop и уроки flash How To Make Photoshop Faster On Slower Computers Of course, the easiest way to get rid yourself of almost all performance issues is to have the money to buy a new, faster computer. But it’s much easier said than done, especially when you are not so financially independant. So, let’s say you have an average PC/Mac and whenever you start Photoshop, it takes some time to load (enough to use the bathroom, make coffee, send an email to your loved one, etc. ) or maybe it slows down when processing high resolution images or rendering a filter. I’ll give you some tips on how to make Photoshop faster just by tweaking some options in Preferences. Note: I am using Photoshop CS4 and the screenshots are from that version, but don’t worry if you have an older version of the software ““ they all have those options, only the text and positioning may vary. Look around and you will find them. To bring up the Preferences dialog box go to Edit-> Preferences or click Ctrl-K: Tip 1: Adjust the Performance settings Choose Performance: Memory Usage Scratch Disks
Old School Type - Line Gradients One of our readers suggested we write a tutorial explaining how to do this cool text effect. On the Dragonforce logo above, the basis of my typography was sketched on paper first and then vectored in Illustrator using the Pen Tool. The process for creating the base logo is not included in this tutorial. Instead, we are going to take the base logo and add that cool “line gradient” effect that you see inside the actual letters. This gives the text an old-school or vintage feel to it. This look is prevalent in wood engraving and sign lettering. Here are some more examples: So in order to get this effect, we will need both Adobe Illustrator CS2 or higher and Adobe Photoshop. You can see the kind of effect we are going to create. Step 1: Prepare your base logo or typeface. We will use our Dragonforce Logo as our base, but you can simply use your favorite font. 1a: Open up Adobe Illustrator and Photoshop 1b: Create your base text (just type something out using a bold font) Conclusion:
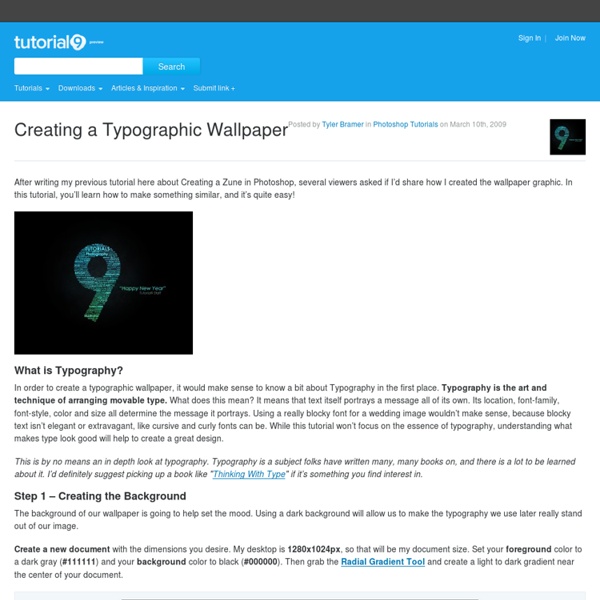
Уроки дизайна в фотошопе, уроки по фотошопу, сайт о фотошопе, уроки фотошопа, уроки PhotoShop, как нарисовать в фотошопе Add Fantastic Color to 3D Text - Part I This is the first part of a two part series. Part two will be released tomorrow. In this piece you will learn how to bring a simple text to life and place everything in fantastic, colored and glowing 3D space. Some neat techniques covered here will allow you to bring your art to the next level. Don't miss it! Take a look at the image we'll be creating by the end of this two Part series. This tutorial series is kind of a continuation of the tutorial Super Malleable Lines. First of all, to create the 3D text, you need to download the demo version of Xara 3D6. The best way to start a colorful art piece is finding the right colors. Let's start with opening a new document of around 1350 pixels by 1600 pixels with a resolution of 300px/inch. So now that we found a good fitting color, grab the Paint Bucket Tool (G) and fill the new layer with #166a91. Now what we need is to give this background some life. When you're done with coloring the background make sure everything works for you fine.
Create Beams Of Light From Nothing In Photoshop Here is some great insight on creating beams of light in photoshop. Check it out. Working With Layers The key to getting a beam of light to look realistic is using multiple layers while creating it. Adding Fog The second part to making the beam of light believable is adding fog to the image. Photo by Vincent Tullo
Adobe Photoshop tutorials, from beginner to advanced | HV-DESIGNS.CO.UK 10 Common Photoshop Frustrations (and How to Fix Them in Five Minutes) Photoshop is not always the most user friendly of programs. Sometimes it has frustrating issues, and the solution is not always clear. Here’s a list of 10 annoying problems you might have with Photoshop, and simple solutions to fix them. They’ll range from simple to complex, some dealing with why the program won’t let you use your cursor tools, or why your cursor has changed shape. Read on to see the list, and what you can learn to make your graphics editing experience more pleasant and productive. Your Cursor Disappears or Changes Shape The Problem: After working with some type or some other tool, only to return to the brush to find that your cursor has changed shape, and is difficult to see. The Solution: If your cursor looks like the ones directly above, you’ve probably switched to “precise cursors.” Your Panels Keep Disappearing The Problem: Uncertain what you’ve done, all your panels have vanished from your screen. Your Brush Tool (Or Others) Have Stopped Working
Watch Full Movies Online For Free “The Hobbit: The Desolation of Smaug” The dwarves, along with Bilbo Baggins and Gandalf the Grey, continue their quest to reclaim Erebor, their homeland, from Smaug. Bilbo Baggins is in possession of a mysterious and magical ring. “The Hunger Games: Catching Fire” Katniss Everdeen and Peeta Mellark become targets of the Capitol after their victory in the 74th Hunger Games sparks a rebellion in the Districts of Panem. “Man of Steel” A young itinerant worker is forced to confront his secret extraterrestrial heritage when Earth is invaded by members of his race. “Iron Man 3” When Tony Stark's world is torn apart by a formidable terrorist called the Mandarin, he starts an odyssey of rebuilding and retribution. “G.I. The G.I.
50 Twitter Tools and Tutorials For Designers and Developers - Smashing Magazine Twitter appears on innumerable personal and professional websites nowadays, whether it is a simple “Follow me” badge in the header or a display of the author’s latest tweets in the sidebar. No longer a fad, Twitter is now a necessity for every website, not just for sharing your thoughts and keeping in touch with people, but also for marketing, advertising and even searching. But you may be wondering, How can I make Twitter work the way I want on my website?