
Terrarium Centerpieces&|&Indie Bliss The other week, my good friend Stephanie and I planned out a craft weekend. Our mission: Terrariums. Not the kind you keep lizards in, but the kind you can seal up and watch the moss grow. Terrariums are meant to be long lasting, so you can even make some months before the wedding and still have them thriving in time for the big day. So lets get down to the nitty-gritty of how you can actually make them: Step 1: Materials • Glass containers in whatever size you heart most. • Good dirt and rocks. • Figurines or decorative rocks to place inside. • Horticultural Charcoal. • Moss (another one of those things you can find outside, but can also order if you don’t live somewhere it doesn’t grow naturally). • Spray bottle (for misting after wards). Step 2: Wash out your containers and rocks (you never know what animal has probably peed on them outside). Step 3: Then start your layering your base. Step 4: Add your moss, and give it a couple shot glasses (depending on the container size) of water.
DIY ornaments // a daily something // part 2 | (A guest post while I’m on vacation…) Some more DIY ornaments from Rebecca of A Daily Something! The Glitter Ornament. To make your own, simply pour some fine glitter into your clear glass ball and place the lid back on the ornament. Feathery Tree. Mini Paper Trees. Wood – Two Ways. And there you have it – six new ornament ideas for your Christmas tree or other fun holiday decorating. Hope you are all having a blessed week and enjoy your holiday weekend thoroughly! Thank you Rebecca! share
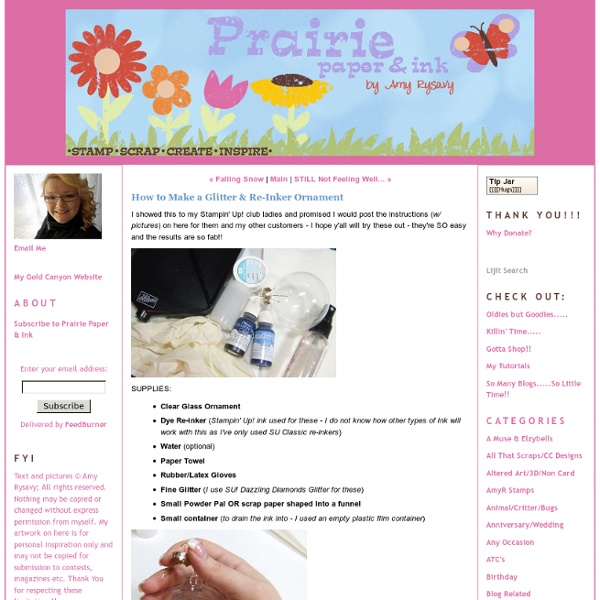
Fill Er Up Fill ‘Er Up We’re so caught up in the Christmas spirit that we decided to try our hand at creating a few custom ornaments this year. Ornament decorating can be as complicated as you make it, but of course we wanted to tackle something easy and super cheap so we headed over to Michael’s and grabbed a six pack of empty glass ornaments ($2.49), some white glitter ($1.30), and a bag of feathers ($2.49). Then we pulled out our craft glue and got down to business. It was really more of a trial and error process. We also used a q-tip to spread craft glue around the top of a few other ornaments, which we then coated in sparkling white glitter for that fresh & fluffy snow look that’s charming and kinda expensive looking actually: The finishing touch was to use some thin white ribbon that we already had around the house to create classy little loops to hang each ornament from the tree with style. So how do we like our feathered and glittered creations?
Cannibalistic Pumpkin Carving Tutorial I thought I would try my hand at carving the popular cannibalistic pumpkin that I've seen so many times before. Just as I was starting out, I realized that this was a good opportunity to document it with my camera. So below is a little tutorial I put together for anyone who might want to try this out. It's not too difficult if you are just patient and take it slow. STEP 1: The first thing you want to do before setting out on this is to get the proper tools and items. 1. STEP 2: Take your washable marker and draw out the face on the big pumpkin. STEP 3: Grab your large knife and cut a hole in the top of the large pumpkin for the cap. STEP 4: Take the cap off and set it to the side. STEP 5: Get your children involved by having them scoop out the insides. STEP 6: Once you get all the seeds and innards out, then get your spoon and scrape out the extra stuff that clings to the side. When you are done, your pumpkin should have a smooth inside all the way around.
Suzys Artsy Craftsy Sitcom: Feature Friday- Faux Metal Wall Art Looking for the Faux Metal Wall Art? Since this project was originally published on The Sitcom in December 2010, it has been my most popular project by far. Who knew that a bunch of toilet paper tubes and an idea would become so big? You can now find the full tutorial and FREE patterns on Suzys Artsy Craftsy Sitcom here: Faux Metal Wall Art I want to personally thank all my readers for making my Faux Metal Wall Art so popular! A similar project to check out would be my Faux Metal Filigree Frame. For more tutorial fun, please check out my Tutorial Page. Signing you up! If you enjoyed this post...
DIY Glitter Ornaments There’s no easier way to get into the holiday spirit with a craft that involves GLITTER! This sparkly ornament craft is tons of fun and very affordable. Another bonus: It’s very easy to clean up and won’t leave a trail of glitter everywhere. This craft makes for great Christmas gifts and they look awesome on the tree. Supplies Needed Floor wax – make sure it’s clear, Pledge brand with the blue cap bottle Fine glitter Clear glass ornaments Cotton swabs A paper cone funnel (or substitute an envelope with the corner cut off) 1. 2. 3. 4. 5. 6. 7. These ornaments make great gifts. About the Author As a writer for HandbagHeaven.com, Sarah spends most of her days accessorizing with tote bags and women’s wallets, but outside of her job she spends time crafting, cooking, and shopping!
DIY 5 Minute Tinsel Garland&Wreath - Home - Creature Comforts - daily... A few Winters ago I was staring at a bland paper bag full of old embroidery hoops that I had picked up at the thrift store months before for a few quarters, when it occurred to me that they would make perfect wreath frames. I quickly nixed the idea of wiring greenery to them (too lengthy of a project and they would only last for a short while) and then thought of the tinsel garland I had wound up the stair banister the previous day. Perfect! What I didn’t know then, was just how simple this project would turn out to be. With literally just a few minutes of your day and two supplies (tinsel garland and an old embroidery hoop or wreath frame) you can have your entire home hung with merry wreaths in no time (and you’ll get to bring them out to enjoy again year after year). Have fun! 1. 2. 3. 4. And finally, here are a few additional images of some of the original 5-minute Tinsel Garland Wreaths I made a few years ago:
Friday Faves: Halloween DIY Roundup Halloween is 16 days away! Are you doing anything fun? I’m trying to convince Stan to go to Salem, but I’m not sure it’s in our budget. I’ve never been there for Halloween! 1. 2. 3. 4. 5. 6. 20 Unique Pumpkin Ideas via c.r.a.f.t. 7. I can’t wait for Halloween Knights tomorrow at the Renaissance Faire! Like this post? 16 Headband Tutorials | Croq Zine - The Blog As a busy mom of three little boys, I don’t always have time to do my hair. (Like, never, actually! I try to sneak in sessions with my flatiron while the boys are distracted with a cartoon… IF I have to leave the house. If I don’t, my hair looks like the bus driver from South Park’s… i.e., bird’s nest. Hmm, a bird’s nest headband sounds kind of cute and funny, actually!) I think I need some headband action to disguise my less-than-perfect hair! Notes from a very red kitchen just hosted a Headband Tutorial Roundup, and there were some super headbands represented! The roundup was full of inspiration, but this rose and pearl headband by Whitney was one of my favorites. This scrappy leather headband by Missie Krissie is super cute, too! Other Headband Resources: I loved this Braided Headband tutorial when I saw it a few months ago, by Cakies (shown above) I loooved this yarn braided headband when I saw it a few months ago at EvaForeva (don’t you just LOVE the styling of the pic, too?)
Paintbrush Ornaments I recently created these paintbrush ornaments for a friend who loves to paint! These were so fun to do! I started with inexpensive paint brushes from Home Depot, and taped them off for painting. I chose these colors for the handles and applied with a foam brush: After this dried, I covered the wooden handles and taped off the brush areas and spray painted the metal section using Rust-oleum spray paints: After the base coats were all applied, I painted on the snowman face and then finished by hot gluing embellishments from my craft stash. Finally, I added coordinating ribbon to the handles so they can easily hang on the tree.
Centsational Girl & Blog Archive & A Dash of Panache: Poinsettia... When I first got married ten years ago, I started collecting Christmas decorations. Christmas is my favorite time of year, and I’d always dreamed of having my own home filled with the sights, sounds, and scents of the season. Every year, I like to add something new to my growing collection. This year I was inspired to create some decorative pillows with felt. The nice thing about felt is that it is inexpensive, it doesn’t fray, and it adds just the right amount of coziness for those upcoming winter months. I wanted to create something bold, something stylish, but nothing too busy. Here’s what I came up with: Red version, up close: If you want to create your own version of these simple sew poinsettia pillows, here’s the step-by-step. Simple Sew Poinsettia Pillows Supplies for a 14 to 18” pillow: pillow insert, 2/3 yard of felt for the pillow form; 1/2 yard of felt for the petals and button; button cover kit or color coordinated button, zipper and thread to match. That’s it, easy peasy !