background preloader

Felt Ogee Ornament Tutorial

Felt Ogee Ornament Tutorial
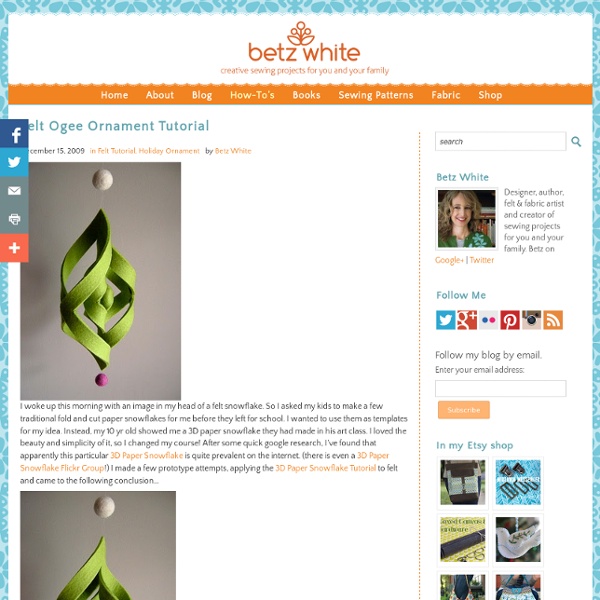
I woke up this morning with an image in my head of a felt snowflake. So I asked my kids to make a few traditional fold and cut paper snowflakes for me before they left for school. I wanted to use them as templates for my idea. Instead, my 10 yr old showed me a 3D paper snowflake they had made in his art class. I loved the beauty and simplicity of it, so I changed my course! After some quick google research, I’ve found that apparently this particular 3D Paper Snowflake is quite prevalent on the internet. …it worked! Step 1: Cut one 6″x 6″ square of felt. Step 2: Using a straight edge and an Xacto knife, cut along the first line from the corner to about 1/4″ from the diagonal line. Repeat until all cuts have been made, keeping the felt intact at each corner on the diagonal line. Step 3: Lift the corners of the center square and hand stitch the ends together with matching thread. Step 4: Turn the piece over and lift the corners of the second square.

celebrate the boy tutorial: basic boys wallet I first want to say thank you to Dana and Rae for hosting such an awesome event. If you haven't been indulging in all the fun already, go check out both of their blogs for lots of great inspiration. There has already been so many great ideas! Today I'm sharing a basic boys wallet tutorial because... every boy needs a place to keep his stuff! So I know, you're probably thinking, 'What? It's a great time of year to make these wallets. Materials: 1/4 yard fall suiting fabric (tweed, plaids, etc., usually made from wool and/or synthetic materials)1/4 yard lining fabric scrap of leather (optional)rivets, grommet (optional)scrap of medium weight fusible interfacing {1/4" seam allowance throughout unless otherwise noted}Cutting the pieces: From the exterior wallet fabric cut one piece 8.5" wide by 4" tall. Also from the lining fabric, cut one piece 8.5" wide by 10.5" tall (this is for the card holder slots) Assembling lining: To create the card holder pockets, take the 10.5" tall lining piece:

Make coasters from curling ribbon | Chica and Jo Years ago when I was a college student, I had a part time job in a card store. One day on the job, I was fiddling with the curling ribbon we used for balloons. As I twisted and curled it in my fingers, I found myself rolling it into a tight spiral. Ever since then, whenever I get balloons or gifts that are tied with curling ribbon, I save the ribbon in a special box in my craft room. Selecting the ribbon You probably haven’t been saving up used curling ribbon from balloons and packages (not yet, anyway), so you might need to buy some new ribbon to start on this project. Winding the ribbon To start your coaster, just grab a piece of ribbon and roll the end up as tightly as you can. Now for the fun part. You can see a lot of potential fun here with patterns and colors. Coat the coasters These coasters won’t last very long as they are, so we need to protect them. or brush-on varieties. Let the polyurethane dry thoroughly before using the coasters. Apply the cork Voila!

Do-it-Yourself DIY String Wedding Lanterns Yarn Chandeliers Jessica of Wednesday Inc shows us how to make those gorgeous twine chandeliers from the inspiration shoot she shared with us this morning. Using balloons, glue and twine, you can also make these lanterns for your wedding – and then bring it home and use it as your very own mid century lampshade. What you will need are: balloons, glue, yarn, tray for glue, corn starch 1/2 cup of Corn starch, 1/4 cup of Warm water, clear fast drying spray paint, hanging lamp cord or fishing line (depending on your desired final product), and a lighting kit if you’re looking for a fully functional lantern. Are you getting excited to try to do this at home as much I am? Instructions: 1.

Quilts - Page 2 Mathematical Quilts Some of my work... Lutes of Pythagoras - Pythagoras was born on the island of Samos in 570 B.C. Spiraling Pythagorean Triples - case 1 - This quilt belongs to the London Science Museum. Spiraling Pythagorean Triples - case 2 - This quilt has the same triangles as the case 1 quilt. The Wheel of Theodorus - Theodorus of Cyrene participated in the Cyrenaic school of moral philosophy. The Six Trigonometric Functions - The history of trigonometry goes back to the earliest recorded mathematics in Egypt and Babylon. The Sacred Cut - Mosaics and paintings in the Garden Houses of Ostia are in many cases laid out according to the geometry of the sacred cut. Five Means Behold! Some quilts are for sale - please contact Elaine at eellisonelaine@gmail.com for more information and prices. Copyright 2014.

Monogram Mugs Friends! I’m so pleased to share our first gift DIY of the season. Maude made these fantastic monogrammed mugs over the weekend. Don’t they look terrific? The idea came when we saw these fun initial cups at Anthropologie and remembered our kitchen was lacking in hot cocoa mugs. It’s a very doable project. 1) We started with a trip to Goodwill, where we collected 8 plain white mugs. 2) Then we gathered supplies. For the font, I had something very specific in mind. 3) Cut out an initial and a piece of transfer paper. 4) Trace the initial. 5) Take your Porcelaine pen and trace over the lines of the initial. 6) Once the lettering is done, let the mugs sit for 24 hours. 7) And that’s it! The project turned out so well that it has my mind spinning with other possibilities. What do you think? Need more sibling gift ideas?

Craft Green: Eco-Friendly Tutorials In the upcoming week I’ll be writing about eco-friendly crafts in celebration of Earth Day. So here are some eco-friendly tutorials to get you started. Look for more upcycled projects and green giveaways throughout the week. Homemade Paper from Instructables. Gift Bags from Envelopes from How About Orange. Plastic Grocery Bag Pom Poms from Creature Comforts. Junk Mail Paper Beads from The New New. Girl’s Spring Mini-Tote from Betz White. Crocheted Tawashi from Linda Permann for Craft Stylish. Fabric Scrap Bowl from Linda Permann at Craft Stylish. Recycled Crayons from Make and Takes. Sweater Skirt from Whip Up. Recycled Sweater Kid Pants from Green Kitchen. Magazine Bowl from A Little Hut. Travel Candle in Recycled Tin from Design Sponge.

Felting Project: A Rug! This is the most beautiful felt project we’ve seen. Strips of felt are wrapped around each other with hot glue to create this amazing swirled effect. What a great project for a snowed-in weekend and a movie marathon with the family. The kids could even help cut strips and decide on color combination while you operate the hot glue gun. Would you attempt something like this? Keep reading to see more pictures and find out where to find more details about this beautiful felt project! You can see all the instructions and details here on The Crafts Dept blog A few other fun pictures of the process: Images: Martha’s Crafts Department Blog Other post of mine you might like: The Best Thing to Happen to Your Baby’s Feet This Winter! Zara Kids Winter Collection Snow Bricks!

Christmas tree ornament mobile, how-to Here is how I made my Christmas tree ornament mobile, it was easier than it looks, promise. The Supplies a 17″ steamer rack from a restaurant supply storeabout 5 feet of lightweight jack chaina small carabiner100 basic ornament hooksone roll, 500 feet, monofilament jewelry string (not the stretchy sort)200 jewelry crimp beads or tubesjewelry crimping tool100 lanyard hooks100 ornaments Note: In the photo above I show earring wire instead of ornament hooks. I changed that later as I found ornament hooks made it far easier to move ornaments around after they’d been hung. Also, my supplies are based on a 4 foot tall mobile using almost 100 ornaments, you’ll need to adjust amounts if you make one larger or smaller. Creating the Mobile Frame Creating the frame for my ornament tree mobile turned out to be fairly simple. For the top of the mobile I needed something that would allow me to easily secure a lot of hanging points without them sliding around too much. Notes: Why so many hooks and bits?

How To Make Soap - Channel4 - 4Homes Step Four: Choose Your Flavours Once the mixture has started to change colour and texture, it's time to add the lovely bits. The delicious scents come from the essential oils - and there are so many flavours to choose from. To the first bowl, I added a handful of parsley, then measured 20g of lime essence into the mix. 2010 Finished Projects This quilt is available for purchase in my Etsy Store. SOLD Flea Market Fancy Quilt (September 2010) Millie and Olivia (September 2010) This quilt has been made using just ONE layer cake. A Pattern for this quilt is available in my Etsy Store. Commissioned Quilt - Sold. Ready for Swapping. Far Far Away 2 by Heather Ross Little Folks Baby Girl and Toddler Quilt (June 2010) Custom Quilt - Little Folks Baby Quilt (June 2010) The Lady of the Lake Quilt (June 2010) The HST Overload Quilt (June 2010)Pattern available. The HST Overload Quilt Pattern is available from my Etsy Store. The HST Overload Quilt - SOLD The HourGlass Quilt (May 2010) Little Folks Quilt (April 2010) Modern Flying Geese Quilt (April 2010)Pattern available. Flying Geese Quilt Pattern available. Georgia's Quilt Pattern available. This quilt is not for sale - pattern available in my Etsy Store Fantastic Fairies Quilt The Bricks and Stones Quilt featuring Hope Valley Fabrics The Bricks and Stones QUILTPATTERN is for sale in my Etsy Store

Related: