
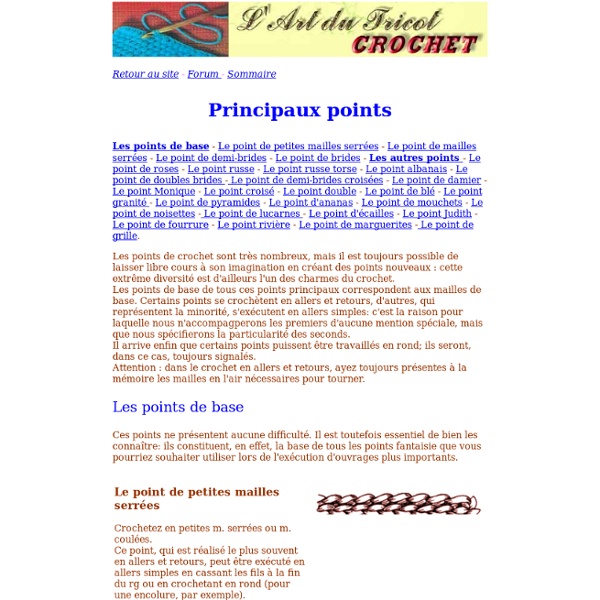
Apprendre les mailles de base du crochet Le crochet s'exécute à partir de quatre mailles de base : la maille chainette ou maille en l'air, la maille coulée, la maille serrée et la bride (dont il existe plusieurs variantes).Comment tenir le crochet ? Avant de commencer la technique des mailles, il faut savoir comment tenir le crochet. Il se tient dans la main droite comme on tient un crayon (entre le pouce et l'index) en faisant dépasser un peu le bout du crochet, la main gauche tient l'ouvrage (si vous êtes gaucher, vous devez inverser et tenir l'ouvrage de la main droite).Les mailles bassesLa maille chainette ou maille en l'airLa maille chainette est également utilisée comme substitut de la première maille pour commencer un nouveau rang. Dans ce cas une chainette équivaut à la première maille serrée, deux chainettes à la première demi-bride, trois à la première bride et ainsi de suite... Ramener le fil au travers des 2 mailles présentes sur le crochet Pages
Logiciels pour créer des patrons de crochet Bienvenue dans cette partie du site consacrée aux logiciels de crochet Je vous propose ici de découvrir différents logiciels que vous pouvez utiliser pour créer vos patrons de crochet, pour accéder à la fiche du logiciel, cliquez sur son nom. PAINT SYMBLCRO <A HREF=" Mesure d'audience, statistiques, ROI</A><BR><A HREF=" des meilleurs sites, chat, sondage</A> MENU© Copyright 2001/2010, Passion-Crochet A faire (châles)… | L Cette page me sert de "pense-bête". J’y ajoute régulièrement les liens des modèles de châles (pour la plupart gratuits) que j’aimerais réaliser prochainement (dernière mise à jour le 11/08/2013). Châle Abyssal : tuto, réalisé ici, ici, ici, ici, ici, ici, ici, ici, ici, ici, ici Châle Birch : tuto, traduction en français, réalisé ici, ici, ici, ici, ici Châle citron de Hillary Smith Callis : tuto en anglais, tuto en français traduit par Christine ou par Cécile, réalisé ici, ici, ici, ici et beaucoup par ici Châle Cladonia de Kirsten Kapur : tuto payant en anglais sur ravelry, tuto payant en français, réalisé ici, ici, ici, ici, ici, ici, ici Châle dentelle Drops : tuto, réalisé ici, ici, ici, Châle Drops au au point d’astrakan : tuto, réalisé ici Châle Eva’s shawl : tuto en anglais, quelques explications en français pour débuter ce châle, réalisé ici, ici, ici, ici, ici, ici, ici, ici, ici, ici, Châle Feather & Fan : tuto traduit par Cécile, réalisé ici, ici, ici,
Leçons de Granny : apprenez à crocheter carrés, fleurs, étoiles, soleils et hexagones Leçons de Granny : apprenez à crocheter carrés, fleurs, étoiles, soleils... Vous avez un faible pour la tendance granny mais vous n’êtes pas pour autant la reine du crochet ? Les blogueuses viennent à votre secours en vous proposant des tutos. Carrés, étoiles, fleurs, sunny spread… Vous saurez tout faire ! le 16 juin 2012 - photos : DR Lilly Chouquette a conçu un bien beau tuto en .pdf pour vous éviter des moments de solitudes intenses, une fois que vous serez armée de votre crochet. Granny maniagrannymania.canalblog.com Granny mania c’est LE blog collectif consacré au granny. Catherine Solange avait une envie de granny hexagone. On craque pour ces petites étoiles à accrocher les unes aux autres. Penelope’s sisterspenelopesisters.canalblog.com Ces blogeuses, adeptes du crochet, prouvent que le granny peut être tendance, grâce à leurs créations résolument modernes. Les petits bonheurs de Miss Tmisst.canalblog.com Les petits bonheurs de Miss T sont aussi ceux des internautes.
Châle "Lurex" de Tricotam: le tuto gratuit pour débutante Châle "Lurex" de Tricotam: le tuto gratuit pour débutante Détails Catégorie : Tutoriels Tuto réservé à un usage personnel J'ai conçu ce tuto pour les ulta débutantes au crochet. Points utilisés pour le châle lurex : avec en lien, leurs explications dans le site de Crochet-Loisirs (une bible pour les crocheteuses débutantes ou expérimentées). ml: maille en l'air (maille chainette) mc: maille coulée ms: maille serrée dB: demi-brides Gros plan sur le point: Réalisation du châle "lurex": Il se crochète à partir de la pointe et s'élargit au fur et à mesure de son avancement. Crocheter 8 ml, joindre en rond par une mc dans la 1ière ml. Rg 1: 8 ml, 1dB dans le rond des ml, 5 ml,1dB dans le rond, tourner Rg 2: 8 ml, 1dB dans l'arceau du rang précédent, 5 ml, 1 dB dans l'arceau suivant, 5 ml, 1 dB dans le même arceau, tourner Rg 3: 8 ml; 1 dB dans le 1ier arceau, 5 ml, 1 dB dans l'arceau suivant, 5 ml, 1 dB dans l'arceau suivant, 5 ml, 1 dB dans le même arceau, tourner. Châle lurex à plat :
Tuto pour des châles au tricot avec (ou sans) dentelle 15 janvier 2012 7 15 /01 /janvier /2012 10:08 Il m'a semblé utile de faire un petit récapitulatif de ce que je sais sur les châles. Je vais essayer d'être très simple et claire sur les différentes étapes et je vous donnerais mes petits trucs. Bien entendu je suis loin de tout savoir alors n'hésitez pas à intervenir ou poser des questions. Les photos sont ceux de mes châles sauf lorsque je le précise Plusieurs étapes sont nécessaires pour bien comprendre : Comprendre comment se tricotent la plupart des châles ? La plupart des châles sont triangulaires mais ne se tricotent pas tous de la même manière On appelle le haut du châle la partie la plus large ( celle qui se pose sur les épaules ) et le bas du châle la pointe châle Haruni d'Emily Ross, en angalis sur ravelry, là : link modèle traduit en français par Christine73, là : link Si vous observez bien le châle vous voyez qu'il est symétrique, le long d'une ligne verticale centrale. en général le modèle vous précise comment faire. link et link