
Cat Eyeliner Tutorial Cat eyeliner has got to the most unpredictable thing in makeup. You never know what shape you'll end up with. One wrong move & you'll have to think of ways to make it look right. I thought I'd share with you how I've been doing mine, because I think it's almost mistake-proof. So, here's a step-by-step tutorial: Apply eyeshadow on lid. *It's up to you whether you want to line the lower lash line or not. Products Used: Because I have hooded lids, it's important that I contour my crease. Hope you liked the tutorial! ♥ Cynthia Z * DIY Fringe Scarf | Lakeland Local Everyone needs a go-to fringe scarf in their fashion repertoire. Here’s an easy way to make your own. What You Will Need: -Old T-Shirt -Good Scissors Step 1: Go through your old T-shirts and find a daring print or color combo. Step 2: Cut horizontally across the shirt, just below the armholes, to create a rectangular tube. Step 3: Working your way around the tube, make a series of vertical cuts that extend from the raw edge upward. Step 4: Tug down on each strand to elongate it. photo credit: Cathy Hayes for Lakeland Local
Fun Friday - DIY Beach Hair I love the messy hair/bohemian look. I also love the beach. So, here is a DIY Sea Salt Beach Hair Spray that I can not live without anymore! The hair just looks so pretty, just like after a day at the beach. Here you go, the tutorial on how to make the beach hair spray: Here is what you'll need: ♥ Coconut Oil ♥ Sea Salt ♥ Vodka ♥ Hair Gel ♥ Spray Bottle ♥ Measuring Cups Here is how do make your very own beach spray: 1. 2. 3. 4. 5. 6. You look so beautiful! Now all you need is a beautifully handmade piece of clothing to finish of the look: {click on images to shop!} Now it's your turn! ♥ Erika PS. Want more radness delivered conveniently to your inbox?
guest post {Marie Darby…diy photo lampshades PINTEREST UPDATE: This is a post from 2010. I do not take custom orders, only the tutorial is available. The lamps have held up wonderfully. As many of you requested, Marie is sharing a little tutorial here on how she made her lampshades. When she made them she was not planning on doing a tutorial for this blog, so be sure to thank her for taking the time to write all this out. Also, for those wondering…Kara will be sharing some tutorials for her book art on her blog soon. Marie is happy to do custom orders for those that prefer buying over making! * LAMPSHADE – Hobby Lobby carries self-adhesive shades & nightlights, Target has some smaller lamps for $19 that would be perfect for this project, I’ve found some lamps & shades on Craigslist. * GLUE – I used a hot glue gun for the first lamp. * VELLUM – I buy this in packs of 20 (I think) in the scrapbooking section of Hobby Lobby. * PRINTER – I have a color inkjet printer. If you are using photos – there are several options. That’s it!
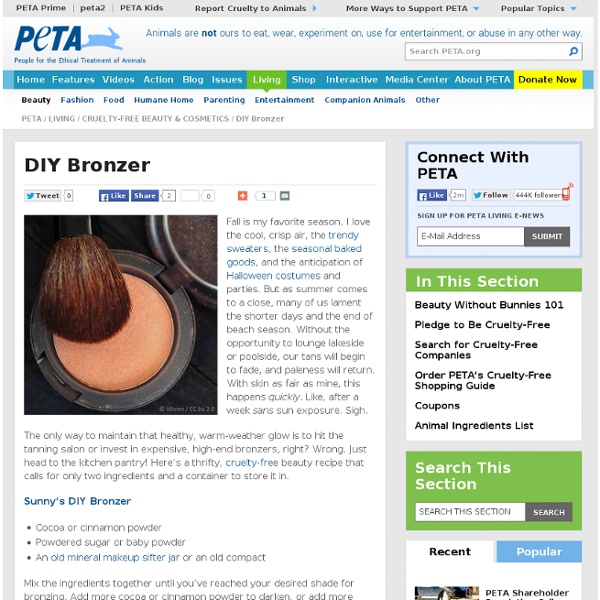
A Cup O' Joe: DIY Facial Scrub The following article was written by PETA intern Sofia Hueter. Many of us are accustomed to the daily ritual of guzzling cup after cup of coffee to stay awake because it is so ingrained in our society that habitually drinking something with caffeine in it every few hours is the best way to fight fatigue. Caffeine does, in fact, help to ward off our lingering morning drowsiness, but drinking coffee, though often delicious and enjoyable, is not the only way to get the caffeine fix that your body craves. Did you know that your body can absorb caffeine through the skin? In addition to giving you a pick-me-up, coffee has other benefits. Cup O’ Joe Facial Scrub 4 Tbsp. olive oil 6 Tbsp. coffee grounds* Container for finished product Mix the coffee grounds and olive oil. *Note: The coffee grounds should be very fine because you will be rubbing them onto your skin. The coffee will exfoliate your skin while the olive oil provides a good source of moisture to keep your skin soft and hydrated.
Photo Tile Coasters {Using Resin} Last Christmas I almost had a breakdown... We had just moved in to our home the month before, but I didn't want to let that prevent us from having the holliest jolliest Christmas. My intentions were good. And that's how it happened. Well, with this project I created an anniversary gift AND a Christmas gift. While I was in Utah, my sweet cousin Michelle showed me a couple of projects using resin. Here's how I made these photo coasters... I started out with a trip to Home Depot. Next, I ordered some photos. Only 13 cents a print at Costco! I used a regular old Elmer's glue stick to paste each picture onto the tiles. I won't give a full tutorial on using resin because each product is a little different. After mixing the resin with the hardener, I just poured it on! Then it took them a full 24 hours to harden up! Once dry, I mounted 4 of the felt circles on the bottom of each tile so they would slide easily on wood without scratching! All done! Now these are stinkin' cute!! Happy weekend!
Dorm Room Spa: 3 Easy DIY Beauty Recipes to Try - College Fashion - StumbleUpon Photo Credit It’s that taxing in-between time of the semester again – spring break is over, papers and projects are coming due, and finals are looming ahead. It’s clear that college students are stressed right now, and with that stress comes the need for relaxation. Of course, as college students, we can’t all afford to shell out for a trip to a high-end spa. 1. Photo Credit Olive oil isn’t just for cooking — it’s great for your hair, too! To give your hair a conditioning treatment, massage about 2 tablespoons of olive oil into your hair and scalp. Next, take a warm, damp towel and wrap it around your head and treated hair (“turban” it). Finally, rinse out the olive oil with shampoo. 2. This DIY mask, made of nutmeg, honey, and cinnamon, is calming and soothing for stressed-out skin – in addition, it smells absolutely amazing! The secret? To create the mask, mix 2 tablespoons of honey with a teaspoon of cinnamon and a teaspoon of nutmeg. 3. Photo Credit Your Thoughts?
Holder for Charging Cell Phone (made from lotion bottle) My husband and I both have cell phones. And both of us have phone chargers. And that means lots of obnoxious cords. You never know when one of us may be moving phone cords around, to give our phones an extra charge while we’re chatting away……… or trying to charge our phones up before running errands or something. Needless to say, those phone cords seem to be everywhere…..and are generally in the way and hanging all over the floor. (Okay, and how about when you’re in a hotel or visiting family/friends. I was looking around on the internet for a solution and found this. It made the perfect little holder for my cell phone while it’s being charged. Holder for Charging Cell Phone And no more phone hanging down from the outlet while in this room or that room……..the cord and phone are now up off the ground, and tucked away into the little holder, while the phone drinks up a full charge. If you look closely, you can see that the orange print is fabric. And turns out, it’s pretty useful.
6 secrets I learned at makeup artist school - StumbleUpon total-beauty TODAY Style TODAY Jan. 12, 2012 at 9:50 AM ET Totalbeauty.com / By Sharon Yi, TotalBeauty.com You could say that I have a love/hate relationship with makeup. But then there are those days when my liner refuses to go on straight, my bronzer makes me look like an Asian Snookie, or my lashes refuse to curl. I had one of those days last week, and after walking into work wearing two very different winged tips on my eyes, my editor assigned me a new story: Go to makeup school and write about it. Want to see the best techniques I picked up without spending the thousands of dollars (and crazy amount of time) it takes to go to makeup school yourself? Lesson No. 1: Spend some bucks on your tools At Napoleon Perdis' Makeup Academy in Hollywood, Rebecca Prior, NP's National Educator, begins the first lesson by introducing us to our tools. Here are the eight basic brushes you need: 1. 2. 3. 4. 5. 6. 7. 8. Once you have your tools, you need to know how to hold them.
Re-purposing: Tshirts into 5-strand-braided-headbands I was walking through Target a few weeks ago and noticed this little knit fabric headband that was not just braided together…….but woven. I decided they were charging way too much for something that could be made with t-shirt scraps. And that means free. So there you have it. A nice and easy project to give my bad-hair-day head some love. (Or you may need one for working out. I kinda love it on my little girl . She always has little hair fly-aways that get into her face…….and this helps with that problem. It even works great with her hair down…..and keeps that hair tucked behind her ears. And yep, good for me too. Thanks little t-shirt scraps. Want to make your own? First, find some old t-shirts. Then, cut your fabric into long strips. Next, stack your 5 strips on top of each other and sew together at one end. Now, pull on each strip of fabric so that they kind of curl on the edges. But let me explain a little better. First, you’ll work on the left side. And that’s it. This post is sponsored by:
Homemade Hair Treatments - At Home DIY Hair Treatments - Womans Day - StumbleUpon Eggs, yogurt and honey are, at first glance, all components of a tasty breakfast—but they also happen to be hair treatment ingredients, and affordable, all-natural ones at that. And they're not the only ones. Did you know, for instance, that the oils in avocados more closely resemble our own skin's oils than any product in the beauty aisle does? For All Hair Types "The [raw] egg is really the best of all worlds," says Janice Cox, author of Natural Beauty at Home. To Use: For normal hair, use the entire egg to condition hair; use egg whites only to treat oily hair; use egg yolks only to moisturize dry, brittle hair, Cox says. Photo by Shutterstock. For Dull Hair Styling products (as well as air pollution) can leave a film that both saps moisture and dulls shine—but dairy products like sour cream and plain yogurt can help reverse this damage. To Use: Massage 1/2 cup sour cream or plain yogurt into damp hair and let sit for 20 minutes. For Itchy Scalp For Limp or Fine Hair For Frizzy Hair