
Seven Essential Sewing Skills & Sew,Mama,Sew! Blog Tasia from Sewaholic and Sewaholic Patterns wows us with her incredible style and sewing skills. Her blog is one of our favorite daily reads! Have you seen all of the gorgeous versions of her Lonsdale Dress out there on Flickr, Pinterest and your favorite blogs, all sewn up this past summer? Tasia inspires, and teaches along the way too; she is a fabulous resource for sewing techniques and more on her blog. We asked for some of her favorite tips for essential sewing skills and she shares them here today. Hello, everyone! 1. Helpful Links: 2. 3. Some great posts on pressing: 4. Here’s a great list of seam finishes to get you started! 5. There are plenty of zipper tutorials out there, but here are some great ones: 6. 7. « Hooded Tunic Tutorial Announcing: October Holiday Sew-Alongs + Giveaways »
Dog Boots Poor Lacey. Snow and ice get in between her toes when she goes outside during winter. It hurts so much, my snow dog stomps romping and digging and crumbles into a little ball from the pain. You try playing in the snow with bare feet. I bet it hurts too. I scoop her up and carry her home. As much as I hate putting clothes on dogs for the sake of putting clothes on dogs, I bought Lacey a pair of dog boots for Christmas. I didn't feel that way last weekend when I tried to exchange the boots for a size that fit Lacey. Seriously? The only thing left in Lacey's size in Store Number Three were a set of disposable dog booties made from recycled plastic bottle fabric. Time to make fleece dog booties! 507You will need: A patient dog (if all else fails, bribe them with treats) paper pen measuring tape fleece fabric sole fabric - leather, suede, or a waterproof fabric that has traction ribbon or elastic velcro scissors pins thread sewing machine Make it: 1. 2. 3. 4. 5. Sole! 6. 7. 8. 9. Pinning! 10. 11.
Clear Toy Storage Bags (with drawstring closure) Why do kids like toys with so many itty bitty little pieces? I guess it increases the fun factor. Tiny brushes. Tiny shoes. So that’s what I did. I made a clear vinyl cinched-up pouch……that she can easily tote around with her little rubber-clothed dolls inside. No more anxiety, wondering where all the little pieces of your children’s toys will go. Just bag it up and make it fun for them to put all their pieces back into their special bag. See? Now, just imagine a whole collection of these……filled with all sorts of things. A perfect way to keep things organized. Would you like to customize your own clear toy storage bags? Supplies: Main Fabric (The amount you need will depend on the size bag you make…….make your calculations below to decide how much you’ll need)Thicker Clear Vinyl (At Joann’s, I bought 17 gauge vinyl I think. First, choose what size bag you want. (Just as a mini math refresher course, the circumference of a circle is the measurement all the way around a circle.
Fabric Leash As promised I have finished up one doggie-inspired project and I am offering it here for you to try. It is really simple, pretty quick and I've got a few photos to walk you through it. Then after you're finished you can walk your dog with it. Materials:*one six foot length of cotton canvas strapping-whatever width you desire, but at least one inch*3 cut strips of fabrics, equal in length and width to your strapping*one of those metal thingermaginggins that latches to the collar, readily available at your hardware store*heavy duty sewing machine needles Step one: Stitch one strip of the fabric to the strapping-very close to the edges on each side. Step two: On the remaining 2 strips of fabric, fold the edges in and press so that the edges meet in the middle. Step three: Fold in lengthwise once more down the center and press so that raw edges are tucked away. Steps five, six & seven: Turn both ends back about a half-inch and run a stitch over a few times for a nice finished edge. xoxo,AM
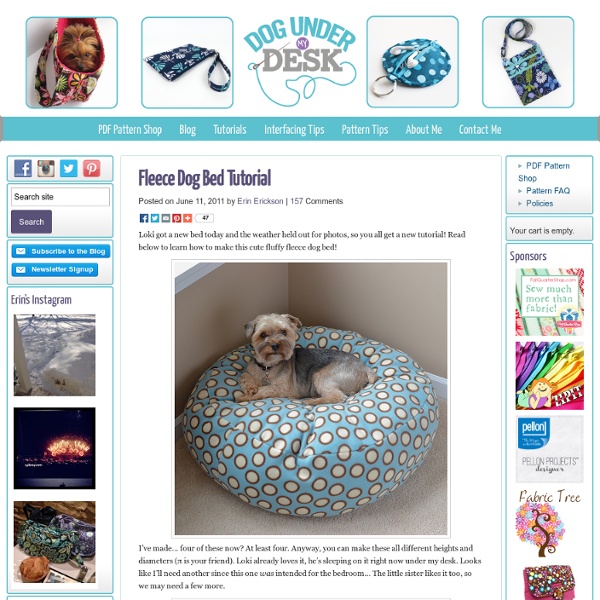
how to sew a circular skirt My apple green bedsheet dress had a circular bottom. This is how you make one. 1. 2. 3. 4. 5. 6. 7. 8. The final product would be worth all the trouble. And please please let me know if the instructions are clear. Quick Stitch Dog Bed Featured Project Quick-Stitch Dog Bed DIYStyle Vodcast Episode 7 Supplies Needed 1 yard of 45" print fabric for the Bed5/8 yard of polar fleece for the PillowMatching threadPolyfill1/2 yard VELCRO® brand sew on fastener 18" square pillow or pillowform Cutting Cut print fabric into two 18" x 45" pieces.Cut polar fleece to 19" wide x 50 Sewing To sew the Bed, place the print fabric's short ends, right sides together and stitch to form one long piece.Turn under 1" hems on each end, press, then stitch.Stitch long seam, right sides together, leaving an opening in the center, about 8" long for stuffing.Stitch each end closed, then apply VELCRO® tape, stitching along each edge of fastener to secure.Stuff tube with polyfill. Now, let sleeping dogs lie (in style). Fabric by Michael Miller Fabrics Download this Project (pdf) for your DIYStyle Notebook
Bohemian Infinity Dress… « Needles, Thread and Love I saw this dress as a project in vol. 4 of the Quick Stuff To Sew magazine. It was insanely easy to make and I love it so much! Its so flowy and bohemian… The dress is essentially a circle skirt with two really long straps sewn onto the front. You can wrap the straps around you in different ways to make a smorgasbord of dresses! Heres a link to a tutorial and some strap wrapping inspiration. The magazine shows you how to create a ton of different looks… it would be so perfect for traveling. Like this: Like Loading... Dogs Sewing Patterns married to a bmw Free Sewing Patterns: Dogs 06. Back to Free Sewing Patterns Dog Leash by Anna Maria HornerDog Collar and Leash by Sew4HomeAdjustable Dog Collar by Sew It Love ItDog Leash by Summer ThinksKimono Dog Harness by Acorn Market for Sew, Mama, Sew! Share this: Connect Search Categories Archives © 2011 married to a bmw. Design by picomol.
T-shirt to Toddler Dress Tutorial | All That Is Good Last winter I made my first forays into refashioning cast offs into clothes for my daughter. I posted about it in “Rags to Riches, the tale of a favorite t-shirt” . Several of you were interested in a more detailed how-to of that little project, so here we go… Remember! Knits are real forgiving. Don’t be mislead into thinking I know something you don’t know and that’s why my project turned out so well. Step 1 – your pattern.When sewing for Claire, I choose a favorite article of clothing she already has (perhaps something she’s growing out of and we know we’re gonna miss) to be my pattern. Step 2 – your cloth.The whole fun of this kind of project is taking something old and making something useful out of it again. Step 3 – cutting out. Front and back views of the waist seam and gathers Step 4 – Waist seamGather the top edges of the skirt to fit the bodice. Step 6 – SleevesLast step! Sew the armholes, trim your threads, and you’re done! OK, now it’s your turn!
pieced jersey pants for celebrate the boy! It’s that time of year, y’all… time to Celebrate the Boy! Can I tell you a secret? I think this is my favorite series in blogland. Since I always kind of saw myself as a ‘girl mom,’ I’m much more comfortable making dresses and accessories and goodies for GIRLS (just ask my sister/sister-in-law who receive way. too. many. dresses for my nieces). Which brings us to today’s tutorial! And I love the way they turned out! To make a pair of pieced pants for a little man in your life, you’ll need:-a pile of thriftstore bound t-shirts (when they’re pieced together, the rectangle they make is just short of a yard)-fabric pen -sewing machine and sewing supplies 1. 2. 3. 4. 5. 6. 7. 8. 9. Thanks for joining us to Celebrate Boys! While you’re here, want to check out a few other fabulous boy projects? 1- Burke and his friends LOVE his hanging tent! Cheers, friends!