
Night Sky Photography Tips | Night Photography Tips Star Trails Due to the Earth’s rotation about its axis, it seems that the light from stars moves in circles around the celestial pole. These movements are detectable after about 5 to 10 minutes, and can be traced by your camera in the form of a streak. Find the Right Location The best place to view and photograph the night sky is in the rural countryside because cities have artificial lights which cause a phenomenon known as light pollution. Use Long Shutter Speeds When photographing the night sky with a long exposure, exposures of 15 minutes or longer will show the rotation of the Earth. Auroras and Polar Lights Photographing the atmospheric phenomenon of aurora borealis is a challenge for photographers. Cloudy Skies As the light begins to fall, look at the cloudy skies. Recommended Settings Metering after dark can be a problem, so make sure you choose the best option for your particular situation. Recommended Equipment Conclusion You might also like:
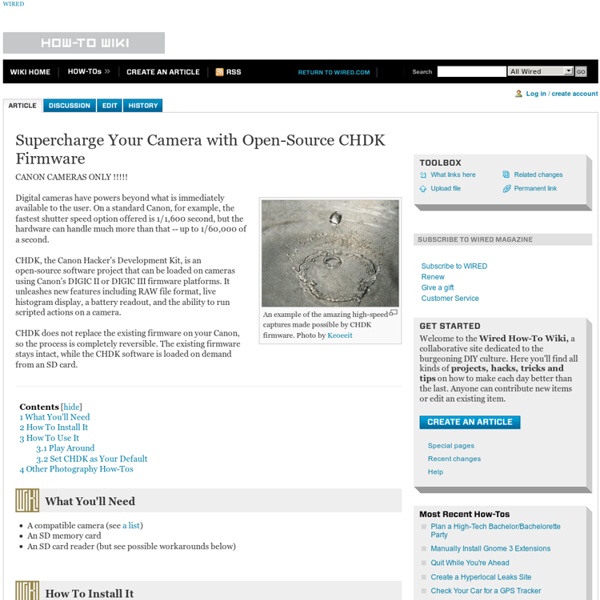
How-To: Expand your camera with CHDK As anyone who has lusted over the technical specifications for Canon’s new Digital Rebel XSi knows, the capabilities of the average point and shoot camera are severely limited. Using the CHDK firmware hack, the features of Canon point and shoot cameras can be significantly expanded, allowing for ultra-high speed photography, very long exposures, time lapse photography, and RAW capture. This How-To provides a guide to our experiences using the CHDK firmware, and shows just how easy it is to get more out of a point and shoot than ever thought possible. Installing CHDK The first step is to install the CHDK software. After installing, you’ll want to have the firmware autoload when you boot up your camera. Taking long exposures Long exposure photography is appreciated for its soft, sometimes surreal images of (usually) night scenes. Navigate to CHDK’s main menu and find Extra Photo Operations. Though the camera will not indicate the modified shutter speed, the changes will take place. next x
Turn Google Docs Into an RSS Reader and Feed Aggregator Learn how to use any Google Docs spreadsheet as an RSS Feed reader. You can also use the technique to embed RSS feeds into web pages. This tutorial shows how to use a spreadsheet in Google Docs as an RSS Feed reader. You can fetch RSS news feeds from different sources into one spreadsheet – much like a simpler version of Feedly – and then publish your feeds as a public web page. If you have a website, you can use the same trick to embed RSS feeds in web pages. Before we get started, let’s look at a real example. Here are the complete step involved for putting RSS feeds into Google Docs. Open a new Google spreadsheet and type the RSS feed URL in cell A1.
5 Great Ways to Reduce Noise in Your Photos Even though the low light capabilities of today’s cameras continue to improve, noisy images are still a common challenge among photographers. As much as we would love to capture photos with exposure settings that yield the cleanest possible image, many shooting situations call for us to make the choice between getting either a noisy photo or no photo at all. And until technology improves to the point that noise is a thing of the past, noise reduction is a skill that every photographer should be knowledgeable about. What Is Noise? Before diving head first into reducing noise in our photos, it’s important to have an understanding of what noise is and what causes it. In digital photography, noise refers to random, irregular specks and grainy patterns in an image. In photography, noise shows up in an image as we increase our ISO setting, creating grainy textures which get in the way of the details in the image that we were hoping to capture (the signal). Types of Noise The Noisy Photos 1.)
10 Embarrassing Mistakes I Made As A Beginner Photographer 1.1K Flares1.1K Flares × When I first bought my camera, I read the manual straight away; I used to take it on photo walks and read it before bed. This wasn’t really like me, but I knew I wanted to become good at photography and to do so, I was going to have to learn. There is now a sequel to this post! I NEVER Used Flash If you play around with your pop-up flash, you can see why I made this choice, and whenever anyone asked, my reasoning was ‘I don’t like flash’. Constantly On The Wrong Focus Mode A lot of the time when you’re taking a photo of something that is happening right in front of you, time is of the essence and one thing you can’t fix in post production is your focus. The Wrong ISO I had 2 problems with ISO, firstly, I knew what the ISO did to your photos in terms of quality and wanted nothing to do with it, so I set the ISO to 100 and left it there. Always Shot In JPG I really can’t encourage you enough to switch to shooting in RAW, as it allows you so many more options.
UBASIC/Scripts Important Remarks Edit The scripts posted below were written by CHDK users, and are contributed as is. Please note that prior to 2009 a number of special builds of CHDK were in general release and some used different uBASIC commands and features. Also, be aware that some of these scripts use CHDK's ability to simulate camera button presses. Finally, some of these scripts use the get_prop and set_prop commands. Scripts Intervalometers Edit Universal Edit Camera Specific Countdown Intervalometer is an easy to use intervalometer script suitable for the casual user. Special Purpose Intervalometers Universal Autoexposure Intervalometer Drivelapse : script for recording a time lapse from a moving vehicle. Sunset Scripts Bracketing plus >> Bracketing without a script. Kite & UAV Photography : a fancy intervalometer with advanced exposure control and USB interface for kite and uav photography Focus & DOF Stacking Motion Detection Zoom Video Other Old / Obsolete Lua Script Libraries Other Resources / Archives
Slideshow Maker and Photo Editor - Free - Flash based The Ultimate Guide to Shooting Milky Way Photography With the low light capabilities of digital cameras drastically increasing in recent years, Milky Way photography is booming in popularity. As a result, it is becoming more and more common to see photographers staying out past sunset and late into the night. The easiest way to ensure that you capture a compelling Milky Way photo is to do the proper research and preparation before heading out to shoot. So, before stepping out under a dark night sky, be sure to check out The Ultimate Guide to Planning Your Milky Way Photography, which covers everything from weather forecasts and finding the Milky Way to camera and lens selection. Once you have done the research, packed, and found yourself under a clear dark sky, it is time to get started. Arrive Early Between a busy schedule, fickle weather conditions, and living in a light-polluted city, I may only get one chance per month to get out to a clear dark sky for a Milky Way shoot. Go Manual Shoot RAW Long Exposure Noise Reduction White Balance
White Balance | Understanding White Balance in Digital Photography Color Temperature To understand the concept of White Balance, you need to first understand the concept of color temperature. Color temperature is a characteristic of visible light. It provides a method of describing these characteristics and is measured in Kelvin (K). How does the Light Affect the Color? You must have noticed some photos turn out with an orange/yellow cast if shot under tungsten lighting or a bluish cast if shot under fluorescent lights. Why to Adjust the White Balance? Since different sources of light have different color hues, a picture taken with a normal white balance under artificial lighting conditions transmits the low heat to the camera’s sensor. Preset White Balance Settings Auto – The Auto setting helps in adjusting the white balance automatically according to the different lighting conditions, but you can try other modes to get better results. Tungsten – This mode is used for light under a little bulb like tungsten, and it is often used while shooting indoors.
Learn where menu and toolbar commands are in Office 2010 - Outlook - Microsoft Office If your ribbon has disappeared and you are trying to find it, double-click any tab to maximize the ribbon again or see how to minimize the ribbon. We have downloadable interactive guides showing you where your menu and toolbar commands from Office 2003 are located in Office 2010. After a one-time download (1 for each Office program), you can open the guide and just click the command or button that you want to find and the guide will show you its location in the 2010 version of the program. They are great way to train yourself or your company after you’ve upgraded from Office 2003. Visit the Download Center to get guides for Office 2010