
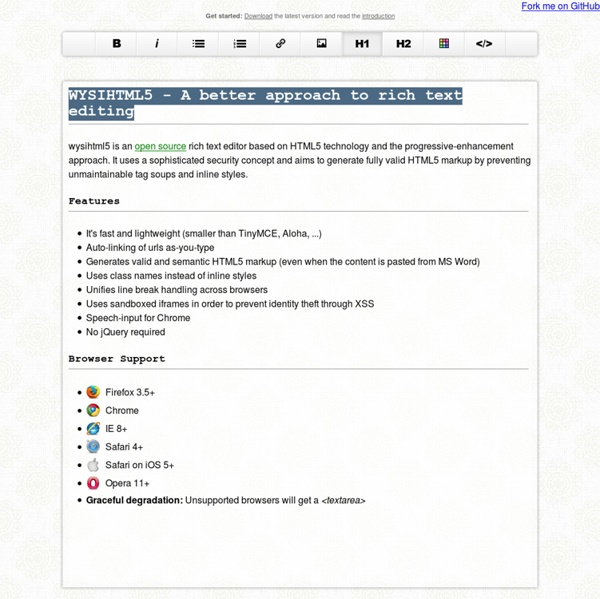
Plupload - A tool for uploading files using Flash, Silverlight, Google Gears, HTML5 or Browserplus 10 Feature-Packed Javascript WYSIWYG And Rich Text Editors WYSIWYG (What You See Is What You Get) and Rich text editor can be easily found in CMS (Content Management System, such as Drupal, WordPress, Joomla etc). There are so many of them, to carefully choose one that suit your needs, you will have to go through each of the features, examine its documentation and play with it for a while to make sure it suits your project. In this post, I have found 10 of the most updated, feature-packed WYSIWYG and Rich Text editor just to save your time. I have listed out most of the notable features and hopefully will save you some time. Mercury Mercury is a full featured HTML5 editor. TinyMCE is a platform independent web based Javascript HTML WYSIWYG editor control released as Open Source under LGPL by Moxiecode Systems AB.View and edit HTML codeHandles most text formatting, list, images, table and linksEnhanced Table creation with border customization etcCustomizable.
Angular directives for Bootstrap The $uibPosition service provides a set of DOM utilities used internally to absolute-position an element in relation to another element (tooltips, popovers, typeaheads etc...). getRawNode(element) Takes a jQuery/jqLite element and converts it to a raw DOM element. parameters element(Type: object) - The element to convert. returns (Type: element) - A raw DOM element. parseStyle(element) Parses a numeric style value to a number. value(Type: string) - The style value to parse. (Type: number) - The numeric value of the style property. offsetParent(element) Gets the closest positioned ancestor. element(Type: element) - The element to get the offset parent for. (Type: element) - The closest positioned ancestor. scrollbarWidth(isBody) Calculates the browser scrollbar width and caches the result for future calls. isBody(Type: boolean, Default: false, optional) - Is the requested scrollbar width for the body/html element. (Type: number) - The width of the browser scrollbar. position(element, includeMargins)
Pompage.net : le web design puisé à la source 9 Most Common IE Bugs and How to Fix Them Internet Explorer - the bane of most web developers' existence. Up to 60% of your development can be wasted just trying to squash out IE specific bugs which isn't really a productive use of your time. In this tutorial, you are going to learn about the most common IE bugs and rendering disparities and how to easily squash them or deal with them. Interested? 1. Centering an element is probably something every web developer has to do while creating a layout. Consider the Following Code: The output you'd expect: But what IE actually gives you: This is mainly due to IE6 in quirks mode and below not recognizing the auto value we set to the margin property. The Fix The easiest and most reliable way to center content for IE6 and below is to apply text-align: center to the parent element and then apply text-align: left to the element to be centered to make sure the text within it is aligned properly. 2. Almost every web developer uses lists to create his navigation. And the IE screen shot: Fix #1 3.
blueimp/Bootstrap-Image-Gallery 25+ Free JQuery Plugins For Doing Guided Tours Through A Website - ninodezign.com When you have a web application which requires some getting used to from your users, a walkthrough of the interface is in order. There are awesome jQuery plugins that easy guiding users and creating site/page tours. You would find these plugins really useful for improving your overall user experience on your website. They are stylish, customizable and simple to use. Check them out: 1 – intro.js Demo Download Intro.js is a simple and fast javascript plugin for creating better introductions to websites and features with step-by-step guides with keyboard and mouse support. 2 – Website Tour with jQuery Demo Download A little script that allows to create a tour on a website with jQuery. 3 – jquery joyride feature tour plugin Demo Download Joyride is extremely flexible and lets you take control of how people interact with your tour. 4 – Bootstro.js Demo Download Bootstro.js is a tiny JS library taking advantage of bootstrap’s popover to help guide your users around. 5 – jQuery myTour plugin 6 – Crumble
CSS3 Create - Démos, tutoriels et expériences CSS : menus, galerie photos, interfaces web.