
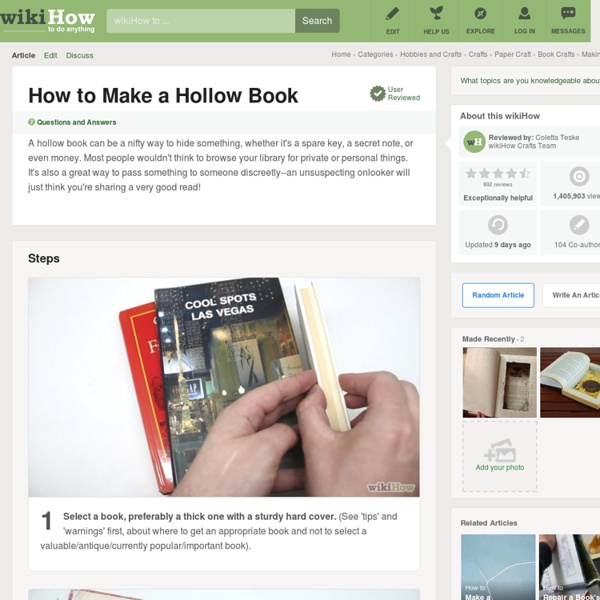
My Paper Crane: handmade goodies and plush! Paper Snowflakes | Gracious Rain When I first saw one of these elaborate snowflakes online, my immediate thought was, “Yeah, sure. Way too hard.” Then, I looked at the directions more closely and thought, “Well, maybe if I put my glasses on and wait until it’s totally quiet in the house and I can concentrate.” But after looking even closer I found that even if you have little kids running all over the place or you’re surrounded– as I am–by crazy people, the good news is: YOU CAN STILL DO THIS. I’m serious. I’ve already told you how I feel about hard stuff–I don’t participate. So if I can do it–baby, you can do it. You will need 6 squares of paper–any size…but the same size. I used a stick to hold this one up so I could take a picture of it. Click here for actual EASY step by step instructions and you’ll be making so many snowflakes that you’ll scare yourself. Carry on…
Cartoons Nuances Kids room Design from Kidtropolis - Home Interior Design Cartoons Nuances Kids room Design Here is the latest and greatest project by Kidtropolis which is took about 4 months of prep work and a 5 day install. Located in Mississippi This amazing fairy bedroom takes captivating fairytale themes and brings them to reality in a beautiful design meant to appeal to small children. Pink is the main color used and it goes great in combination with the other elements to create this incredible room. Cartoons Kids room Curtain Design Cartoons Mushrooms Chair Fairy Bedroom Design Cartoons Mushrooms Nuances Kids room Design Fairy Bedroom Door Design Tree Huts Cartoons Kids room Design Cartoons Nuances Kids room Shelves Design Fairy Bedroom Table Design Cartoons Kids room Flower Lamps Design Rounded Kids Bed Fairy Nuances Kids room Source…
How to Make a Snowstorm November 25th, 2013 Email 355 users recommend Say goodbye to hand-cut snowflakes taped to windows. Jeff Rudell A guestroom plays host to a man-made snowstorm. Hung like beaded curtains in front of windows, these snowflakes make a subtle, modern, and whimsical addition to any seasonal room décor. Photo: Jeff Rudell A friend of mine visiting from the tropics wanted, more than anything, to see snow. So, in contrast to my chandelier post, I offer a low-skill, high-impact project sure to surprise your guests (and your family) and help put you in the spirit of the season (regardless of whether the weather is cooperating with you or not). View 4 member project galleries posted in: Stay connected with CraftStylish We dare you to make your own gifts and decorations this holiday season! Find inspiration and exciting how-to projects to get you through the holiday season in DIY style.
EDDIE ROSS - No Wire Hangers! (Well, Maybe Just One) Here's a Christmas wreath so darling and dear, even Miss Crawford would approve. Take one of these... and bend it into the form of a circle. Then, grab your glue gun and as many round ornaments in varying sizes as you can find. To secure the metal cap to the ball, dab a little hot glue and press. Next, untwist the end of the hanger, then string one ornament at a time, making sure to alternate the placement and colors as desired. Check out the final result! I Love You Pop-Up Card Simply Vintagegirl Blog » Blog Archive » Tutorial: How to Make Lovely Fabric Flowers 29 May 2010 These elegant fabric flowers are very simple to make . . . and only take a few basic supplies. The finished product is delightfully lovely, and at times can look like a real flower! If you haven’t used those tea lights in a while, now’s the time! Supplies: · Synthetic Silky Fabric · Scissors · Candle (preferably a tea light) Additional supplies: · Needle and Thread, Glue Dots or Glue Gun · Buttons and/or Beads Directions: 1. Make the largest one’s diameter about half an inch larger than you want the diameter of the flower, as the petals will end up shrinking a bit. 2. You can also cut around the pattern and skip the drawing part, it just might not be as uniform . . . but with these, uniform isn’t necessary. 3. Cut just inside the drawn lines to make a circle out of the fabric. 4. Be very careful (please have adult supervision, this is rather dangerous), as it is very easy to get burnt. 5. Using a needle and thread, create a beginning knot and then sew the layers together.
Canning Jar Pincushion Tutorial Have you seen these new Ball® Wide Mouth Contemporary Styled Glass Preserving Jars? I love this little Half Pint size, especially if you turn it into a pincushion. I realize this is not a new idea and there are lots of instructions available for converting a jar lid into a pincushion, but I think maybe I should give you my version! Supplies Needed: Fabric Scrap of your choiceJar with lid and bandCotton balls or fiberfillCard StockGlue gun, not pictured Step 1: Using the lid of the jar, cut out a circle of the same size from the card stock. Step 2: Using the lid of the jar, trace around it on the wrong side of your fabric. Step 3: Layer the fabric, cotton balls, and lid then place the “sandwich” inside the band. Step 4: Press the lid down so that the cotton balls and fabric form the pincushion on the opposite side of the band. Step 5: Trim away any excess fabric and hot glue the cardstock over the fabric edges.
Wipe Off Weekly Menu Board I am a meal planner. I refuse to go grocery shopping without my week’s worth of meals planned out and list made. (It’s either that or wander aimlessly around the grocery store for two hours and then make ten more trips back during the week to get things I forgot.) Wipe-Off Menu Board Tutorial Supplies: Picture frame with glass front (I love these 12×12 frames I found at Ben Franklin for only $7!) 1. 2. 3. 4. Now everyone in the family knows what’s for dinner each week! I decided my frame would look better black in my kitchen, so I spray painted it black. Little Birdie Secrets are regular contributors to Make and Takes and was born from the crafting obsession of three friends living in the Pacific Northwest.
WASH YOUR MOUTH OUT! so...i was figuring that it's never too early to start washing your kids mouth out with soap...and now that can be done with these soapsicles!...lol...i'm thinking i'm not going to be asked to babysit anytime soon!...hee hee...anywho...thought i'd do up a tutorial on how to make these yummy tasting smelling soaps.... you'll need....a popsicle mold...this one's from go planet earth...but you can certainly use whatever mold you want...small soap bags...also from go planet earth...popsicle sticks...and large binder clips.... also...grab some clear melt and pour soap...glass measuring cup...soap colorant...i prefer liquid over the powder or gel...fragrance oils...and rubbing alcohol in a spritzer bottle... take your soap and cut up into chunks...and put in glass measuring cup...it takes about 2 1/4 ounces for one soapsicle...now that's solid weight...not liquid... once it's all melted...you'll want to spritz with rubbing alcohol...this takes the bubbles out of the soap... twistie tie 'em up!...
Handmade Tissue Paper Flowers and Pompom Garland You'd think after making hundreds of these for my wedding, I'd be completely sick of them. But I can't help it, I love them so much! I'm a little sad that I didn't save a bouquet of paper flowers from my wedding, but I never thought I'd want to see them again. So I made some for home, only this time as a garland... ...And as bedroom decor... ...And maybe I couldn't resist making just a few little blossoms... Want to make some? Materials: Tissue paper Heavy-duty scissors Floral wire Make sure you use a pair of scissors that you don't mind ruining, because they're going to take a serious beating here. For a package of 20" x 25" tissue paper, 8 sheets: Large flowers (Peonies): 16 per pack Small flowers (Carnations): 32 per pack Mini pompoms (Garland): 8 per pack Small pompoms: 2 per pack Medium pompoms: 1 per pack* Large pompoms: 1 per pack *There will be enough paper leftover from a medium pompom to make flowers or mini pompoms The flowers are easiest, so lets start there. And here's completed!
Handmade Salt Pouches For The Shower Or Bath I love salt scrubs, especially this time of year when I want to slough off the dead skin from winter, and I equally love bath salts for the skin softening ingredients in them – but more often than not I find myself in the shower. These pouches are perfect for combining both bath salt and salt scrub into an exfoliating pouch I can bring into the shower, and they are simple to make. You can go a few different routes when making these so play around with your recipes and find your favorite. 1 cup sea salt – Coarse because it holds up better in the water for exfoliating1 cup Epsom salt – Anti-inflammatory, skin softener among other things1 cup powdered milk – Skin conditioner, gentle exfoliate1 cup baking soda – My mom has hard water, this will soften it15 drops of Peppermint essential oil – She is up before dawn and needs a pick-me-up A few different ideas for a mix: Start with 6 cheap washcloths. Folded in half, cut them into thirds. Still folded, sew along each side leaving the end open.