
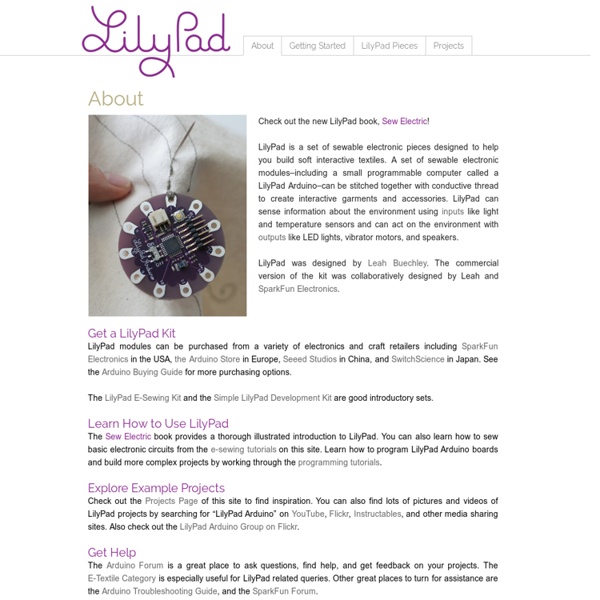
Textile intelligent Un article de Wikipédia, l'encyclopédie libre. Robe intégrant des LED et fibres optiques Les textiles intelligents, de l'anglais smart textiles, également trouvés sous l'appellation e-textiles pour electronic textiles, sont des textiles capables de capter et d'analyser un signal afin d'y répondre d'une manière adaptée[1]. Ils peuvent donc être décrits comme des textiles capable de réagir "par eux-mêmes" en s'adaptant à leur environnement. Ces textiles peuvent pour cela incorporer des composants informatiques, numériques ou électroniques, mais également des matériaux polymères innovants comme des polymères à mémoire de forme ou des matériaux chromiques aux propriétés de changement de couleur, ainsi que des fibres et matériaux innovants. Historique[modifier | modifier le code] Au milieu des années 1990, une équipe de chercheurs du MIT dirigée par Steve Mann, Thad Starner et Sandy Pentland a commencé à développer ce qu'ils ont appelé wearable computer (en) (ordinateur mettable).
fabrickit : fabrickit Adafruit GEMMA v2 - Miniature wearable electronic platform ID: 1222 - $9.95 Love FLORA but want a bite-sized version? Look no further, GEMMA is a tiny wearable platform board with a lot of might in a 1" diameter package. Powered by a Attiny85 and programmable with an Arduino IDE over USB, you'll be able to realize any wearable project! We wanted to design a microcontroller board that was small enough to fit into any project, and low cost enough to use without hesitation. NEW In version 2! The Attiny85 is a fun processor because despite being so small, it has 8K of flash, and 5 I/O pins, including analog inputs and PWM 'analog' outputs. Even though you can program GEMMA using the Arduino IDE, it's not a fully 100% Arduino-compatible. GEMMA does not have a Serial port connection for debugging so the serial port monitor will not be able to send/receive data Some computers' USB v3 ports don't recognize the GEMMAs bootloader. Here are some useful specifications! Super small, only 1.1" / 28mm diameter and 0.28" / 7mm thick.