
Making reversible bag from top of straps to bottom of bag: 50 cm / 20 inchesheight: 28 cm / 11 incheswidth: 40 cm / 16 inches I don’t know because I used leftover fabric for my bag. You can print the pattern and place it on your fabric to make an approximation. It is only one piece of pattern. Fort similar bag, you can check Charlie bag by Burdastyle ($1.99). It is a bit bigger and has squared bottom. Please go to the bottom of this post to download the PDF pattern and tutorial. Disclaimer: You may use the finished products for both personal and commercial use (craft shops or markets only – no mass production). 1. 2. If you use my pattern, sew the darts before sewing the bottom and sides of bag. 3. 4. 5. Pull out each of the remaining straps. 6. 7. 8. 9. 10. A reversible bag! Thank you for reading and I hope this post is useful for you! Click to download:
Casserole Carry-All Sewing Pattern 5 August,2014LindaM Carry your favorite casserole or dessert in style with this insulated carrier with wooden spoon handles! Conveniently created to hold your favorite 9″ x 13″ casserole dish or an 8″ x 9″ dish just by selecting different hook and loop tape configurations, this casserole carrier is perfect for all of your parties and potlucks. Instructions included for a matching pot holder. It’s perfect for hot or cold dishes. Sewing Beyond the Basics – Kitchen Accessories Take your beginner sewing skills to intermediate and impressive in this sewing class that includes 9 great kitchen projects. More Patterns and Tutorials
Boho Sling Bag Tutorial | The Destashification Project Boho Sling Bag Patchy Boho Sling Bag The Boho Sling Bag – plain or fancy. A sewing project for everyone – regardless of their sewing pedigree or experience! The Boho Sling Bag seems to be fairly popular among those that could form the next generation of needle-artists. This Tutorial starts with the “plain” bag. Select Fabrics Just a few items are required to make the Boho Sling Bag. About the fabric: I have a HUGE STASH of fabric (thus “The Destashification Project”), but if selecting fabrics require purchase, here are some suggestions. Boho Bag Pattern Sketch The purse requires four of the pieces shown in the pattern sketch. Four pieces are needed because two for the outside of the bag and two for the lining. Each piece requires approximately 1/2 yard of 45″ wide fabric. Two purse bases (the bottom of the purse) will also require two 8 by 12″ rectangles (download the pattern for boho bag base here – no enlargement required) and the inside pocket requires another rectangle that is 18″ by 13″.
Des patrons de couture gratuits - Des patrons expliqués pas-à-pas Des patrons de couture faciles Qui n'a pas souhaité se coudre un vêtement ? Du patron, à la confection, en passant par la customisation, il est possible aujourd'hui plus que jamais grâce à internet de trouver des patrons gratuits pour coudre ses habits ou les transformer. Grâce à des patrons faciles et gratuits à télécharger ou à reproduire, chacune, débutante ou plus expérimentée, peut se constituer une garde-robe à l'image de son tempérament. Ne résistons plus à l'envie de nous faire une robe ou une jupe, pionchons dans les patrons de couture ou les modèles de tricot pour nous offrir la garde-robe de nos rêves. Le best off des patrons de couture Free pattern sewing : obi apron par Prudence Rabbit Mardi 10 août 2010 2 10 /08 /Août /2010 11:59 En fait j'ai flashé sur le modèle gratuit du Burda Style Blog du tablier à ceinture obi intégré et découvert une créatrice super fascétieuse : Prudence Rabbit. Un joli tablier habillé et féminin à souhait pour cuire les macarons, n'est-ce pas miss Cecile ! Cette petite ingénue gourmande m'envoit des photos de milliers de macarons colorés pour me tenter. Comme je me doute que vous désirez savoir où trouver le patron couture : cliquez ici (il faut être membre du Burda Style Blog pour avoir les patrons, c'est gratuit). Pour le blog de la jolie et talentueuse Prudence Rabbit, venez donc voir ici. Alfafa Partager l'article ! inShare Par Alfafa - Publié dans : Tutos couture ludiques
tuto du très grand sac de plage Fournitures: 3 tissus assortis 100x140 de tissu fleuri 40x140 de tissu rayé 70x140 de tissu uni 1 fermeture éclaire de 18 cm 1 ruban de 10 cm 1 gros bouton découpe du tissu: dans le tissu rayé découper 2 bandes de 15x70 cm et 2 bandes de 11.5x 85 cm dans le tissu fleuri découper 2 bandes de 40x70 cm =corps du sac. 1 bande de 37x70cm = la grande poche intérieure (1 bande de 24x26cm 1 bande de 24x6 cm) pour la poche zippée 1 bande 20x27 cm = la poche à portable 2 bandes de 40x30 cm = le rabat dans le tissu uni 108x70 à découper après le montage de l'endroit du sac afin de vérifier les dimensions obtenues après couture la doublure doit avoir la même dimension que l'extérieure Montage de l'extérieure du sac bien noter ces dimensions et couper dans le tissu uni un rectangle de dimensions identiques. faire un ourlet dans un des deux grands côtés de la bande de tissu fleuri de 37x70cm Faire deux coutures droites sur la totalité de la poche dans le sens de la hauteur afin de la compartimenter
Handmade by Julie | Couture : créations, cadeaux et tutoriaux Quel tissu ,quelle aiguille,quel fil ? - Le blog de jean louis Le tableau 1 permet de connaitre quel fil utiliser (référence étiquette)en fonction des matières à assembler Le tableau 2 permet de déterminer quel est le diamètre d'aiguille à utiliser en fonction du fil utilisé Le tableau 3 permet de déterminer quelle type d'aiguille à utiliser en fonction des matières à piquer Fils * La référence mentionnée dans le tableau (Numéro d’étiquette) est celle marquée généralement, sur la bobine Plus le numéro d’étiquette est petit plus le fil est gros dans la norme " NM :numéro métrique" par contre si on utilise la norme officielle "TEX" c'est l'inverse Exemple : Une bobine marquée NM 40 ou 25 TEX a un fil dont le diamètre est plus gros qu’une bobine marquée NM 80 ou 12,5TEX * Le marquage sur la bobine est une référence fabricant et ne correspond pas obligatoirement à une norme (Tex, Nm …) * Il est fait abstraction dans ce tableau des fils nylon, polyester, mercerisés etc Aiguilles * Le diamètre de l’aiguille est exprimé en 100ème de millimètre (pointe à bille fine)
Simplicity Patterns | Sewing Patterns | Simplicity Patterns UK growmama: Tutorial - vintage taie d'oreiller au panier This is the long awaited tutorial detailing how to make your own shopping tote bag from a vintage pillowcase. The blogpost i wrote about the design a few years ago (HERE) has had thousands and thousands of hits and many of you asked for a tutorial....here it is: (in timely fashion...they make great holiday gifts!). If you are looking for the Sew Mama Sew Giveaway post, click HERE. Take your vintage pillowcase. Iron pillowcase to begin. Unfold the top of the pillowcase. Sew handle. Turn inside out. Fold over and pin to create a hem out of the raw edges. Sew. Box the corners. Turn your bag right way out and iron. Take one of the scrap pieces, zigzag the edges and iron to create a pocket. Add a bit of velcro to keep the pocket's contents safe. And there! Update: in response to all your requests, i have posted a tutorial on how to box corners, the technique i use in making this bag.
Tutorial: shirring with elastic thread - Made By Rae I know that a number of you out there are terrified by the concept of shirring with elastic thread. You Fear the Shirr. Shirring is sewing with elastic thread in the bobbin of your sewing machine to create a “smocked” appearance on your fabric (it’s not actually smocking, though; true smocking is a decorative stitching technique done on pleated fabric…my grandma used to hand-smock dresses for me back in the seventies and eighties). [pinterest] I completely sympathize with those of you who are intimidated by shirring, because when the shirring trend started to get really hot a few years ago I just could NOT get it to work on my machine — and, after attempting it a few times, I just about threw my sewing machine out the window. I use a Bernina Activa 220, which has a front-loading bobbin. First, let’s talk about elastic thread. Okay, grab your elastic thread, and let’s get started! Place the bobbin case in your machine. This blog is proudly sponsored by
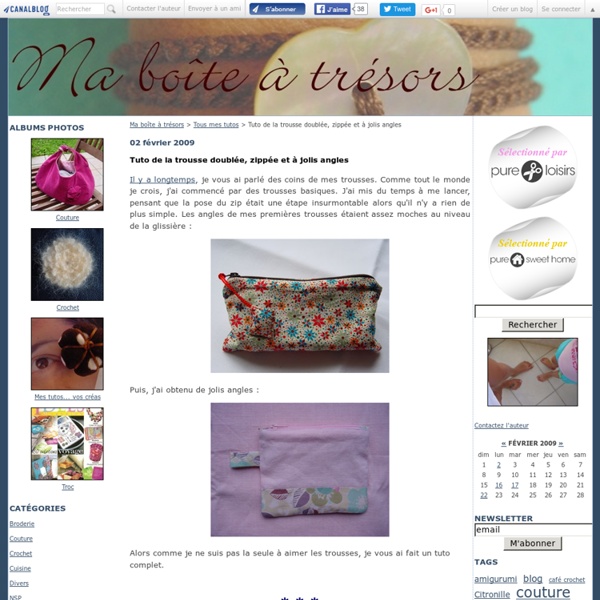
monatelier.frblog.net - Blog mon blog : Tuto pochette très pratique J'ai trouvé cette pochette super mignone et très pratique alors je m'en suis inspiré pour faire celle d'Isabelle. Voir aussi ma pochette en cliquant ici. C'est une pochette dans laquelle on met tout son bazar (clés, papiers, crayons etc ...) et quand on change de sac, on a juste à prendre la pochette ! Voici comment je l'ai faite, sachant qu'il y aura des améliorations. 1/ Il vous faut un tissu de 80 cm sur 31 cm minimum en tissu souple imperméable (genre toile de tente ou rideau de douche). (Si vous souhaitez mettre une doublure, ajouter un morceau de 30 cm sur 31 cm) Couper les pièces comme indiqué ici, en ajoutant 1,5 cm pour les coutures, sauf pour le haut des pièces dites « côté » où on ajoutera 3 cm (voir schéma). 2/ faire l’ourlet haut des poches 3) Mise en place et couture des poches extérieures .Assembler les parties poches aux « côtés » par un surfil en bas (dos des poches sur devant des côtés) . Positionner vos objets et marquer l’emplacement des couture des poches. Coudre.
tunique robe.facebook_767021611 Tutoriel robe par LauraTolton sur deviantART