
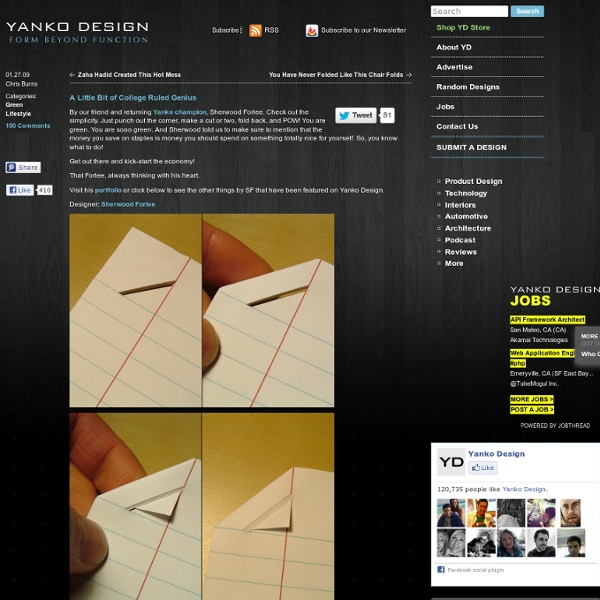
Origami Lucky Star Folding Instructions - How to Make an Origami Star The origami lucky star is fairly simple to make. It's a popular tradition to fill up glass jars with these lucky stars. Made this origami? Comment and Submit your photo using the comment box at the end of this page! Start with a strip of paper, about 11 inches long by half-an-inch wide. You can make this strip by cutting a piece from the long end of a sheet of computer printer paper: Now make a knot near one end of the strip, as shown in the next three (3) photos: Flatten the knot as shown, but don't crease it as tightly as you would for standard origami folds. Now flip the knot over, and tuck the loose end into the back of the knot as shown: Now we'll start wrapping the long end around the star. Now the second: Third and fourth: Fifth and sixth wrap: Seventh and eighth (final) wrap shown below. Now we've flipped the lucky star over, and we're tucking the loose end into the back side. Here's what it looks like when the wrapping is complete: Now the fun part, inflating the star! Very nice, Sophia!
>How-To: Newsprint Manicure « A Pretty Penny I saw this newsprint manicure over on The Daily Nail and thought it was adorable (especially for bookworms and word lovers like myself). I did a little Google detective work to see how to recreate it, and was surprised at how easy it is! All of the tutorials I found called for vodka or other clear distilled spirits, but we were fresh out. Like this: Like Loading...
Lovely Package® . The leading source for the very best that pack How to Make a Magazine Reed Box April 17th, 2009 Email 262 users recommend Tightly rolled magazine pages make gorgeous reeds, which you can use to cover all kinds of things. Diane Gilleland You can use ad pages, article pages, or text pages to make your reeds. Here's a simpler magazine reed project: covered picture frames. Photo: Diane Gilleland 1 | 2 | 3 | 4 | 5next> View all I'm getting fairly obsessed with magazine reeds these days. What you'll need: Magazine pagesTwo bamboo skewers (the narrowest ones you can find)Glue stick (see note below)RulerPencilAleene's Tacky GlueMoist towelSharp, strong scissorsSmall boxMod Podge and brush A note on glues: For this project, you'll want a glue stick that sticks strongly and isn't too wet. Incidentally, you'll end up with a lot of glue on your fingers during this project! Part 1: Make a Magazine ReedFirst, tear out a pile of magazine pages. Fold each page in half lengthwise, as shown. View 4 member project galleries posted in: recycled, recycled magazines, magazine
How To Steal Like An Artist (And 9 Other Things Nobody Told Me) - Austin Kleon Wednesday, March 30th, 2011 Buy the book: Amazon | B&N | More… Here’s what a few folks have said about it: “Brilliant and real and true.” Read an excerpt below… Tags: steal like an artist
Giant Paper Rose Flower If you loved the beautiful DIY wedding this morning and Nata’s gorgeous paper flower bouquets, you are in luck as Nata is sharing how she crafted them with us! She was inspired by a template created by Morgan Levine on Martha Stewart (as was I in the flowers I created for this styled shoot). I just love that this basic idea has inspired different brides to create their own version of giant paper flowers – you might remember these equally awesome giant paper flowers from this wedding I shared last year. :) Thanks so much Nata for sharing how you created your giant pink paper rose + special thanks to Studio Castillero for the photos of the DIY + her wedding! Materials (to make one giant rose) Step 1: Cut the petals Cut 5-6 teardrop petals and 15-6 heart-shaped petals from the petal colored crepe paper. IMPORTANT: Crepe paper is directional so it matters which way you’re cutting the paper. Repeat until all of your petals are cut Step 2: Cut the leaves + calyx Step 3: Make the rose stem
60 Small Ways to Improve Your Life in the Next 100 Days Contrary to popular belief, you don’t have to make drastic changes in order to notice an improvement in the quality of your life. At the same time, you don’t need to wait a long time in order to see the measurable results that come from taking positive action. All you have to do is take small steps, and take them consistently, for a period of 100 days. Below you’ll find 60 small ways to improve all areas of your life in the next 100 days. Home 1. Day 1: Declutter MagazinesDay 2: Declutter DVD’sDay 3: Declutter booksDay 4: Declutter kitchen appliances 2. If you take it out, put it back.If you open it, close it.If you throw it down, pick it up.If you take it off, hang it up. 3. A burnt light bulb that needs to be changed.A button that’s missing on your favorite shirt.The fact that every time you open your top kitchen cabinet all of the plastic food containers fall out. Happiness 4. 5. 6. How many times do you beat yourself up during the day? 7. Learning/Personal Development 8. 9. 10. 11. 12. 13.
100 Years of Illustration George Hand Wright, N.A. (member of the National Academy) was an extremely prolific illustrator, watercolor painter and printmaker with a long lifetime of work and achievement, but not much seems to have been documented about his personal life beyond the fact that he was born in Pennsylvania in 1872 or 1973 and died in Westport CT in 1951, where he had been one of the founders of that community of illustrators who worked for publications in New York City. Walt Reed mentions him in his excellent work, "The Illustrator in America 1900-1960s." I'll be posting more work by this prodigious illustrator and have selected this batch to coincide with the Independence Day holiday being celebrated this weekend. Click on images to enlarge them. This is the title page of a lead article in which both author and illustrator described the wartime scene in the nation's capitol after troops had been mobilized by enlistments and conscription and the city appeared to be bursting at its seams.
How to Make Paper Pencils (tutorial) I have always wanted to make my own pencils, but the thought of shaping two pieces of wood to allow a piece of lead to sit perfectly inside made me think it wasn’t worth the effort. For some reason I was looking at some pieces of lead I have (for a drafting pencil) and “pop” there it was.. a solution to my DIY longing. Here is a tutorial to make pencils that is so ridiculously easy I’ve made 10 pencils since the idea came to me yesterday! Enjoy. Paper: I recommend using 6″ origami paper. Here’s a video I made so you can watch me make it from start to finish! I have to admit I really enjoyed doing this craft. Hope you’re just as excited about this as I am! leads {here} paper {here} mod podge {here} {If you like pencils, you may also like my toadstool pencil craft!} Share 16K+ Kimanh Hi my name's Kimanh.