
Tutorials for Recycling T-Shirts So way way back, in June, I wrote this Studio Organization post, about starting the process of organizing my studio by cleaning out the closet full of junk. Well, it's September and...let's just say the closet is a work in progress. Some of the things that are taking up space in the closet are shirts that I never wear anymore. I realized I could repurpose them into something else! Here are some tutorials for recycling shirts: Check out these t-shirt scarves! Create cute little bows for accessories or packaging with this tutorial. Gorgeous ruffled pillow tutorial here. Looks like I have a lot of projects ahead of me to keep me from cleaning out my closet!
Tissue Flowers Tutorial, No.2 - gingerandgeorge A couple of months ago, Jenny - the very lovely editor of PaperCraft Inspirations - asked me to work up a feature on different ways to use tissue paper. You can see the results in the September issue (on sale right about now), and alongside ruffles, twists, layers, buttons and twirly skirts, there's a miniature version of an old tissue-paper favourite. I made these flowers for Halloween a couple of years ago, and although the large scale can look fantastic on card projects, it doesn't leave room for very much else. By scaling it down, you create a much more versatile embellishment and your tissue supplies will stretch a little further, too. Tissue paper (plain or patterned) Scissors Ruler Pencil Thin wire (e.g. fuse or jewellery wire) Small button or circle of card PVA glue Measure and cut out two strips of tissue paper, each around 20cm long and 5-6cm wide. Cut a small piece of jewellery wire and wrap around the centre of your folded tissue. x
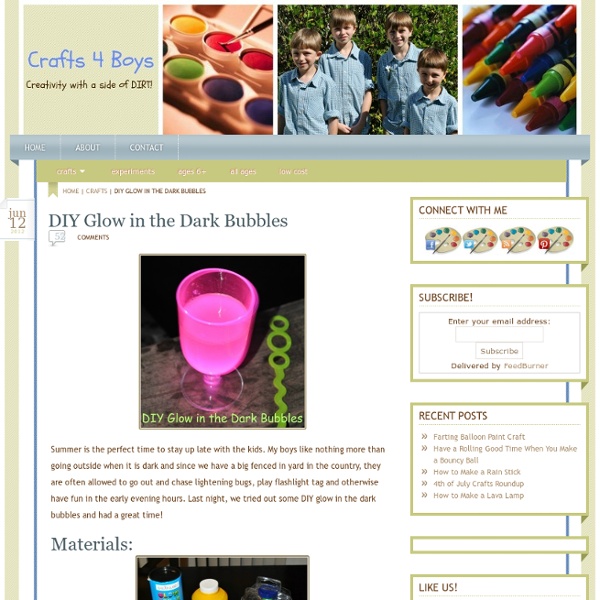
creative little daisy: Have you priced vintage blue canning jars lately? Wanna make your own really cheap? I bought these probably five years ago at an antique/consignment store. I think I paid about 12 dollars for a set of four. Now you can expect to pay at least that for just one. Last night I was cruising around the internet and happened upon a link to a tutorial using mod podge and food coloring to make your own. This afternoon I decided to play around with some mod-podge and food coloring myself. Just pour some mod podge into one of your jars. Add a few drops of water to thin down just a bit. You want to get as much of the mod podge mixture out of the jar as possible so you don't have a big glob of dried gunk in the bottom of your lovely jar. This is how it will look wet. I'm pretty sure I read somewhere about heat setting paint on glassware by baking it at a low temp, so I set my oven on the lowest setting it would allow, 150 degrees and popped them in. I took this after they had cooked for about 20 minutes. And for the finished product, drum roll please..... Not too shabby, eh?
How to Make Leaf Skeletons I wanted to share with you a project from one of my readers who shares with us how to make leaf skeletons. I LOVE this! I have several leafs in various forms displayed in my home and knew I needed to make some of her leaf skeletons to add to my decor. I love how a pattern of leaves can enhance the beauty in your home. So I asked Heather if she would mind sharing her project with you. You can find more great projects from Heather at her blog The Other White House. I have spent hours and tried various ways of making these. You need washing soda, not baking soda! Gather your leaves. Washing soda is a strong base so you may want to wear gloves when handling the leaves. You will add 3/4 cup of washing soda and 4 cups of water to your pot of leaves. Keep going, you will need to add more water so your pan doesn’t dry out. When 1.75 hours are up fill a glass baking dish with cool water. I carefully removed them and rinsed with water and added clean water to the pan. 37.1Kstumbleupon
DIY projects Our Favorite Craft Supplies: Glue These are the types of glue that I use most often for Oh Happy Day projects. I’m a super fan of the Quick Dry Tacky Glue. I use it any time I am doing paper projects (It’s seriously the best!) Click through for details… (more…) Gold Medal Badges by Kathleen Ballos Do you have a favorite event in the winter olympics? Click through for instructions… (more…) Favorite Party Ideas This Week 1. (and I don’t give out that praise lightly!) How to make an easy and stylish paint chip mobile for your nursery Supplies: Wooden knitting ring Assorted paint chip samples in colors of your choosing Spray adhesive (optional) Circle punch Sewing machine Tape Punch out piles of circles from your paint chips samples. I had about 20 circles in each of the 5 colors. Paint chips are one-sided so you’ll have to either glue two together or sew them together when you’re making your strings of circles. Line them up in piles next to your machine the way you’d like them to hang from the mobile. Hold them together and run a running stitch through the middle on your machine making sure to start with plenty of string at the beginning since we’ll be using that string to tie it to the mobile when we’re done. Remove the inner section of the wooden knitting ring (by loosening the knob). Cut four pieces of string or fishing wire, tie and tape them evenly around the circle as well. Tie another long piece of string or wire to the knot and attach to a nail on the ceiling to hang.
Tricks + Treats: Graphic Soaps by Sarah Rhodes Hi, It's Sarah from Team Rhodes Weddings! I am going to share a simple soap DIY with you this morning. Enjoy! Shopping list: - clear glycerin (found at craft stores) or you can recycle clear soaps of your own.- essential oils for lovely smelling soaps- a small milk carton- tracing paper, book pages, transparency paper, any kind of paper, or pretty fabric squares. Have your artwork to put in soaps ready before you start! Over low heat, melt your glycerin in a pot on your stove. Add your oils! Once all the glycerin is melted, pour it into your milk carton. Put the whole carton in your freezer for quick setting! Once you're done with all of them, and they're all solid, then tear off the carton around the bars. Thanks, Sarah!
elsie marley & Blog Archive & the quick little bunny tutorial I really wanted to make the sock bunny that Heidi (from My Paper Crane) created, but I didn’t have any of those fantastic red and brown monkey socks. What I do have is baby socks: tons of cute, mismatched, totally useless, never stay on baby socks. Now that my littlest is very much not an infant and too soon will be a toddler it seems kind of silly to keep all those teeny tiny socks. This is indeed a quick little bunny. Materials: baby socka handful of stuffingheavy duty threadscissors Make that bunny: Before you start sewing take second to look at the sock you have. the body: Take some stuffing and stuff the foot part of the sock–not too tight! the tail: On the top of the bunny’s back, sew a circle about an inch in diameter with a simple running stitch. the head: To make the head, put a little stuffing inside the sock and sew a running stitch around the top of the heel. the ears: Cut a big V shape out of the top of the sock. The attitude:
Do-it-Yourself DIY String Wedding Lanterns Yarn Chandeliers Jessica of Wednesday Inc shows us how to make those gorgeous twine chandeliers from the inspiration shoot she shared with us this morning. Using balloons, glue and twine, you can also make these lanterns for your wedding – and then bring it home and use it as your very own mid century lampshade. What you will need are: balloons, glue, yarn, tray for glue, corn starch 1/2 cup of Corn starch, 1/4 cup of Warm water, clear fast drying spray paint, hanging lamp cord or fishing line (depending on your desired final product), and a lighting kit if you’re looking for a fully functional lantern. Jessica recommends using a sharpie to mark on the inflated balloon how much room you need to leave for the lighting cord. Are you getting excited to try to do this at home as much I am? Instructions: 1.
Paper Flowers - Anyone Can Do That | FindInspirations.com Japanese Kusudama, this tutorial is featured on Craftuts Anyone can do that, I assure you. The proof: I can, just take a quick look at my result below. Below you can see my very first attempt to create paper flowers. What you will need to make your own Kusudama paper ball? 1. 3. 4. (optionally) I prefer torn paper instead of cut. You have to start with a single petal. Now you have to glue your 5 petals into a flower. Apply the glue to only one side of each petal, except for the last one, in this case cover both sides with glue. Your first flower is done. Don’t glue every petal right after you make it. When all 12 flowers are finished you have to glue them together. When two halves of Kusudama Flower Ball are ready you have to glue them together.
Making a Composition Book Art Journal.... Can you believe that this….. …..was once this: It took a lot of work but now the journal below is FULL of memories, notes, lists, drawings, etc. It is a simple process and you will get so much enjoyment out of it. Here is how you can make your own: The cover is the easy part. Then I poke holes in either side of the journal and thread ribbon through. Sometimes I’ll use gesso (gesso is pictured further along in the post) to paint over some letters to decorate the cover as well….. …I love the messy, haphazard image that is left behind. The next step is to thicken the pages. Place wax paper underneath 2 pages of the journal to protect the other pages. Paint matte medium on the bottom page to glue the top page to it. Take a brayer and roll out any air bubbles. Next, I take old phone book pages and use the matte medium to glue them onto the top page. Keep adding scrap phone book pages until the page is covered. Here is the journal closed with wax paper in between the wet pages. DIY Journal Ideas