
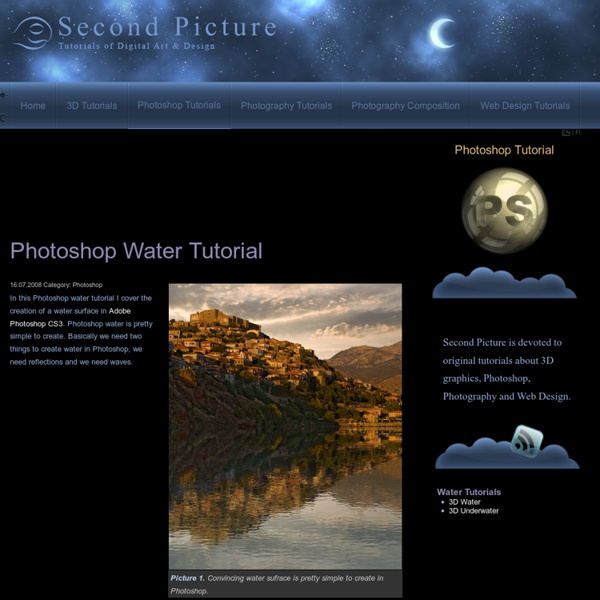
http://www.secondpicture.com/tutorials/digital_image_processing/photoshop_water_tutorial.html
The Fallen Angel – Photoshop Tutorial The Fallen Angel – Photoshop Tutorial 5 (100%) 2 votes I’m quite excited about this tutorial. It’s more about body retouching techniques than manipulation because I will show you how to smoothen skin, add hair, makeup and of course how to get to the result you see on the preview. How To Make a Cool Cinemagraph Image in Photoshop No doubt you’ll have heard of the term Cinemagraph since it exploded onto the Internets. Originally coined by Photographers Kevin Burg and Jamie Beck, a cinemagraph is a clever revival of the classic animated GIF. It combines features of video and photography to create a the illusion of a still image but with cool motion effects. Let’s take a look at how to create your own animated GIF cinemagraph by playing around with Photoshop’s animation tools. Some of the best cinemagraph examples can be found on the creators’ own website. Their original cinemagraphs from New York Fashion Week capture moments just like an ordinary photograph, but also preserve that living moment in time to re-experience endlessly.
Photoshop Illustrators Network Group News Cloth Fold Sculpting - Zbrush tutorial Happy Tree Friends - Fall Out Boy | The Carpal Tunnel Of Love • MUSIC VIDEO Photoshop HDR Second Picture is devoted to original tutorials about 3D graphics, Photoshop, Photography and Web Design. HDR Photography Elsewhere 19.02.2008 Category: Photoshop Tutorials Picture 1. Revealing Dita Von Teese in a Fully Articulated 3D Printed Gown Last night at the Ace Hotel in New York to a crowd of uber-cool fashonistas and paparazzi we revealed the 3D printed gown designed by Michael Schmidt and Francis Bitonti modeled by queen of burlesque Dita Von Teese. The fully articulated gown based on the Fibonacci sequence was designed by Michael Schmidt and 3D modeled by architect Francis Bitonti to be 3D printed in Nylon by Shapeways. The gown was assembled from 17 pieces, dyed black, lacquered and adorned with over 13,000 Swarovski crystals to create a sensual flowing form. Thousands of unique components were 3D printed in a flowing mesh designed exactly to fit Dita’s body. This represents the possibility to 3D print complex, customized fabric like garments designed exactly to meet a specific person or need.
Simply For You – Manipulation Tutorial Simply For You – Manipulation Tutorial 5 (100%) 1 vote Adjustment Layers will be used extensively in this tutorial. You will see how to use Fill layers as well as other adjustment layers to create ambient color and special effects. Learning Resources for Adobe Photoshop - Tutorials Written by RossJune 17, 2008 Here we will create some thin flowing lines that look as if they emit light. This technique is fairly simple and is a great way to create an abstract wallpaper or looks good integrated into another image. This tutorial will mainly explore the brush engine and you will also learn how to create custom brushes and use them effectively, combined with some interesting layer styles. Tutorial Files
Create a Lamb's Coat in Photoshop This week we are celebrating the launch of PhotoDune, Envato's new stock photography website with a series of photo effect and photo manipulation tutorials that showcase the images from our new marketplace. In this tutorial we will demonstrate how to create a lamb's coat in Photoshop using several stock photos that are available for free for Psd Premium Members. Let's get started!
Create Light Leaks & Lomo Effects Using Actions in Photoshop In this quick tip tutorial, we will explain how to create light leaks and lomo effects for you photos using actions in Photoshop. Let's get started! Tutorial Assets The following assets were used during the production of this tutorial. Step 1 Begin by opening your images and navigating to the Window Tab of Photoshop. INSANITY Workout - Extreme Home Workout DVD - INSANITY Workout Reviews - Beachbody.com To start: This program is not for beginners. If you have a lot of physical problems, this is not the program for you. However, if you want to really get toned and lose weight then this is the perfect workout for you. I have tried many programs out there (Pilates, Yoga, gym membership, weight lifting) and never see the result. With Insanity, the change is immediate and you will see that during your first week of the program. The first two weeks is intense, especially if you have never worked out a day in your life and it doesn't get any easier as you progress week after week.
Create a model look with naturally perfect skin - 27 October 2010 - Poetry, Writings, Art, Design With this tutorial i show you a new way to make your portrait skin become perfect naturally like a model without using any extra plugins. You will know about a technique you may never use before. I used a stock from Depositphoto. 1. Duplicate your pic. Her skin does not have many blemishes so i just use Spot healing brush tool to remove them on a new blank layer. Quick Tip Easy Learning 55 Photoshop Tutorials Posted in photoshop For Beginners, Photoshop Tutorials. Tagged with Photoshop Beginners, Quick Tips. No comments
22 Professional Photoshop Image Enhancing Tutorials Adobe Photoshop is the premier tool for digital artists when it comes to professionally enhancing images. Whether you’re a beginner just learning the ropes or an advanced user looking for unique techniques to add to your Photoshop arsenal, you’ll find some tutorials here that you’ll surely want to bookmark. In this article, you’ll discover plenty of tutorials that deal with enhancing images, adding unique and impressive effects, and recreating digital replications of popular traditional photography techniques. Perspective Correction In Photoshop - Repairing Keystoning Written by Steve Patterson. Have you ever tried taking a photo of a building only to have the building look like it’s leaning backwards? That’s a perspective problem known as keystoning, and it’s caused by the building and the camera lens being on two different angles. Usually, unless you’re fond of climbing trees or you have a friend at the fire department, standing on the ground and tilting the camera back a bit is the only way to get the top of a tall building into the photo, and since the camera is tilted away from the building when you snap the image, with the top of the lens being further away from it than the bottom of the lens, the building ends up looking like its leaning backwards. This problem actually exists any time you need to tilt the camera back to get something tall into the photo but it’s most noticeable with buildings due to their straight parallel sides.