
Hybrid Manicure I’ve been seeing lots of outrageous nail art lately on pinterest. One hot new product that’s really caught my eye is adhesive nail polish strips. I love the funky designs and bold colors with these products, but they’re usually a little spendy for me. I have a great alternative and I’m super-excited to share with you a really fun, new way to use digital scrapbooking supplies! We are going to give ourselves a little hybrid manicure. To begin with, you will need the following: light color nail polish (white, light pink, cream, pale green, light turquoise, you get the idea….)rubbing alcoholsmall cup (I used a medicine cup.)digital supplies (laser print or copy)nail polish topcoat 1) Before getting started, quickly measure your fingernails. 2) Open a new Photoshop document and create for yourself 10-15 boxes that are a little larger than your nails. 3) Find some great papers that you’d like to have on your nails. 4) Print your page. 5) Paint your nails with your light colored nail polish.
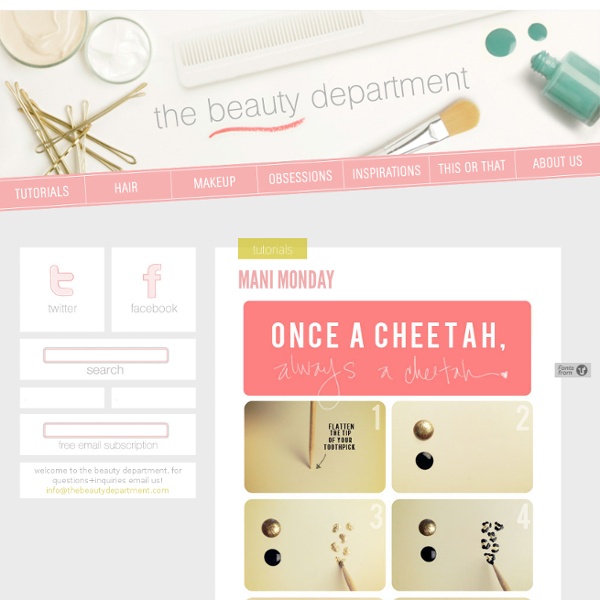
How to draw hearts photos and post by Kristin Ess So Valentine’s Day has come and gone… but it’s never too late to learn how to do this! We got a lot of emails after Valentine’s Day asking how to make a heart on your nails. Love is a year ’round thing so here we go: TOOLS: Toothpick, polish, a piece of paper or foil. PREP: Pour a little puddle of polish on a piece of paper or tin foil. Using your toothpick dipped in polish, make a dot on your nail.Make a second dot next to that.Using your toothpick tip, drag one of the dots down at a 45 degree angle.Drag the other dot down at a 45 degree angle to meet the other side. What else do you want to learn as far as nail art goes? Tags: DIY, heart, how to, kristin ess, mani monday, the beauty department, thebeautydepartment.com Related posts: NAILED IT! I’ve always loved the artwork below and I finally figured out a way to get a similar look in a mani. It’s different than a regular chevron pattern because it’s slightly more abstract and free-handed. I love the way one color runs over into the next one. You have to find the right pens- some that run/smear as you slowly apply a topcoat, and others that stay put. Sharpie “Ultra-Fine Point” regular maker (will run/smear). Whatever colors your choose to use, I suggest putting a white zigzag below a darker zigzag. The steps to this are pretty simple: Start by prepping your nails with a bright color as a base– try hot pink, coral or green. Using your Ultra-Fine tip Sharpie, make a zigzag pattern horizontally. If you want to see a short video clip on running the topcoat over, you can see it on our Vine! By the way, if anyone knows the name of the artist who made that image above, I would love to know so I can credit them! UPDATE: Artwork is by the insanely talented Jennifer Moreman.
Create your own Nail Polish Here it is, finally! The Pigment Tutorial! For our purposes, pigment is a dry coloring material that can change the color or texture or a nail polish. Some pigment is loose, and some is pressed (think loose eyeshadow vs. the kind in the compact.) Pigment can make a drastic change in the color of a nail polish. First, some pigments: TKB Trading Yellow 5, MAC, Fyrinnae. Pressed eyeshadows can also be a good source of pigment. However, there is one type of pigment that you should NEVER be putting on your body. Artists pigment. So, if you’ve got your non-toxic pigment, what else do you need? A little teeny spoon (I got this at a Japanese coffee shop) and silicone baking tins. Last, you need a spare bottle of clear nail polish. The most basic pigment mixing is with clear polish. Left to right: MAC Teal, Fyrinnae Aztec Gold, Fyrinnae Boytoy, MAC Green Brown. Next, get ready to mix! 1. 2. 3. Voila! Here’s one coat (over the bright yellow I had on before!) With a coat of Seche. Like this:
Owl Nail Art Tutorial For this design, you will need several colors of polish, I used OPI San-Tan-Tonio, Color Club Almost Famous, Color Club Twiggie, Sally Hanson Lacey Lilac and a Black and white. YOu will also need dotting tools, or your prefered method of making dots. I used a small detail brush for some elements, but you could also just use the dotting tools or a toothpick. I started with a base coat of San Tan Tonio, this color is prefection and a must have, in my opinion! I then used a large dotting tool to add two large circles connecting in the middle, this will make the mask for the owl, I used the same color and a detail brush to add the wings. Next I added in white with the large dotting tool. The Usinga smaller tool, I added in the black to finish up the eyes I used yellow to add the little feet and a beak I finished up using the detail brush to add some lilac v’s, if you don’t have a detail brush, you could also just add some polka dots. Like this: Like Loading...
It's My Birthday and I'll Blog If I Want To Yep, today is my Birthday! It's just a quick post to show you one of my favourite combinations of late. I've been wearing a lot of glitter and found the perfect pairing with Sally Hansen Big Money and China Glaze Tart-y for the Party. There's a (not so subtle) clue in the mani.... can you guess how old I am today? Faded Floral Manicure photos + post design by Kristin Ess Who doesn’t love a soft, faded floral pattern? You can basically do this mani in any color combo you want– we chose a spring-y palette. Here’s how you get the look: YOU WILL NEED: Nail polish remover, 4 small paint brushes, a plate or something to put your polish drops on, a white nail polish + 3 of your favorite polish colors that look good together. Place a dot of each color on your plate. Good luck with your pretty faded florals and as always, tweet us a picture when you’re done! (Special thanks to Kimberly, our new nail intern for showing us this technique!!) Tags: DIY, faded florals, floral, floral nails, flower nails, flowers, how to, kristin ess, mani, mani monday, manicure, nail art, nail polish, nails, polish, polished, spring, the beauty department, thebeautydepartment.com, tutorial Related posts:
Splatter Nails Tutorial Splatter nails are super cool and easy to do, but they make a huge mess! I didn't tape my nails for this tutorial, and I really regretted it while I was doing the clean up. If you want a tutorial for how to tape off nails check out this one. In this tutorial I used Tip Top Nail Chic in Twilight for the base and splattered Beauty UK polish in Black and Lilac Girl, Sally Hansen Insta-Dri in Mint Sprint and Wet and Wild in Tickled Pink. Lay out newspaper to work over. Back to Tutorials Still have some questions? Copyright 2012 Lisa Bailey © Nail-Art-101.comAll Rights Reserved
Patchwork Colour Block Tutorial A little while ago, Sally Hansen got in touch to see if I'd like to be a Nail Art Ambassador for their I ♥ Nail Art campaign. As you'll know if you've been reading for a while, my undying love for Sally Hansen is no big secret around here so of course I was more than happy to get involved! Each month there's a new theme and you can submit your nail creations for the chance to win amazing prizes. I'll be bringing you two tutorials every month and for the month of April, the theme is Colour Blocking! Before you start, make sure you have everything you need: A quick drying top coat. Some Scotch tape, or anything similar. Start by painting on your base colour, this is the colour that will show at the sides. Sticking scotch tape to wet nails is a big no no so wait until it's completely dry before moving on. Apply one piece of scotch tape diagonally across your nail... ... and then another at a right angle to that piece. Apply the second batch of tape in the same way.
Feather Manicure I bought these feathers a few weeks ago and I knew they'd make a gorgeous mani. Here's how to recreate the look. It'll cost you waaaay less than what you'd pay in the salon! You will need: A base color. I chose Essie's Glamour Purse. Before you start, prepare all of the feathers you plan to use by cutting off the ends. Paint on your base color, let it dry, then add a coat of your thick clear top coat. While the clear coat is still tacky, carefully place the feather on to your nail. When that's completely dry, apply a few coats of your fast drying top coat. Once that's dry, use scissors or cuticle clippers to trim off most of the excess feather hanging off the end of your nail. You can remove what's left with a nail file which also leaves you with a nice smooth edge. I like to clean up around my cuticles with pure acetone and a small paintbrush, especially after piling on all that top coat! And here's the result... What do you think of this manicure idea?
Halloween Patchwork Nail Art Tutorial Here's a tutorial for yesterday's Halloween themed nail art. I mentioned that I freehanded the design but this time around I created the tutorial using scotch tape as I know straight lines can be hard to master with a brush. You'll need: Black acrylic paint or nail polish Scotch Tape Top coat - preferably fast drying Start by painting on your base colour and topping it with a thin layer of your top coat. Place two strips of tape on your nail to mark off your first patch - it can be absolutely any shape but I've gone with a triangle. Paint on your first colour and immediately remove the tape. Add another thin top coat to make it dry quickly. Once it's dry, section off your next patch using tape. Just like last time, paint straight over the tape and immediately remove the tape. Now you've got your patches! For the stitching detail, take a nail art brush and first, outline the patches. Next, paint on the stitches. And you're done!
'Simplicity is the ultimate sophistication' I felt like wearing a simple, clean springtime manicure today but I wanted to mix things up with a colour combination I haven't tried before - Green and Pink. The great thing about pastels is you can mix absolutely any colours, even ones that would normally hurt your eyes. Can you imagine a combination of bottle green and hot pink? I used Sally Hansen Crinoline as my base colour with Green Tea just on my middle finger. Finally, I topped everything with two coats of Seche Vite for a glassy finish. Fade to Black Manicure Like this: Like Loading...
Flower Nail Here is a quick tutorial for the flower nails I created on Day 14. I had so many lovely comments and the design is just so simple to create so I thought I'd show you how I went about it. All you need is to create this look yourself is a few colours of your choice; a base colour and however many colours you decide to use for the flowers, and a dotting tool. And if you don't have a dotting tool, bobby pins make a great subsitute!