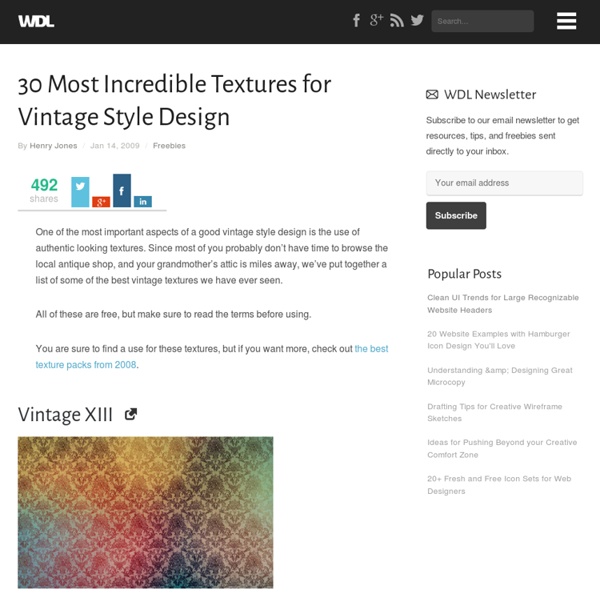
List of compositions by Wolfgang Amadeus Mozart This is a selective list of the works of Wolfgang Amadeus Mozart, listed by genre. The Köchel catalogue contains a complete, chronologically ordered, list. How Mozart's compositions are listed[edit] Symphonies[edit] Mozart's symphonic production covers a 24 year interval, from 1764 to 1788. Childhood symphonies (1764–1771)[edit] These are the numbered symphonies from Mozart's early childhood. There are also several "unnumbered" symphonies from this time period. Salzburg-era symphonies (1771–1777)[edit] These symphonies are sometimes subcategorized as "Early" (1771–1773) and "Late" (1773–1777), and sometimes subcategorized as "Germanic" (with minuet) or "Italian" (without minuet). Although not counted as "symphonies" the three Divertimenti K. 136–138, in 3-movement Italian overture style, are sometimes indicated as "Salzburg Symphonies" too. There are also several "unnumbered" symphonies from this time period that make use of music from Mozart's operas from the same time period.
29 Most Useful Texture Packs of 2008 | Web Design Ledger 100 shares The trend of using texture in web design has been around for a while, but in 2008 it was taken to a new level. Not only were there many beautiful sites launched that made use of textures, but there were also lots of useful texture packs created. I’ve taken the time to sort through them and hand pick the ones that I feel stand out in usefulness and beauty. Grunge Textures Christy Sobolewski Textures vintage grunge textures color grunge textures hardcore vintage grunge Large Paper Grunge Textures Anatomy of a Dumpster: 12 Textures rust textures Grunge II Texture Pack Old Grunge Photo Texture Pack Grungy and Dirty Textures 24 Free High-Res Textures Vintage Textures 15 Old Book Cover Textures 17 More Old Book Cover Textures Free High-Res Texture Pack: The Anatomy of a *Really* Old Book Vintage II Texture Pack Vintage Texture Pack Vintage Bum Wood Textures Textures – Wood Local Texture: Three by One Dark Wood Texture Pack Free Hi Resolution Wood Textures Fabric Textures Free Fabric Texture Pack
Free Vintage Flower Art Scrapbook Paper Choose a thumbnail version of any of the vintage flower scrapbook papers. When you click on one, it will appear larger. Once you've chosen an image and see it larger, double-click on the larger image, which will make the best version of the art appear. Then, if you use a Mac, control-click the image until you get a pop-up menu with an option to save the file. If you have a PC, right-click and save the artwork to your hard drive. Feel free to download these printable vintage flower art scrapbook paper images for your own use in scrapbooks, handmade cards and other crafts, and on Web pages, blogs, fliers or other materials. Also, please note that I have very little control over which ads appear on this page. If you use these images, I would appreciate a link back to this page using the following code or text: <a href=" flower scrapbook paper</a> ... and link it from one of the phrases below:
50 Websites For Free Vector Images Download Unlike raster images, vector images are flexible and scalable enough to not lose quality when stretched out beyond their original size. This makes it perfect for use for both web and print design. In fact, we have plenty of compilations that feature vector images (you can start with our multipurpose vector icon sets), but in case you want to do your own searches, we have the next best thing. Are you wondering where to download free vectors for your next project? Note: While most (if not all) of them are free, we still encourage you read and understand their license before downloading and using these free vectors. 40+ Websites to Download Royalty-Free Images 40+ Websites to Download Royalty-Free Images Chances are you're pretty tired of seeing traditional stock photos of people in suits shaking hands. Pikbest Pikbest is a design resource platform that has thousands of vectors, along with graphic templates, videos and music. Vecteezy Vecteezy is home to vector icons, art and patterns. Freepik
How to Remove Tourists from Your Photos | Travel Photography and Stock Images by Manchester Photographer Darby Sawchuk - dsphotographic.com Every notable landmark seems to have one thing in common: visitors, and lots of them. But if you want that postcard shot or that image that shows how the location may have once appeared, you have a challenge ahead of you. This digital photography and PhotoShop tutorial will provide a means to remove the tourist throngs from your vacation images. Taking the Photos The technique I will describe here applies to photos you have yet to take. To start, you’ll want to be taking your photos with a tripod. At busy sites, once you have composed your shot, you will find there is no end of tourist flow through your frame. The trick is, with your tripod-mounted camera, you can take your shot with people in it. As an example, look at this photo I took at the ruins of Ta Prohm in Cambodia near Angkor Wat: A lot of tourists loitering in the scene don’t make for such a great photo of a place that evokes imagery of explorers discovering a long-lost ruin. Putting it Together in PhotoShop Image Alignment Notes
List of animated feature-length films This list of animated feature films compiles animated feature films from around the world and is organized alphabetically under the year of release (the year the completed film was first released to the public). Theatrical releases as well as made-for-TV (TV) and direct-to-video (V) movies of all types of animation are included. Currently the list doesn't recognize one release form from another. In order to qualify for this list, films must be "over 40 minutes long and have animation in at least 75% of their running time, or have at least 40 minutes of animation in total." This list chooses to use the AFI, AMPAS and BFI definitions of a feature film. For marionette films like Team America: World Police, or films featuring non-animated puppets, see Films featuring puppetry. Lists by decade[edit] Lost/unfinished films[edit] See also[edit] References[edit] External links[edit]
Minimalist House by Shinichi Ogawa & Associates This long narrow house in Okinawa, Japan, by Japanese studio Shinichi Ogawa & Associates is divided lengthways into a courtyard and living space. Called Minimalist House, the property is surrounded by four solid walls and internally divided into three strips. The first forms a courtyard open to the sky and is separated from the second strip by a glass plane. This middle section contains bedroom, living room and workspace furniture in one volume. The third space is enclosed behind a wall and contains the kitchen, utility room and bathroom. The building is a concrete construction on a three square-metre grid. Here's some more information from the architects: This building is a court house for a couple in Itoman-shi, Okinawa, Japan. The house is built on a 3M grid module in all XYZ directions, while it is composed of 4 vertical plates as exterior walls and 1 horizontal plate as a roof slab. The space composition is characterized by the division of the house into two areas by a like-wall furniture.
Design a Professional Laptop Advert « PSDFan Final Image: Here is the final image that we will be creating: Step 1: Open up a new document 1000px wide and 600px high. Step 2: Now I want to create a vanishing point for the screen of the laptop. Select the screen part of your laptop using the lasso tool. Then paste this new larger screen back into your original document. Step 3: Now select your line tool and a nice bright color for it and draw lines each corner of your large screen through to the matching corner of the original screen and past to a vanishing point. Step 4: Now duplicate your larger laptop screen and select edit>free transform. Move this resized image so that it matches up with the perspective lines that you created earlier. Repeat this process of duplicating/resizing/aligning using the resizing percentages of 80%, 70%, and 60% from your large screen layer. This is how your image should look after you have created this new screens and lined them up correctly: Step 5: Now create a new layer set called ‘photo 1′. Step 6: