Top 10 DIY Tech Gifts
@keyboard-vomit: Yeah, but wouldn't it be awesome if some of our not so tech friends actually attempted (and accomplished) one or more of these feats? I mean, when "it's the thought that counts," shouldn't it be a thought about something we'd actually appreciate. Then again, maybe socks are your thing. ;) @HunterShoptaw: That they are, I'm wanting some socks with an integrated HDD, and some USB connectivity. @HunterShoptaw: The thought does count, but it sure would be nice if they enjoyed the gift too. So for this year, I created wishgenies dot com for people who WANT to give good gifts, but don't know what they'll want. @keyboard-vomit: I swear that some day, some how...Google will be able to find my lost socks.
A cool pallet wood chair anyone can make – part 1
Part 1 – the reveal! <— YOU ARE HERE Part 2 – how to build the chair <— click to visit HERE Tools to help get the job done! Disclosure / affiliate links applicable. Desiring something super unique, this 2 full pallet chair was whipped up in a couple of hours, and is PERFECT for the non builder types! I just desired something you couldn’t find in a big box store. So here’s a little pallet wood and burlap coffee bean sack pillow eye candy! Burlap coffee bean sacks are the perfect no sew upholstery. The reason for the cheater upholstery is in PART 2 HERE. See how the large pillows were done HERE. You can find coffee bean sacks at local coffee roasters in your area, or check places like ebay. Taking advantage of all the natural crate markings on the wood, I allowed them to become the artwork. Both arms are different which I love. (see the original Farmers Market sign HERE) This leg got a little extra detail with an antique wooden level. And yeah, the board cracked because I didn’t predrill.
How to make a tool set
Life without tools is barbaric. But even simple tools can be expensive in rural parts of developing countries. Import duties bump the costs up higher than they are in the States or elsewhere, and sometimes only low-quality brands are available anyway. So, to hold off future barbarians, we'd like to show how to build a simple tool set on a very low budget. Larry Bentley, the man who figured out how to make these tools, said a wise thing: "Without tools, kids don't take stuff apart, and without taking stuff apart, you don't learn how things work." These tools, Bentley says, could be in the hands of the next William Kamkambwa,who made a working wind power generator from backyard scraps in a village in Malawi. Here's Larry's quick guide to DIY tools. The tools in this guide: Saw Pliers Wooden vice Wood drill bit / star drill bit Chisel Strap hinge vice
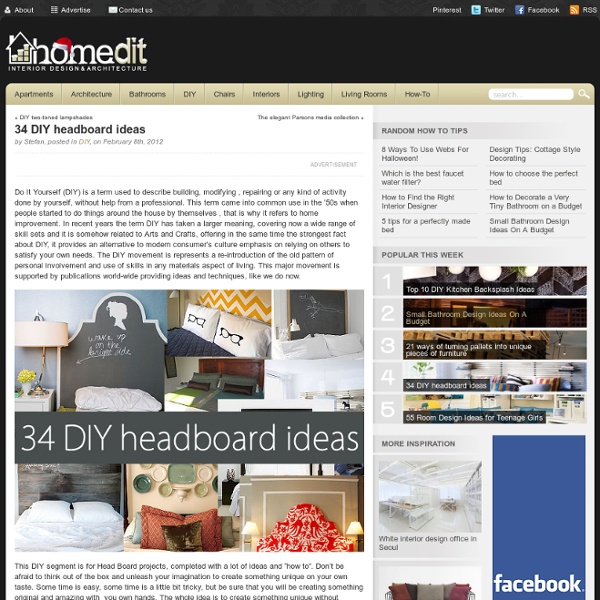
DIY Project: Reclaimed Wood Look Headboard - aka design
1.2K Flares1.2K Flares × Okay, so truly this is a super easy project. Like almost 1, 2, 3 easy. And it is a total cheat. The only prep work is to decide how big to make the headboard. You will need: palm sander OR sandpaper and some musclesstud finderpencillevelwood (We used twelve 1″x6″x8′ pieces of spruce and had Home Depot cut them all down to 5′ long.)2″ screws (flat-head)drillold ragMinwax stain in Special Walnut Step 1: Decide where to put your headboard. Step 2: Sand rough spots and edges off of the boards. Step 3: Starting at the bottom (@ baseboard or floor), screw the first board to the wall using the stud marks you made in Step 1. Step 4: In a well ventilated room, and perhaps wearing a mask (trust me, this stuff STINKS when wet!) Step 5: Make it look pretty! See, didn’t I tell you it was easy?! And it was inexpensive! The wood was $2.97 per 8 foot length. So for $46.50 (plus tax depending on where you live) - voila!!!! Any questions? PS. 1.2K Flares Pin It Share 1.1K
Build a Laser 3D Printer - Stereolithography at Home
Here is how to make a Stereolithography 3D Printer. It is still a bit of a work in progress but so far it is working pretty well. This is mainly an experiment which started as a Delta Robot Stereolithography Printer but ended as a more traditional Cartesian Stereolithography Printer. "I'll be honest, we're throwing science at the walls here to see what sticks. No idea what it'll do." - Cave Johnson Stereolithography (SL or SLA from Stereolithography Apparatus) is an additive manufacturing process using a vat of liquid UV-curable photopolymer "resin" and a UV laser to build parts one layer at a time. I have wanted a 3D Printer for a while now and there are some very reasonably priced kits available like the Makerbot, Ultimaker and the RepRap project. I decided to enter this in the Epilog Challenge Contest because I could really use a laser cutter :-) I also have some ideas how to redesign this project, for creation on a laser cutter. This project is Open Source Hardware.
The DIY Headboard Extravaganza {Unique Headboard Inspiration
There’s so much fun to be had with headboards. The possibilities for headboards are endless when you consider them in their basic form. Headboards certainly don’t need to be purchased. DIY & re-purposed headboards can be just as beautiful as something you would find at a trendy shop, only more personalized with WAY more character. Before you think about hitting up the store, or scouring the web for your next headboard, step outside the box and remember that headboards don’t have to be confined to a rectangular piece of wood. Headboards can be made from just about anything, an old fence, driftwood, curtains, a pallet, an old door, the list goes on. See my post on “How to Make an Upholstered Fabric Headboard” if you’re inspired after reading this =) 21 Unique D.I.Y Headboards I just love the contrast between the white and vibrant yellow in this beach cottage bedroom. Another fabric upholstered headboard, this time in blue. “Rustic chic” is such a fabulous design trend. Wow. Just lovely.
DIY fire making
Glowing Outdoor Orbs
O.K. Get ready for it … this one’s a doozy. Doozie? Doosey. It’s a humdinger. It looks high end with a side of huge impact, It costs next to nothing, And even if being “handy” to you means replacing your regular lightbulbs with eco-friendly ones … you’ll be able to do this in 3 minutes flat. Opaque glass shades found at second hand store … Mini Lights from Christmas … Glowing orbs for your garden Want more STUFF like this? Get my posts emailed to you daily. Total Cost: $3 In my attempt to make my backyard a teensy bit more contemporary than my 170 year old house I ran into a few problems. It isn’t gonna be for lighting if I can help it. So while perusing the local second hand store I came across some truly unfortunate stains on the carpet AND these ubiquitous opaque glass shades. Because as you can see, all you have to do is shove some old mini lights in em to create an outdoor light that even a magazine Editor in Chief will comment on. And here’s the best part! at night during the day p.s.