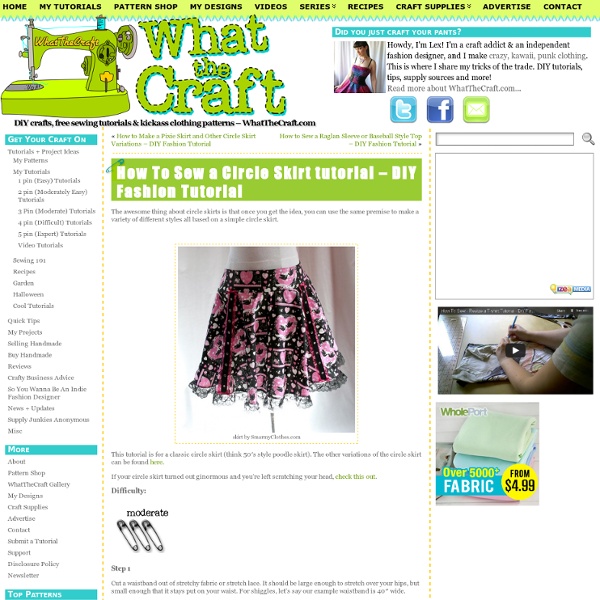
How to make bias tape
{photo of liberty bias trim by poshyarns} ETA: Also check out the continuous loop bias tape method for a faster method (it’s just slightly trickier the first time). As I mentioned recently, I think bias tape is wonderful stuff. It’s a terrific help if you can learn to make it yourself. Yes, it’s a bit time consuming, but the possibilities are pretty endless for prints and patterns, it’s less expensive, and best of all as far as I’m concerned, you can make tape to match your fabric! If you’re not really familiar with bias tape, it’s basically a long strip of fabric that’s been cut on the bias of fabric. So here’s one method. You’ll need: a piece of fabric to use for your bias tapea Clover Bias Tape Maker. Step 1: Cut yourself a rectangle of fabric. Step 2: Now you need to find the bias. Step 3: Mark off strips along the bias by measuring equal distances from the line you marked. Step 4: Now cut out your strips. Step 5: Trim the ends of the strips so they’re flat. And you have bias tape!
How to Hem Pants - Hemming Pants Tutorial
Note: There are also video instructions for this tutorial. When it comes to pants, it’s all about the fit. You may have a pair of pants that look great on the booty, but are too long or short for your legs. Hemming pants is so easy that leg length should never stand between you and a hot pair of pants. If you can hem pants, then you’ve got the advantage every time you hit the dressing room. What you'll Need: Gather the above supplies and get ready to prepare your pants.
rostitchery: convertible/infinity dress
(this post was originally published on 29 june, 2006, with the title "one seam convertible dress".) have a question? please visit the convertible dress FAQ's. have you made a convertible dress? PLEASE NOTE: the instructions for making this dress are available for free but are not to be used for commercial purposes. please do not sell dresses made using these instructions, and do not make copies of the instructions without asking my permission first. thank you! but the version i liked best was the one by monif c., a plus-size designer who makes AMAZING clothes that non-plus size girls can envy. and here, without further ado, is how to make this variation, using ONE SEAM: the next part sounds complicated but it is not. turn your skirt inside out--you are going to sew from the INSIDE of the waist--which means you don't need a free arm on your machine. overlap the straps 3"-4"... this is the one and only seam. the whole thing took less than an hour from start to finish.
Making a Crochet Hook Case: A Tutorial
I made myself a crochet hook case last month, and my daughter Autumn has become obsessed with it. Finally I asked her, "Would you like for me to make you a case of your own?" Without blinking she nearly shouted, "Yes!" I asked her what she wanted it to look like, and she said, "I want it to be groovy." And so, to make your very own crochet hook case that will be coveted by people everywhere,you will need: ♥ Two fabrics: one main fabric, and a complimentary fabric for the pockets♥ quilt batting or fusible fleece♥ complimentary ribbon♥ two buttons Let's get started! Cut a rectangle from your main fabric 20 x 34 inches. Cut a rectangle from your quilt batting or fusible fleece 20 x 32 inches. If you are using fusible fleece, fuse the fleece to the wrong side of the main fabric according to the manufacturer's directions. If you are using batting, baste it to the sides of the main fabric. Cut two rectangles from your complimentary fabric. Press the rectangles closed once more. Press. You're done!
Dresses :. #5203 Petit black dress
Difficulty: ** You will need: gabardine; lining; fusing; 1 zipper; 3 buttons. Attention! Fabric consumption varies depending on the size of garment. First of all, print out paper patterns and lay them out at the width of fabric/ knit you plan to use, to see how much fabric you will need. When sewing the garment, pay attention to notches- they must coincide. Cutting: Fabric: 1. Lining 1. Fusing: details above waistline (upper part). Instructions: 1. 2. 3. 4. 5. 6. 7. 8. 9. 10. 11.
Making a kilt
[From Bobbie Suttie, images copyright Jan Bruyndonckx and used with permission] A Kilt is basically a pleated, wrapped skirt. The back half of the kilt is pleated, the front half (apron) is the made of two overlapping panels. A true kilt is completely handmade. Think of a deck of cards, which have been fanned out.
¡The AntiCraft!
Christopher Lansdown (photo) Beth Skwareck (model) click image to enlarge A Petticoat for the Ages Although you can make this petticoat as a skirt to wear to work or school, its main utility is in its usefulness for the time-traveler. Say your future self invents a time machine, and comes back to offer you a ride in it, say next week. Just as a space traveler's best friend is his towel, a time traveler's best friend is her petticoat. Here I'll give you a recipe for a basic petticoat, not too fluffy, suitable for everyday wear as a modern 2000s woman. by Beth Skwarecki Suggested Watching Doctor Who (New or Classic) on the BBC Difficulty Boy Scout Burnout Click here for definitions of difficulty levels. Finished Measurements Tailored to fit, but ~39" long if not shortened before making a casing for the elastic in the last step. Download Petticoat pattern with full-sized illustrations (pdf format) Materials Fabric for ruffled skirt: 2.5-3.5 yards of 45" wide fabric (see chart below). Pattern Notes