How to Use Wireshark to Capture, Filter and Inspect Packets
Wireshark Display Filter Examples (Filter by Port, IP, Protocol)
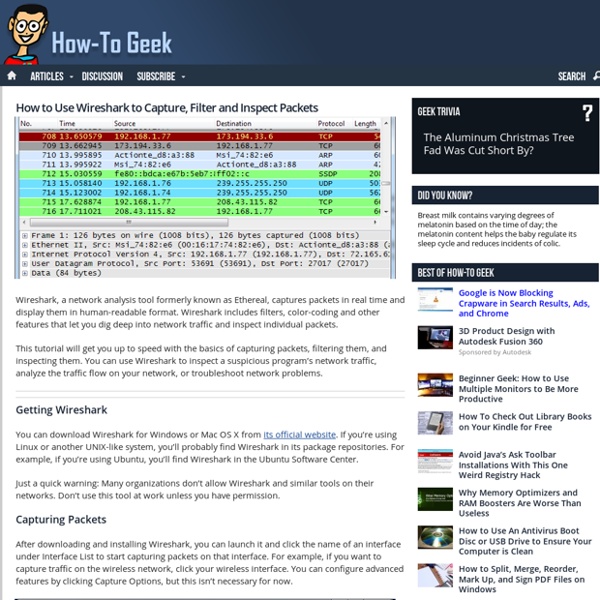
While debugging a particular problem, sometimes you may have to analyze the protocol traffic going out and coming into your machine. Wireshark is one of the best tool used for this purpose. In this article we will learn how to use Wireshark network protocol analyzer display filter. 1. Download and Install Wireshark Download wireshark from here. After downloading the executable, just click on it to install Wireshark. 2. Once you have opened the wireshark, you have to first select a particular network interface of your machine. From the menu, click on ‘Capture –> Interfaces’, which will display the following screen: 3. A source filter can be applied to restrict the packet view in wireshark to only those packets that have source IP as mentioned in the filter. ip.src == 192.168.1.1 4. A destination filter can be applied to restrict the packet view in wireshark to only those packets that have destination IP as mentioned in the filter. ip.dst == 192.168.1.1 5. http 6. http||arp 7. 8. tcp.port eq 80
A Network Sniffer in C#
Download source files - 21.08 KB Introduction In this article, I will discuss the working of a simple network sniffer which can parse IP, TCP, UDP, and DNS packets. Capturing the Packets mainSocket = newSocket(AddressFamily.InterNetwork, SocketType.Raw, ProtocolType.IP); mainSocket.Bind(newIPEndPoint(IPAddress.Parse(cmbInterfaces.Text),0)); mainSocket.SetSocketOption(SocketOptionLevel.IP, SocketOptionName.HeaderIncluded, true); byte[] byTrue = newbyte[4]{1, 0, 0, 0}; byte[] byOut = newbyte[4]; mainSocket.IOControl(IOControlCode.ReceiveAll, byTrue, byOut); mainSocket.BeginReceive(byteData, 0, byteData.Length, SocketFlags.None, newAsyncCallback(OnReceive), null); For capturing the packets, we use a raw socket and bind it to the IP address. The second parameter passed to IOControl with IOControlCode.ReceiveAll should be TRUE so an array byTrue is created and passed to it (thanks to Leonid Molochniy for this). Analysing the Packets The IP datagram encapsulates the TCP and UDP packets. References
Related:
Related:
