DIY: Stencil Pillow
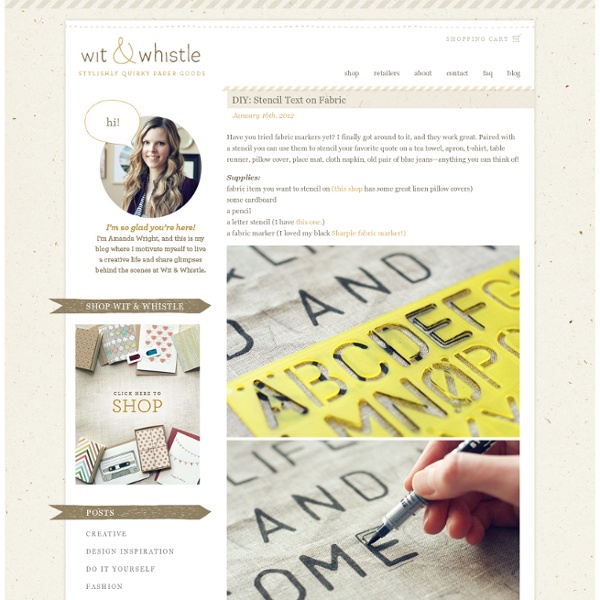
January 16th, 2012 Have you tried fabric markers yet? I finally got around to it, and they work great. Paired with a stencil you can use them to stencil your favorite quote on a tea towel, apron, t-shirt, table runner, pillow cover, place mat, cloth napkin, old pair of blue jeans—anything you can think of! {*style:<i><b>Supplies: </b></i>*}fabric item you want to stencil on some cardboard a pencil a letter stencil (I have this one. ) a fabric marker (I loved my black Sharpie fabric marker!) After choosing your quote, wrap your fabric over the cardboard to keep the marker from bleeding through and to keep the fabric stretched out smooth. Use a pencil to stencil your quote onto the fabric. Once you’ve penciled everything in, go at it with your fabric marker! The Sharpie fabric marker packaging didn’t say anything about heat setting the ink, but I will probably press my fabric before I wash it, just to be safe.
http://witandwhistle.com/2012/01/16/diy-stencil-pillow/
Perfect Summer Bangle
Here's a fun tutorial on how to make a message bangle that's one-of-a-kind, done in the sun, waterproof and weatherproof. Even after several trips to the beach, it won't fade or wash off! Essentially, it's the Perfect Summer Bangle. Used in this tutorial: Inkodye Red
How to make an easy and stylish paint chip mobile for your nursery
Supplies: Wooden knitting ring Assorted paint chip samples in colors of your choosing Spray adhesive (optional) Circle punch Sewing machine Tape Punch out piles of circles from your paint chips samples. I had about 20 circles in each of the 5 colors. Paint chips are one-sided so you’ll have to either glue two together or sew them together when you’re making your strings of circles. Sewing them together when you’re making your strings of colors proved to make more sense to me. Line them up in piles next to your machine the way you’d like them to hang from the mobile.
DIY Tutorial: Wang Spring 09
Flip the sweater inside out. (it's best to lay it on a flat surface) Cut out a piece of sheer fabric that's large enough to cover the first pattern that you will be working on.
Decorated Kraft Paper Letters
Whattya need? Kraft paper lettersGluePlastic googly eyesHot glue gunScissorsColored stringColored cotton ballsChalkGlitterPaintbrushChalkboard paintNewspaper clippings How do I make Decorated Kraft Paper Letters? Glitter letters Using a paintbrush apply a thick coat of glue to letter.
DIY: Furniture Makeovers
I'm obsessed with making-over old, worn out furniture. It's amazing how almost any old piece can be totally transformed with new paint, hardware and a little imagination! Here are three examples from Ladies Home Journal...click here to read the entire article. Out-dated side table with stone top transformed into a bright and cheerful accent piece!
A Tutorial: Fabulous Ric Rac Flowers » Matilda Jane Clothing Rocks
Let me start out with a warning or sorry of some sort. The warning is because I have never done a Tutorial before, so I hope this is helpful and easy to follow. The sorry is for how horrible my nails look.
How to Turn Old Magazines into a Bookshelf
The magazines you’ve read through can be turned into extra storage space for the home in a few easy steps. Magazines can be thick, but individually, the floppy, thin pages seem like the last material you would use to build a sturdy bookshelf. To everyone’s surprise, Sean Miller did the unthinkable and crafted a bookshelf from 80 National Geographic magazines and was named one of 23 finalists in Inhabitat’s Spring Greening Contest .
foam mag + alternative apparel workshop
Just wanted to share the DIY I taught at the Foam Magazine X Alternative Apparel Workshop last Saturday. Love to see if anyone tries this... it's a fun, summer top to add to your closet. Will post pics from the event soon... and a big thank you to those who stopped by! 1: Lay t-shirt flat. 2: Create an eye-shaped template (4 1/2” in height at the center and width the same as the t-shirt). 3: Trace onto shirt with fabric pencil.
Paint-dipped Baby Food Jars DIY
Feb 23 by Chiara Alberetti Milott Anyone with a baby knows how quickly those glass baby food jars can fill up the recycling bin.
Tribal patterns - Bedrooms - Decorating &Design
These 15 beautiful bedrooms are at the top of our list for inspiration. Photography by Sue Stubbs Tribal patterns A simple bedroom is brought to life with tribal-patterned bedding. Opt for classic white bedding and introduce accessories like colourful cushions and throws that can be switched up when tastes change. Add some colour to your bedding with our helpful throw pillow buying guide.
Spring Scrapbook Paper Tree
Hello fellow crafters! Tristin and I were invited to be today's featured guest blogger over at Everyday Mom Ideas! We were thrilled with this wonderful opportunity, and wanted to share with the readers over there one of our trees from the collection we're currently doing.
‘52 Things I Love About You' Ideas & Tips
‘52 Things I Love About You’ Ideas & Tips Over the summer I posted ‘52 Things I Love About You’ Deck of Cards Album , a gift I made for my husband for our wedding anniversary. Lately, I have people asking how to come up with 52 reasons I love my husband. So I created a list of over 50 to get you started or if you are running out of ideas. It took me a while to write down 52 things. Trust me, I love my husband, but coming up with 52 reasons written in such few words was not easy.
24 - THE DIRTY - Dirty Laundry - {the blog}
Friendship Day is 8/7. So I'm going to try my hand at making some friendship bracelets for a few of my friends that have helped me SO much with Dirty Laundry over the past several weeks. I'm going to try to make some snazzy ones! Here is my inspiration. 1. Hand Printed 'Insanity' Braided Cuff BraceletThis bracelet is made with hand printed fabric and super soft sued.I just LOVE how it all comes together.
tripod camping stool
In honor of this month’s outdoor theme, why don’t we build an old-fashioned camping stool? First of all, have you seen modern folding-tripod stools? They are ugly as sin, and your grandpa would be ASHAMED if you bought one. With the help of some hefty dowels, a little hardware and a piece of leather or heavy canvas, you’ll be sitting by the campfire in style. Also, the materials will only set you back about $25. — Matt See the full how-to after the jump!
Related:
crafts to do for room
•
Couture
Related: