temporary fabric wall paper
Sequin Photobooth DIY
Dec 29 Happy New Year! I had ordered these giant sequins a while ago and thought New Years Eve was the perfect occasion to make something with them. We used giant 60 mm sequins (sometimes called pailletes) for this wall and needed about 600. Materials Needed: 600 Sequins 60 mm in diameter 6 pieces of large and thin FoamBoard 1/8″ thick, 32″x 40″ wide 2 Rolls of Gold cheap wrapping paper to cover the foamboard. (these are just really short straight pins, you need one for every sequin) Ruler A long piece of posterboard to make a guide Step 1. Step 6. Thanks Meg + Anne for being my models! Sorry, the comment form is closed at this time.
cute frame idea, make pics portable!
Update: Kalia's Party was chosen as Party of the Week, then Fan Favorite and then won Party of the month for September over at the amazing Project Nursery, thank you!!! Kalia's 2nd Birthday Party can be found here- another DIY filled party- a "dress up" theme! I LOVED planning, crafting, thrifting and executing Kalia's 1st birthday party. Since Kalia is only one, she is not really into much; besides chewing anything that is not food- and I had trouble creating a party theme around that... So, I created a simple feminine look for her first birthday party. Lots of pink, glitter and flowers for my little girl! 1- Yard Sale Frame- $5.00 (the frame contained Kalia's 1-11 monthly pictures & were hung with ribbon and glittered clothespins)2 & 8- DIY Cake Stands- Thrifted Plates & Candleholders $6.49 Click here for the DIY! (Any serveware/dishware was already previously owned by me, if you have specific questions, Please ask!) Balloon name glitter- Kalia's name in glitter! The food!
MAKE CHLKBRD PAINT
We love using chalkboards as backdrops for displays and parties (like this one here!). So we were super excited to learn that you can create your own custom colors-and it's really easy! We first learned how from Martha Stewart whose tutorial you can read here. She recommends that you use latex paint, but we tried it out with acrylic paints with much success. Here's how you too can create your own chalkboard paint... Supplies: 1/2 cup acrylic paint (choose any color you like, or mix colors together to make the perfect shade!) 1. 2. Once your chalkboard has fully dried be sure to slate the surface before using it for the first time. Have fun creating any color combination you like!!
sharpie!
metal trays=magnet thingy!
Hi Crate Paper fans! It's Tara here with a crafty DIY Summer project for you! This Summer, I enrolled my little 6 year old, Alaina, in an Art Summer Camp and over the past couple of weeks, she's been bringing home all sorts of paintings and drawings that have taken over the front of the refrigerator! So, I thought it was time to think of a new display idea for her art and what could be more cute than a petite art gallery display board? The Essentials: CP Chipboard, CP Buttons, CP Brads, CP Paper Scraps, CP Border Stickers, Baking Sheets (Light Weight), Vintage Tart Tins, Magnets, E6000 Glue, Glue Dots, Foam Pop Dots, Paper Flowers, Command Brand Picture Hanging Strips, Spray Paint Start by spray painting your baking sheets. Next, gather the supplies for the magnets. Here's a step-by-step of how I put one of these tart-tin magnets together! First, Set out all your supplies like I've done above. Add a couple of glue dots to a button and place it on top the tulle. ***Note to self.
clothespins, color ribbon, thumbtacks
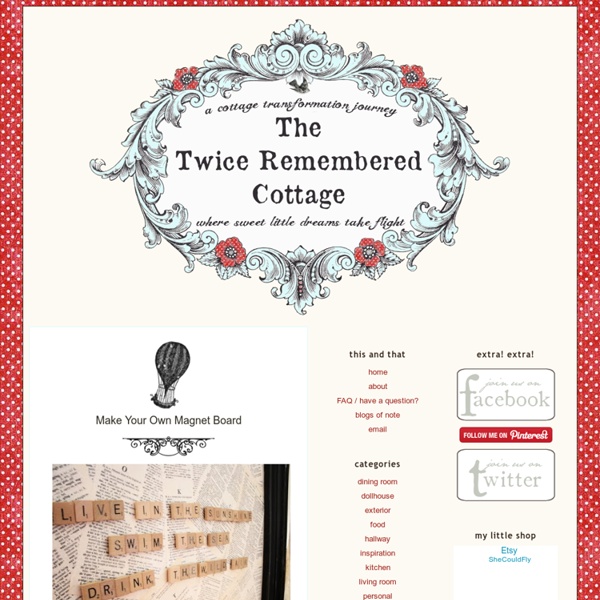
Hanging magnetic Scrabble board.
You would think we were doing some major DIYing with the length of time it took us to complete this project. Seriously, this little guy has been sitting on our dining room table in various stages of completeness for months. Yep, months. Yet somehow Adam and I both felt productive at the same moment and made a pledge to finish this project this past weekend! And just in time for the summer edition of the Pinterest Challenge hosted by these amazing bloggers: So, without further ado, here is our new project - a hanging magnetic Scrabble board. And thought how cool it would be to have something like it that we could build on each day and have this ongoing casual game - enter our new hanging (and magnetic) Scrabble board complete with chalkboard mat (for notes or score keeping) and shadowbox frame giving us a perch for the letter holders. Here are all the details on how we made it. Step 1: Paint border of sheet metal with chalkboard paint. Step 2: Glue magnets on letter tiles.