
Let’s Make a Playful Yet Robust 3D Letter Design A few times a each month we revisit some of our reader’s favorite posts from throughout the history of Vectortuts+. This tutorial by Jonathan was first published on February 24th 2009. This tutorial is perfect for the advanced beginner who wants to take her skills to the next level. We'll explore how to create 3D text and use depth-of-field to enhance a design. Want access to the full Vector Source files and downloadable copies of every tutorial, including this one? Join VECTORTUTS PLUS for just 9/month. Step 1 Start by typing each letter separate so you can adjust the angle and 3D qualities of each. Also, use a grey or light color so when you proceed to the next step you'll be able to see what your 3D text looks like. Step 2 Go to Effect > 3D > Extrude & Bevel... Step 3 Even after you apply 3D effects that you would like your letter to have you can also continue to rotate the letter to whatever angle you like, as I've done below. Step 4 Use the same technique on the other letters. Step 5
Dribble Toggle navigation Actions Display Options Tags / logo Show and tell for designers What are you working on? Jobs for Designers Ads via The Deck Your content. Creating a Vintage Typography Layout in Adobe Illustrator Vintage style typography is classic and remains popular still today. There’s something about the hand drawn and hand placed feel of these types of layouts that is appealing and draws your eye. Lets take a look at how to create a vintage style type layout in Adobe Illustrator. Here’s a look at what we’ll be creating. Before getting started I found a great inspiration piece to use as reference for the steps will be working through in this tutorial. When putting together a design like this there are a few very important factors to consider in order to achieve that vintage look. - Fonts – You have to put in the time to seek out the right fonts. - Shapes – Shapes and elements were drawn by hand, so keep that in mind when putting together your design elements. - Symmetry – Most vintage layouts such as this one contain some degree of symmetry. Step 1 In Illustrator, on a new art board, lets start with the basic shape of our layout. Fir the background we need to create a series of wavy lines.
EntheosWeb: Text Styles Get incredible & amazing text effects with these ready-made premium high-quality Photoshop styles and text effects. Stunning fire text effects, retro text, grunge text, vintage text, 3D text, metal text effects, chocolate text, valentine’s text, elegant gold & silver text, glass text, glowing text, wood text effects, candy text, embossed text and more! Use these awesome text styles in a brochure, flyer, poster or other graphic design or website design. Retro Style Text Actions 7 Premium Text Styles 5 Awesome Text effects & Layer Styles Grunge Revolution – Text Effects Premium 3D Text Styles Retro Text Effect Beautiful Blue Text Effects Cinematic 3D Actions Create awesome 3D effects just in a few clicks. Glowing Light Text Effect and Styles 9 glowing light layer styles combined to create the three glowing text effects you see in the preview.Many of the styles look great alone though and there are many other nice combinations you can easily create. Real Fire Text Creator Techno & Dance Text Effects
Create a Stunning Retro Futuristic Typography Create a Stunning Retro Futuristic Typography Posted by Alex on Wednesday, March 3, 2010 · 64 Comments Retrofuturistic design is a return to, and an enthusiasm for, the depictions of the future produced in the past, both in science fiction and in nonfiction futurism of the time, which often seem dated by modern standards. We always strive towards creating a better future. Whats more compelling than envisioning one. If the images are loading slowly, you can download the .RAR Package containing all the images here : The future as seen by many of us have been expressed in forms of art, design, movies, comics, and even cartoons. Long before the advent of technology, our ancestors tried to picturise the concept of space with mundane tools such as pencil, paper, brush to name a few. I am enthralled to announce that we have our first guest writer here. In this tutorial, we will learn some really cool techniques to help us achieve a few aspects of Retro Futurism. Step 1: Step 2: Step 3: Step 4:
Create a Grimy Text Treatment with a Pen Tablet in Illustrator In this tutorial I will show you how to create a grimy text treatment utilizing Illustrator’s Blog brush, Live Paint, and a pen tablet. You can easily apply these techniques to other illustrates, type treatments and logos. Final Image Below is the final type treatment we be working towards. Tutorial Details Program : Adobe Illustrator CS4 (This tutorial uses the Blob Brush, a tool specific to CS4. Step 1 Create a new document and type out some text with the Text tool (T). Step 2 In the Layers panel, rename your layer to “Template” by double-clicking on the layer and changing the name in the Layer Options dialog. Step 3 For drawing the outlines and contours of the treatment, we are going to use the Blob Brush(Shift + B) and a pen tablet. Step 4 Zoom in really close to you first letter and start tracing it with the Blob Brush (Shift + B). Step 5 Once you are done tracing the first letter, create some more Brush strokes within the letter making it more grimy! Step 6 Step 7 Step 8 Step 9 Step 10 Step 11
Create a Stylish, Vector Hair Typography Illustration I love creating portraits in vector but what I love even more, is doing wild and crazy hair styles. It was suggested to me recently to try crossing over the techniques of creating hair into typography and I just had to rise to that challenge! So in today's tutorial, I'm going to show you how I created this stylish piece of hair typography in Adobe Illustrator CS5. I've also finished it off with a quick aged coloring giving it a vintage design feel. Step 1 When the concept was first suggested to me to create a piece of typography with hair, I straight away considered what sort of style to do it in. The next thing to consider is what sort of word to use. There was the possibility of "Brush", which would tick all the boxes however a capital "B" would have a slight problem with a sharp angle. I opted for "Edwardian Script ITC" as I rather liked the way the "S" coiled. Step 2 I've reduced the Opacity of the text to 10% and used it as a template to begin drawing the base shapes for the hair.
Create a Retro Folded Text Effect in Illustrator (+ Source Files) In this tutorial we’ll learn how to create a Retro Folded Text Effect using Adobe Illustrator and adding some final options in Adobe Photoshop to create a nice presentation which can be used for your portfolio. This text effect is simple and attractive and holds a vintage 50′s look with the type of font used. Resources: Final Result 1. In Adobe Illustrator, create a new documents that’s 600×600 pixels. 2. 3. 4. 5. 6. 7. Photoshop Options you can do 1. 2. Go into Adobe Illustrator and select all of the text effect with the Selection Tool. Download Source File Powered by Tweet to Download
How to Create a Retro Style Textured Logo #-#Used to track user’s interaction with embedded content. Maximum Storage Duration: SessionType: HTML Local Storage __Secure-ROLLOUT_TOKENUsed to track user’s interaction with embedded content. Maximum Storage Duration: 180 daysType: HTTP Cookie __Secure-YECStores the user's video player preferences using embedded YouTube video Maximum Storage Duration: SessionType: HTTP Cookie __Secure-YNIDPending iU5q-! LAST_RESULT_ENTRY_KEYUsed to track user’s interaction with embedded content. LogsDatabaseV2:V#||LogsRequestsStoreUsed to track user’s interaction with embedded content. Maximum Storage Duration: PersistentType: IndexedDB nextIdUsed to track user’s interaction with embedded content. remote_sidNecessary for the implementation and functionality of YouTube video-content on the website. requestsUsed to track user’s interaction with embedded content. ServiceWorkerLogsDatabase#SWHealthLogNecessary for the implementation and functionality of YouTube video-content on the website.
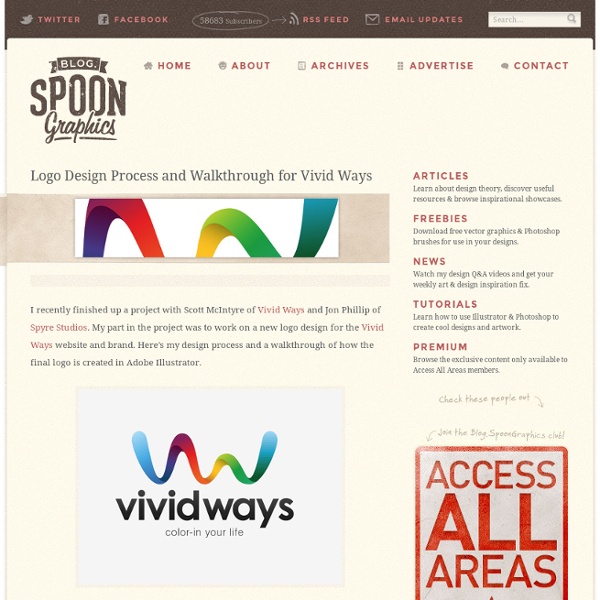
How To Create a Cubist Style Logo Design in Illustrator Follow this logo design process walkthrough to see the making of a cubist style logo design made up of lots of detailed vector facets. Not only will we be creating the actual design in Adobe Illustrator, but I’ll also be describing the whole logo design process in this tutorial, from the initial sketches right through to finishing off the final design. The logo we’re creating as part of this tutorial is a trendy “Cubist” style logo made up of lots of detailed elements to form an larger object. The design is based on a fictional brand or company named Raven, but the whole process is the same for a live client (just without the infinite cycle of changes and revisions!). We’ll first create the full colour logo in all its glory with gradients and effects, then tone back the logo to create flat and mono versions to provide a versatile design for use in any situation. It’s worth starting any logo design project with a sketch. The main logo symbol is complete, so we can now move onto the type.