
Transfert d’image sur bois super simple Crédit photo: Rosemary Paquet Attention : vous allez apprendre une technique qui peut de vous rendre accroc. Simple, rapide et peu coûteuse, vous risquez de vouloir en mettre partout! Matériel Ciseaux Planche de bois, de la dimension que vous désirez Papier ciré Imprimante à jets d'encre Une ou plusieurs images* (les images vintage sont parfaites pour ce projet) *Si vous choisissez une image avec un texte, vous devrez l'inverser, de manière à ce qu'elle soit à l'envers (vous pouvez vérifier avec un miroir pour être certaine d'avoir le bon sens) avant de l'imprimer. Technique 1. 2. 3. 4. Aussi facile que ça d'ajouter une touche originale de bois chez vous! À noter Ce projet se prête bien aux décorations saisonnières (Noël, Halloween), et aussi aux cadeaux personnalisés pour les gens qu'on aime. Rosemary Paquet Vous aimerez aussi
I guess About Me is a more aptly named title! I suppose it is about time I fill in this page, nearly a year after it arrived on my header! The main reason that is has been a vacant spot for so long is that it kind of feels like a weird first day of school assignment to write the obligatory "About Me" essay, specially at my age. What age would that be exactly? Well, I guess that would be a good place to start. I am a 29 year young wife and mom of an awfully sweet 4 year old (that would be Wren, the real star of this blog). my little buddy. Some popular adjectives I use to describe myself are busy, creative, outgoing, ambitious, friendly and smart. You may notice that things change regularly around our house, and the main reason for that is that I used to own and run a local furniture refurbishing business named WhiteBerry Reinvented. So where exactly is home? Our humble, evolving abode. And that is the long and short of it my friends! As always, enjoy whatever it is you are doing ...in the fun lane. Holly
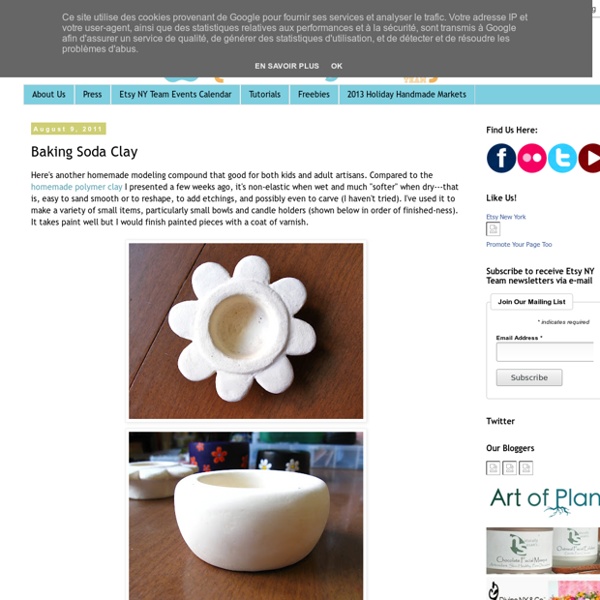
Homemade Polymer Clay At different points over the last few years I've played around with different kinds of homemade "clay." My favorite is a polymer clay also known as cold porcelain. Its main ingredients are cornstarch and white PVA or Elmer's glue. But it took awhile to get the recipe right. Materials 3/4 cup white glue1 cup cornstarch2 tablespoons mineral oil (I used baby oil but reportedly even vaseline will work)1 tablespoon lemon juiceNon-stick potWooden spoon Steps Add cornstarch to glue in a nonstick pot. Cook over low flame stirring pretty much constantly (you can take a quick break or two if your arm gets tired, which it will) until the mixture resembles mashed potatoes. Remove from heat! Pull off a bit to work with and put the rest in a re-sealable plastic bag with the top about half-way open until it's cooled down a bit. Let dry about 2-3 days, then paint, or not. Until next time -- Enjoy! Linda
Comment fabriquer soi-même des tickets à gratter ! Hello J’ai toujours rêvé de concevoir moi-même mes tickets à gratter… Sur une affiche, sur une brochure, sur un vieux ticket, sur un carton d’invitation, bref, l’effet de surprise est toujours là lorsque l’on gratte avec une pièce de monnaie pour savoir ce qui se cache derrière ! Et bien voici un petit tutoriel proposé par le site ArtMind pour faire ça vous-même ! Pour cela il vous faut : du liquide vaissellede la colle en bâtonun carton rigidede la peinture acrylique argentéeun récipient pour faire votre mélangeun pinceau pour l’étalerl’image que vous souhaitez gratter > Pour suivre le tutoriel c’est par ici Vous m’en direz des nouvelles ! Ces articles peuvent aussi vous intéresser:
How To Paint Particleboard / Laminate Furniture Remember these sturdy Broyhill bookcases I got on Craigslist for our schoolroom? Well, they were hiding a little secret.... While the front and the drawers were made out of real wood, the sides, shelves and backs were made out of what I like to call the fake stuff. I decided that painting those babies white and putting them on either side of the window was just the thing to do. Here they are after eight months of daily use, nary a scratch to be seen.... I was so impressed that I recently painted our dining room table using the same process even though it is made out of solid wood. Before After Here is the scoop on how I did it: First I cleaned the bookcases thoroughly with a damp cloth. This oil based primer is key! This primer dries quickly, in about 2 hours, but I waited 12 hours between coats as a precaution. After the paint was fully cured I applied two coats of Varathane Floor Finish, waiting about 12 hours between coats. Life in the Fun Lane . to this...
Making Odor Absorbing Gel - Smelly Jelly OK, time to begin making our own odor absorbing gel, also known as smelly jelly! First, we need some ingredients. I sent my boyfriend out to two different Wal-Marts, because I'd heard you can get the gel component in their home and garden store. We did this in January and NEITHER one had any at all! Very odd, you would think people would be gardening in pots during the winter. So on he went to a Home Depot. Next he stopped by Whole Foods for some scents. So the total cost of purchasing ingredients to make a lot of "orange gel" (to replace my Natural Magic gel) is $13.06. It was time to start the measuring process. OK, this was fun! Here's the first six photos as we did this. Huzzah! Making Containers for Smelly JellyBasic Information on Smelly Jelly Cleaning Tips and HintsLisa Shea Site Homepage Lisa Shea Homepage | Advertising Info | Low Carb Recipes | Sangria Recipes | Travelogues | Game Walkthroughs All content copyright © 2013 Minerva WebWorks LLC.
Tuto comment faire des petits sacs en papier Parce que ça peut toujours servir, je vous explique comment j’ai fait mes petits sacs en papier. C’est archi simple et vous pourrez les décliner dans n’importe quel papier, de n’importe quelle taille. Le matériel dont vous aurez besoin Des ciseaux De la colle Du scotch De la cordelette un peu rigide, la mienne vient de chez mon grand pote le suédois de de la corde de papier Des jolis papiers imprimés Alors simplissime n’est pas ! Que cette journée vous soit douce et créative. Tuto comment faire des sachets à oreilles de lapins Vous les avez aimés, et vous m’avez demandé de vous expliquer. Dans "bricolage" Tuto comment faire Un sac à goûter Petit plancton avait besoin d’un sac à goûter pour la rentrée. Dans "A imprimer" Tuto comment faire un petit carnet en carton recyclé Je sais, je sais, vous avez très envie de vous en faire un aussi.
I Love You to the Stars! We had a joint Earth and Stars birthday party for Lauren and Jacob last Saturday. Lauren told everyone that she had to share her party with Jacob because he doesn't have any friends of his own. It made me so sad. My neighbor Hiedi and I put together this star mobile. Inspired by Miniature Rhino, I made gift bags for all of the kids and embroidered the constellations on the front. Each of the wee ones also received another little gift in their bag; glittered star bobby pins for the girls... And gloves for the guys with stars stenciled on the palms. I made a little picture for the front door using wood, chalkboard paint, wooden stars, and craft rings. For crafts, the kids painted the stars on small canvases. They also painted Earth balls. While half of the kids were inside painting, my brave friend Courtney was busy outside making terrariums with the rest. I had planned to make t-shirts for everyone and had put together two designs: an Earth for the boys and a star for the girls. Our babies.
Plastic Bottle Apple For The Teacher This morning I sent my kids off to school with these cute plastic bottle apples for the teacher, together with a wish for a happy new year, written by each child. I filled the bottom of the bottle with a circle of round tissue paper, and left the top portion empty to view the red colored treats. For complete instructions, see my tutorial here. This is a simple project that's great as a teacher appreciation gift any time! Basic Tunnel Book Tutorial | Sticks, Stones, and Paper Stew Blog This is for you Wendy Y-H. Hope you take a peek! For this seasons 4E house project I’ve decided to create a tunnel book. Each artist has to respond to the previous artist’s page, there is no real subject (well, not at this point because I’m still creating the back ground). Tunnel books are assembled with a solid back and accordion pleated sides. Accordion pleats To start with , I picked a dark green 80lb cover stock for the accordion pleated sides. Pages: Created from a quartered section of 80lb cover paper(8.5″x11″), I made the book 6 pages deep including the back and front window. I had a simple image in my mind incorporating hills, trees and a house. I used an exacto blade to remove the negative space on each page. Once all the pages were cut to my liking, I sanded them w/ 220 grit to create a surface for the pastels to adhere. This was more time consuming than I originally thought. Like this: Like Loading...
52 Weeks Project Inspired Entertaining: DIY Chalkboard Wine Glasses Last month I got an email from one of those "deal of the day" websites featuring a very cute set of wine glasses with chalkboard stems from a company called Chalkboard China. I've seen chalkboard glasses before, and always thought them to be a fun and chic way for guests to keep track of their glass throughout the night so you don't end up with mixed-up glasses or dozens of half-full glasses left around the house. But all the ones I've seen in stores feature a strip of chalkboard paint across the bowl of the glass, which I've always felt looks awkward and takes away from the beauty of the wine or beverage in the glass. What I like about this version is that the writing part is at the bottom on the stem and foot of the glass, so it doesn't compete with the beverage. I also like that the simple black foot on the glass is in itself an elegant design element, and would work just as well with no writing on it. So I figured, "I can totally make that myself!" Materials 1. 2. 3. Method Step 1.