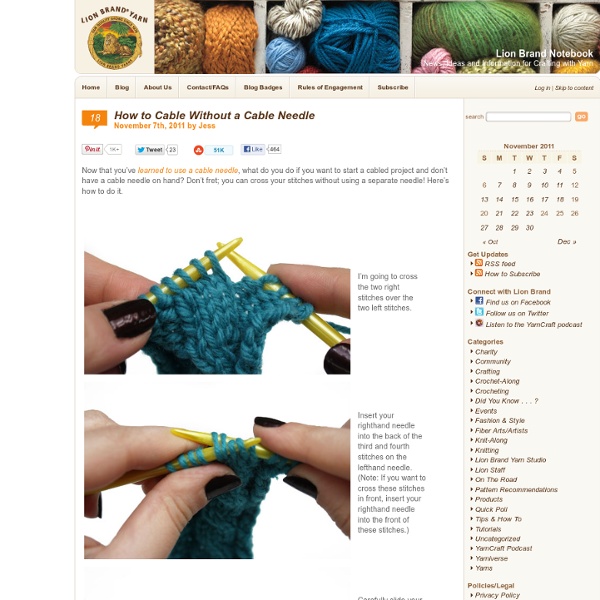
T-Shirt "Yarn" Tutorial | - StumbleUpon I know what you’re thinking–you’re thinking, “t-shirt what?” You heard me. I said, T-shirt yarn. Get a load of this… Oh, yeah…it’s cotton “yarn” made from a spiral cut T-shirt. does everyone on earth have a huge pile of orphan T-shirts that nobody wears, but they can’t seem to part with… or is it just me? So let’s get real green and do something useful with some of them…shall we? Start with a regular t-shirt that has lived a good life…no guilt now. Cut off the bottom hem. Now cut the top off just under the sleeves… so you have a tube of fabric. Fold it nearly in half, leaving the under side sticking out about an inch. Now cut from right to left all the way up to and just past the top fabric, but leave the one inch margin of the lower fabric uncut. it should look like this. The easiest way for you to hold the fabric and cut it into one continuous strip is to slide your arm through the two layers of fabric 1 inch uncut margin running along the top of your arm. Fear not.
Double Knitting - Knitting Community Double knitting is the exception to many knitting rules. You can double knit a stockinette scarf, and it will lay flat instead of curling. Color knitting will be reversible, showing a negative of the image on the back of the work instead of floats. How is this possible? Double knitting produces a fabric with the right sides showing on both sides of the work. Cast on Cast on with double the number of stitches The cabled cast on is great for double knitting because it creates a flexible edge. Cast on with yarn held double You could also use the cast on of your choice, but with the yarn held double. How to Double Knit Single color double knitting instructions This is the easiest way to do double knitting Cast on an even number of stitches *Knit 1, slip 1 purlwise with yarn in front, repeat from * across the row Repeat stitch pattern on each row Bind off (using any method) Double knitting with one color in the front and one color in the back Repeat these two stitches across the row
Knitting With Circular Needles Circular needles are a lot of fun to work with. They allow you to make bags and sweaters without seams, as well as other fun projects. But most patterns assume that people know how to work with circular needles, which can be intimidating for people who don't. What Are Circular Needles? Circular knitting needles can be made of most of the materials that straight knitting needles are made of: bamboo, metal, plastic and resin are the most popular materials. Circular needles can be bought in a fixed format, meaning the needles are permanently fixed to the cord, or they can be purchased as part of an interchangeable system, where the tips can be taken off the cord and exchanged for larger or smaller needles. Circular needles can commonly be found in US sizes 3 to 15. Getting Started with Circular Needles The process of casting on is the same with circular needles as it is with straight needles. There are several different methods for joining a project in the round.
Spud & Chloë & Blog - StumbleUpon Hi Spud & Chloë Friends, After an overwhelmingly positive response for the Oink preview and for adding wings….. here he is! This project is so fast to work up you will barely blink an eye and a pig will be flying around your house. Oink’s body has a Hi Bounce Pink Ball inside but it is optional. Here is some information you might like to know: Finished Measurements: 3 ½ inches tall by 2 ½ inches wide Yarn: Spud & Chloë Sweater (55% superwash wool, 45% organic cotton; 160 yards/100 grams), 1 hank each in Watermelon #7512, Popsicle #7501 and Igloo #7517 (optional for the wings only) Needles: US size 5 double pointed needles, set of 4 or size to obtain gauge Tools: Yarn needle Scissors Tape measure or ruler Polyester fiberfill (small amount) Hi-Bounce Pinky Ball (optional and available on Amazon.com) Black embroidery floss Stitch marker Gauge: 6 stitches per inch in stockinette stitch Pigs really do fly! Have fun and hopefully Oink will bring some smiles to you and those around you.
How To Crochet: Broomstick Lace You can use a very large knitting needle for bigger loops and you can create different rows with different size stitches. The only stitch that you need to know is single crochet, can you believe it? For this tutorial, I used my favorite crochet thread in size 3 with a size C crochet hook and a size 17 knitting needle. The usual grouping of stitches is 4 to 6. Your initial chain will vary in length depending on how many groups of stitches you want to make. In this example, I am going to make 4 groups of 5 stitches so I will chain 20. Chain 20. Insert crochet hook into each chain, yarn over and bring the loop up onto the knitting needle. You should now have 20 loops on your knitting needle. In groups of 5, gather the stitches off the knitting needle. Now begin to draw up your working yarn and chain 1 to close the group. Now make 5 single crochets in the space for the gathered stitches. Continue across row gathering 5 stitches, and making 5 single crochets in each group.
Knitting Stitch Patterns The Technique Zone: Acrylic Paint Transfer - StumbleUpon Supplies needed: Acrylic dabbers, photocopy of an image, water spritzer bottle, paintbrush, card stock, craft sheet and heat tool (optional) Take the lid off the dabbers and brush the paint onto the card stock, ensure you get a good coverage Take your photocopied image ( remember that you will get a reverse of the image, so don't use bold words), flip it over and place it in the acrylic. Leave to air dry for at least 15 minutes and then if you wish give it a blast with the heat tool Only move onto this step when you are sure your paint is completely dryTake your water filled spritzer bottle, spray the back of the paper no more than two squirts, you don't want it too wet Next start to rub the paper very gently with your finger Keep rubbing and extra spritzing if you need too Eventually you will get rid of all the paper, but it does take a bit of patience as you have to be careful not to wet it too much and rub the image away You can do exactly the same on a canvas
fear of commitment cowl - cocoknits Your options are wide open with the “fear of commitment” cowl! Button it right up close to your neck for maximum warmth. Too warm? Move the button so the cowl rests on your shoulders or somewhere in between. Super easy and fast, the trick is in connecting two buttons with elastic so you don’t have to commit to a button hole! Skills Needed General knitting skills. Size One size, approximately 9" wide by 33" long. Materials Yarn 250 yards any soft, bulky yarn which calls for #10.5–11 needle. Sample: Debbie Bliss Cashmerino Super Chunky (55% Merino, 33% Microfiber, 12% Cashmere, 72yds/50g) Needles Size appropriate for your chosen yarn. Notions buttonselastic cord Gauge 14–15 sts = 4" (row gauge not important) in stitch pattern.
The 30 Minute $6 Dress Tutorial | papernstitch - StumbleUpon Guest post by Rachael at Talk 2 the Trees. The perfect dress is hard to come by. I like my dresses to be cheap, and long enough. (I’m not a fan of super short dresses!) Cheap and long dresses don’t seem to go hand in hand.. so, if you want something done right, you have to do it yourself! Here’s Your Supplies List: 1. Here’s How you Make it: 1. 2. 3. 4. 5. 6. 7. 8. 9. 10. 11. 12. Here’s the tutorial in pictures… Believe it or not, this dress only took about 30 minutes to make. About the author.
January 2011 Archives January 31, 2011 A Small Parade The hunt for unfinished things, and the desire to move them to the other category yielded up a few things in the last few days. The urge to tidy the box holding UFO's didn't go away. I know that picture is blurry, but you have no idea what it took to get a good enough shot of my own feet. My Lenores have been sitting on my desk, waiting only for the ends to be woven in for months. They've finally made it into rotation. Next up, the January socks for this year. Pattern: Basic Sock Recipe from Knitting Rules , and the yarn is a discontinued one from the depths. It's Online Supersocke 100 "Sierra Color" #893... That tidy up meant that the only socks around are the cashmere ones... and I've finished one of the pair there. This leaves me... because I haven't cast on the second sock of the cashmere pair yet.. with (you might want to sit down for this one) no socks on needles. Tomorrow - finishitupitis and the mitten portion of the basket. Then the sweaters. Delayed
Craftside: Knit leaf coaster pattern from the book The Complete Photo Guide to Knitting by Margaret Hubert It's Thursday and that means Question day with a book Giveaway. The book is The Complete Photo Guide to Knitting and today you get a free knit leaf coaster pattern from the jam-packed book of knitting fabulousness! Leave your answer to today's question in the comments section of today's post by Midnight ET on Thursday, September 2, 2010: What is your favorite leaf (real or crafted)? Mine are Dusty Miller with a close second being fall maple leaves. The Dusty Miller because I love the idea of a leaf being so soft and fuzzy. If you prefer to knit yours, here's a great pattern for knit leaves that I think would look great in green (as they are here) or in fall colors! Click on the images to read the full pattern and instructions on how to knit a leaf coaster. This great knitting project is from the comprehensive new book: The Complete Photo Guide to Knitting by Margaret Hubert This volume is a comprehensive how-to book about all aspects of knitting.