
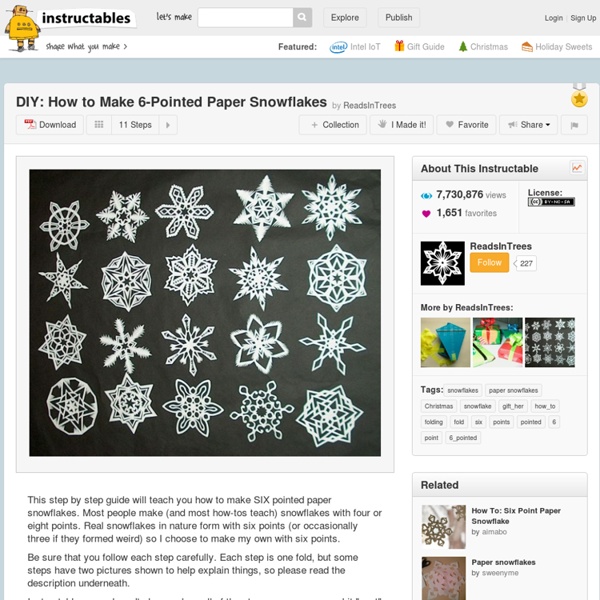
Tutoriel : décorez vos cahiers de papier népalais Dans ce nouveau tutoriel, il ne s'agit pas de carton, mais de papier...Laissez vous guider par cette fiche créative de l'Atelier Chez Soi pour transformer de simples cahiers d'écolier en jolis carnets personnalisés. A vous de varier les couleurs, et les décors ! Niveau : ce tutoriel est adpaté aux débutants. Dans tout le tutoriel, cliquez sur les images pour les agrandir. J'ai choisi de recouvrir de simples cahiers avec des feuilles de papier népalais. - un cahier d'écolier et quelques feuilles de papier népalais - pour coller : de la colle vinylique (colle blanche), un pinceau large, un plioir (outil plat qu'on utilisera lors du collage pour éviter les faux-plis) - pour couper : un cutter, un tapis de coupe - pour tracer : une règle graduée - pour protéger le support : des feuilles de papier journal Choisissez la feuille de papier destinée à recouvrir votre cahier. Placez votre cahier fermé sur un côté de la feuille (en conservant bien la marge de 2,5 cm tout autour). Rabattez les bords.
diagrammi Nel progettare questo modello ho pensato ai bambini, quindi a qualcosa di semplice da piegare e nello stesso tempo versatile. Inizialmente, ho realizzato queste due composizioni, e per questo l’ho chiamato Bialbero di Natale. Poi mi sono reso conto che i moduli possono essere assemblati alternando dimensioni diverse e anche colori diversi, avrei dovuto chiamarlo Multialbero di Natale. Sono molto contento di questo modello, che unisce semplicità, armonia, e versatilità, è come un gioco che può essere smontato e rimontato in modo personale. Ciascuna composizione è ottenuta da 6 ottagoni di carta per fotocopie, ricavati da sei quadrati coi lati di 11, 13, 15, 17, 19 e 21 cm, dall'alto verso il basso. Eccellente presentazione e sequenza fotografica di Maria Sinayskaya: goorigami.com Diagrammi per piegare i moduli del Bialbero di Natale Da dicembre 2012 è disponibile un bel video di di Mariela Recinos: Bialbero di Natale, composizione con otto moduli
Every Creative Endeavor: Organization Week: Family Binder How do you guys keep all your family stuff together? I’m talking schedules and bills and meals and church meetings and organization meetings and important paper and receipts? Me? I have it all in one place: Each year it gets a new cover: (see how it matches the organization week logo/thing?) Pretty much that is the only thing Fancy about this binder. In the front are the binder pencil and pen. Then comes another family calendar. Next comes bills. ugh. Next I have a clear sleeve with bills to pay in it. Next I have a list of our favorite dinners and sides. Next is my blog calendar – {You probably recognize it from here!} Next up is birthdays – this is new this year. (sorry it is blurry – I have no idea what happened but you get the idea!) It’s nothing fancy – just a list of the months and days that I have filled in. Next up is church calling stuff – but you could put PTA stuff here, political stuff, just stuff for whatever you are involved with. And there you have it!
it's just Laine: How to Make a Giant Chalkboard Ever since last year when I showed you the dining room, I've been getting inquiries about our chalkboard. (Seriously don't know why it's taken me SO long to write this post!?!?) A massive chalkboard was something I wanted for my home ever since I saw one in a Pottery Barn catalog years ago. I had thought about just painting a chalkboard on the wall, but my uber-smart hubby pointed out a few issues with that, like...1)what if one of the kidddos pushed too hard and it made a hole in the wall...2) or how about if I wanted to change the wall color, it would be a pain to paint around (which was so true since we did repaint a few weeks ago...he knows me too well!)3) and if we ever moved, my humongous chalkboard would be left behind. That was the clincher for me, lol! Here's how we made it: (btw...we made it over two years ago when I wasn't blogging, so there's no step by step pics, sorry!) I absolutely LOVE this chalkboard and it's size.
un pompon avec un t shirt Learn how to turn old t-shirts into pom poms! T-shirt Pom Poms are so much more durable than tissue paper ones. And I think they look loads better! got an old tee or two {or 20!} Supplies t-shirts, 1 per pom pomscissorscardboard use round objects to trace circles onto cardboard to make 2 templates like those shown above. i used a roll of tape and my camera lens cap…. the diameter of the outer circle is 6.5″ and the diameter of the inner circle is 2.5″. you can play around with different template sizes to get different sized pom poms. cut your t-shirt into 1/2″ strips. i only used from the arm pits down on each shirt. . take one strip and one template and place strips as shown close to the inner circle. sandwich the strip by putting the other template on top. take a fabric strip and place on cardboard with the end even with the outer edge. wind around the template as shown. pull the strip tightly so that it stretches the material. when you get to the end of the strip….
Carambola Flowers by Carmen Sprung If you’ve been following me on Flickr for a while, you’ve probably seen this picture of Carambola Flowers before – I folded them ages ago! But since my Pro account is going to expire in a few days time (and I don’t feel like upgrading it again), a lot of my old photos won’t be displayed anymore. So I decided it would be a good idea to share the very best of them on my blog! These absolutely beautiful origami flowers were designed by Carmen Sprung and I just love them! Each flower is made from a single sheet of paper, not from a square though, but from a pentagon. I would recommend using fairly thick and strong paper (80-90 gsm) to fold them – Tant origami paper will be just the right choice! Description Video tutorial presented by Sara Adams of HappyFolding.com. Tags: Carmen Sprung, Floral
super cheap DIY mod podge and a reason to buy more gelato Guys. I love mod podge. But it is getting pretty expensive. So this DIY mod podge recipe is WAY cheaper! Probably about 1/3 the cost or less if you get the glue at a good price. I also love Talenti Gelato. I needed more mod podge. Materials: -plastic container -Elmer’s glue, 7.625 ounce bottle -water -free printable label Step 1: Go buy some Talenti. (Step 2: Eat it in one sitting. Step 3: Wash it out. Step 4: Buy some elmer’s glue. Step 5: Mix 2 part elmer’s glue to 1 part water. Step 6: Put it in your Talenti container, screw the top on and shake it up! Done! To add the little label, print it out. I have a few mod podge projects coming up in the next few weeks. Here are some of my past mod podge projects: Photo Dresser Ruffle FlatsDictionary shoes Glitter ShoesGeometric necklaceTissue box covered in fabric
How to Weave on a Cardboard Loom June 25th, 2008 Email 1322 users recommend Weaving like this can be the basis for so many projects: place mats, coasters, bags, hats—use your imagination. All photos by Diane Gilleland Keep your edges a little loose, and they'll stay nice and straight. An ordinary salad fork makes a great tool for keeping your weaving snug. Photo: All photos by Diane Gilleland Weaving is such a meditative, relaxing craft—and at the end of it, you have fabric! I like to re-use cardboard shipping envelopes for my simple looms. Begin by deciding how wide you want your weaving to be. Next, measure and mark every 1/4 inch along the edge of your cardboard, working between the two width marks you made in the previous step. Draw a line 1/2 inch from the edge of the cardboard. Use a pair of strong scissors to cut a series of slits in the edge of the envelope, 1/4 inch apart. Repeat these steps on the opposite edge of the cardboard. Time to string your loom! Here's a shot of the back of the loom. Ready to weave?
Pochette au crochet Depuis le temps que je voulais crocheter des sacs... J'ai repéré une foule de modèles sympas, que je prévois d'adapter à ma manière (je suis presque incapable de suivre scrupuleusement un modèle, il faut toujours que je mette ma touche personnelle) Commençons modestement par une pochette crochetée d'une seule pièce et fermée par un bouton rouge. Point de vue dimensions, on peut adapter à ses besoins. Fournitures et matériel : 150 g de Coton fifty de Bergère de France travaillé en doublequelques g de coton rouge pour le boutonun bouton plat (un vieux bouton moche fait très bien l'affaire, puisqu'il est recouvert)un crochet n°3,5 et un crochet n° 3Réalisation : On commence par le fond du sac, réalisé avec le crochet 3,5. Pour le bouton, on adapte la taille en fonction du bouton à recouvrir, et on travaille en cercle, comme pour les amigurumis. Arrêter l'ouvrage, rentrer les fils, et coudre le bouton au centre de la face avant.
Paper Models of Polyhedra Bookish: Upcycled & Repurposed Books and Pages I have always loved books, and have to admit I am a "book collector!" I don't just love to read books though - I love the feel of a book in my hands - it's heft, the texture of it's pages, the gilt of the artwork and lettering on an antique pressed cover...and of course, since learning to read in childhood, the thought of what wonderful secrets could be hidden inside. I love books. But what about altering and repurposing books? Years ago the thought would never have entered my mind because my books - they were sacred to me. Book page mobile Book bench Book cover headboard Storage bin made from book spines by Roadsidephotographs via Etsy Utensil holder made from an old cook book rug sheet music rose Shelf made from a stack of old books e e cummings mobiles book safe poinsettia book page wreath how to nails (how to) What do you think?