
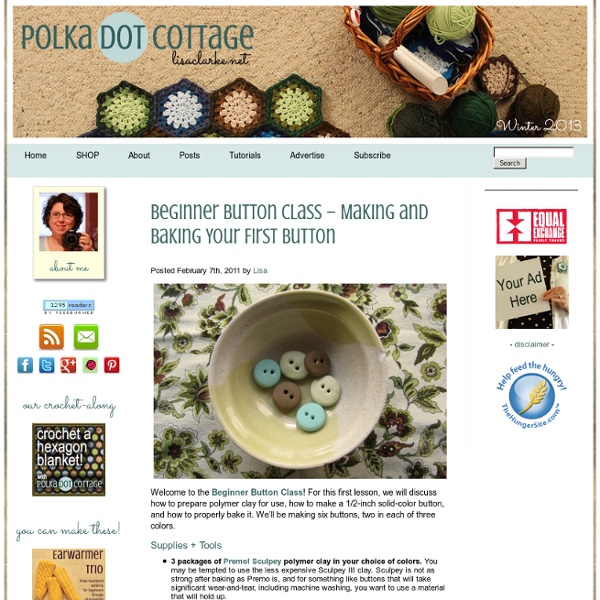
Meet the 2012 Sundance Filmmakers #5: Matthew Akers, 'Marina Abramović The Artist is Present' | Filmmakers, Film Industry, Film Festivals, Awards & Movie Reviews | indieWIRE "Marina Abramović The Artist is Present" (which will screen in the U.S. Documentary competition) documents the 2010 career retrospective of performance artist Marina Abramović, which featured the artist, still and seated, during the show's three month long run at the Museum of Modern Art in New York. What's it about? Says Director Matthew Akers: "I have a degree in fine art and started out as a painter and a sculptor. "When I began making this film, I was skeptical of performance art. "You don’t need to know anything about performance art or even have a particular interest in art to enjoy going on this ride. "Marina Abramovic The Artist is Present." Indiewire invited Sundance Film Festival directors to tell us about their films, including what inspired them, the challenges they faced and what they're doing next. Keep checking here every day up to the launch for the latest profiles.
DIY Painted Feathers I’ve always loved the idea of painting fake feathers, and with festival season underway it seemed like the perfect time to do it. I originally thought of these purely as decorations but then it occurred to me that they’d be a great finishing touch for a festival outfit. This is a great activity to do outside on a warm sunny day, and once you start it’s slightly addicting! What you need: fake feathers, paint (I used acrylic paint), and a paint brush. I got this paint from Utrecht and I love it. I added a little bit of water to the paint before applying to the feathers, and they absorbed the paint almost like watercolor. After the entire feather was covered I added some dots and lines with white paint. Get as creative and colorful as you want with the feathers! I wanted to add in some of the smaller brown feathers to my arrangement, so for those I kept it simple and painted them in colorful ombre shades. Arrange your feathers on a wall as beautiful spring artwork! Photos by Julia & Brigette.
Tutorial: Springy Rings | Motherhood, Frugal Fashion & Thrifty Living |... - StumbleUpon Apr12th2010 I’m sure these tutorials of mine are all starting to look the same. That’s because they are. Haha, enjoy. Supplies 2 colors of coordinating fabric (or not. * I ordered a bunch of these little rings from an Etsy shop called The Perfect Bead. Instructions I chose two coordinating fabrics in peachy/pink shades. Cut 5 circles from the first fabric, varying from 1 inch in diameter down to about 3/4 inch. Use your lighter to singe the edges of each circle. Stack your “petals”, alternating between the two types of fabric, with the largest circles on the bottom and the smallest on the top. Run your needle and thread through the center of the stack to secure. Stitch or glue beads, pearls, rhinestones, or anything else you have onto the center of your flower. Glue the back of the flower to the little pad on the ring and you’re finished! These little rings make great gifts for birthdays, bridesmaids, or even Mother’s Day.
Wooden Gems Try This: Wooden Gems Today's tutorial will set you back a couple of bucks and ten minutes, and in the end, you'll have a handful of little gemstones ready for whatever projects your imagination can scheme up. Read on for the easy step-by-step and few ideas for how to put these little beauties to use. MATERIALS: wooden rectangles, pencil, fine tip paint brush, craft paints in colors of your choosing, black, and white ONE: Begin by sketching the facet lines as shown. TWO: Mix up six shades of the color of your choosing using black and white paint. THREE: Use the fine tip brush to carefully paint inside your sketched facet lines. Try out some other colors and use them in all sorts of ways...jewelry, keychains, napkin rings.
Light Box I built a light box, it's fairly rudimentary but works well! I've been needing one both for the blog and my etsy shop. I think I'll be making a few adjustments, higher wattage and maybe another tissue panel. Here's the construction, I started with an old moving box and attempted to spray paint it but the weather wasn't cooperating. So I went with an interior latex instead. I painted the whole thing white and tucked in a white poster board for the backdrop. The photos below are untouched save for cropping on the right side photos. So pretty and so easy! "Stained Glass" Votive Holders By Jenny Ryan Many times when I’m at the grocery or drug store, I can’t resist throwing a few scented votive candles in my cart. When I’m ready to burn them, it’s easy enough to sit one on a cute little vintage china saucer, but I recently decided to try and find a fancier display solution for them. I also wanted the project to be inexpensive, and the materials used to be things I already had on hand. I was inspired by memories of making faux-stained glass in elementary school and came up with these fun little glass votive holders. This project is quick and easy, and a great way to whip up custom party décor on the cheap. Materials Tissue paper in your desired colors Mod Podge (matte finish), in a pinch you can also use school gluePaintbrush Scissors Glass containers to fit your candle(s), I used thrifted vases and wine tumblers Paper punches in various shapes Q-tips, optional Directions Step 3: Start affixing the punched-out paper shapes to the glass using your paintbrush. More: Related
35+ Reusable Grocery Bags You Can Make: Free Patterns earthgirlfabrics.com.au Quick Carrier: Design features short handles that don’t require turning and french seams, quick to whip up. For Market: Nice ‘n sturdy, designed to last yet look stylish while using. Made with quilting weight cotton or home decor weight fabric. bijoulovelydesigns.com marthastewart.com Repurposed T-Shirt: A simple, clever craft to help everyone be “green.” Simple: Available in pdf or word doc format (also an animated web tutorial). morsbags.com daisyjanie.typepad.com Fabric (For Produce): Requires one fat quarter or one 18” square. Oilcloth: Made with 3 panels of sturdy oilcloth and features a circular bottom. purlbee.squarespace.com spiderwomanknits.typepad.com Pillowcase: This tutorial will show you how to turn one standard case into a very functional piece for shopping using every bit of the case, minimal sewing, minimal cutting and very little of your time. sew4home.com wisdomofthemoon.blogspot.ca creativekismet.com about.com unabashed.wordpress.com instructables.com
Hanging String Balls Whattya need? BalloonStringScissorsGlueJar How do I make glue string balls? Step 1: Hang inflated balloon from ceiling. Step 2: Put string and glue in the jar with a hole in the lid. Step 3: Wait until dry (try to contain yourself). Created by Dane Holweger Starting Your Own Etsy Business: Part 3 As a follow up to the two great interviews yesterday, I thought today I’d share some both some “big picture” lessons I’ve learned about starting a business as well as some really practical tools, like the excel file I use to track sales and inventory. I’ll say from the outset that this is a lot of common sense and I offer it in hopes that someone who is dreaming of starting a business on Etsy will be emboldened to take the plunge. Rocket science it may not be, but it is heartfelt! (Part I and Part II) Originality is Overrated A lot of people who talk about starting their own businesses say things like “well, {insert their business idea} has been done before…” They use this as a reason not to start a venture. Keeping it Low Risk is Underrated Something I love about Etsy is that it is incredibly low cost and low risk to start a business. The cliché is true: do what you love : For me, I was already going to flea markets, trolling eBay, haunting antiques stores.