
Custom Tree House Plans, DIY Ideas & Building Designs | Designs &Id... No, really: would you want to design, build and live in an real fantasy tree house all year round? More and more people have decided to do just that and where treehouses were once novelty architecture for kids they are now (almost) mainstream structures, as attested to by the pictures above via Bella Seven. Many modern tree house designs and home designers and custom builders take a site-specific approach and construct their tree buildings around not only views and rooms but also have to account for access and structural support in unique and novel ways. Some of the results are little auxiliary spaces intended for guests or vacations while others are fully developed tree homes with everything need for daily living. While a lot of attention is paid to lofty plans by fashionable designers, there are many people who continue to use quite conventional home-building plans, techniques and materials to construct tree homes and cabins that look much like ordinary residences on the ground below.
Most amazing apartment&ever! - MAIYA - MY ADVENTURE IS YOUR ADVANTAGE ::... Ah, jeez. This apartment in Sweden has my name written all over it! I love the black and white theme accented with bits of green and yellow. I could definitely be happy in such a bright, clean place! One of my favorite details is the Random Light (by Moooi) in the living room. But what really sets this space apart is the incredible kitchen! [via Freshome]
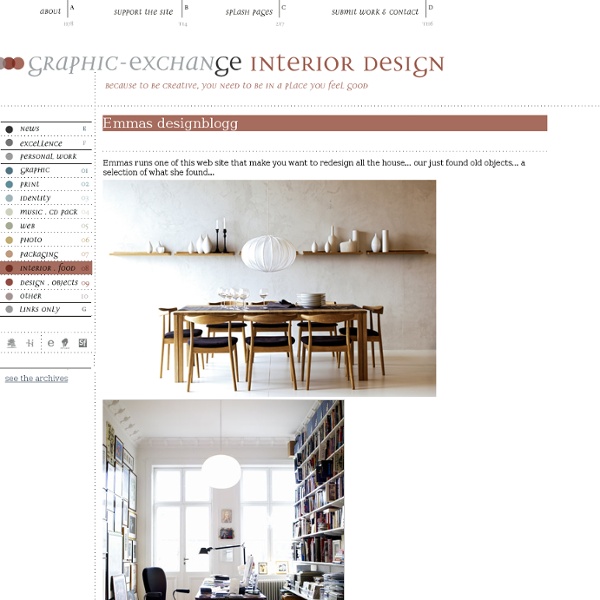
Inspiration for artists from Wildfox Couture - I LOVE WILDFOX - Gwyneth... AHEM* can I be a movie star? Interior Inspiration #20 Continuing a series of posts about the best interiors in a week. To see more pictures or information, simply click on the image. Colorful Apartment Pleasantly Combining Traditional and Modern Design Ideas Maurice Padovani Charming Apartment with Surprising Design Elements Fresh and Colourful Contemporary Rugs from Sonya Winner Impressive Modern Arrangements Within a Relatively Small Apartment Friday stalking 2 Fresh Turquoise Apartment with a Feminine Appeal Scandinavian Duplex Characterized by Refinement and Diversity Intriguing Sci-Fi Apartment Design by A-cero Luxurious Apartment in Arizona With Extensive City Views Intriguing Modern Apartment: Linear Perspective by Redo Studio Warm Atmosphere in Cluj-Napoca Residence by Qub Design Amazing Loft Space in SoMa, San Francisco Friday stalking quickie 1 Juranda House by Apiacás Arquitetos Rustic and Modern Residence in Spain’s Priorat Wine Region You might also like Interior Inspiration #19 Tags: Apartment, Loft |
Pipe Lights by MESH Architectures Eric Liftin, principal of MESH Architectures handcrafts pipe lights in a variety of configurations including custom insalls. The fixtures are made from iron plumbing pipe and almost have the appearance of tree branches. The fixtures cast a low, soft light akin to candlelight, but unlike candles these lamps can be switched or dimmed with a simple touch. They are available for purchase through MESH Architectures’ Etsy shop. Revolving Kitchen And Hanging Bed In Stunning 600 Sq. Foot Recycled Cabin :... Photo: Evelyn Muller. Although interior design events in Latin America are always full of huge museum rooms thought for impossible houses, it's good to see the trend of small spaces popping up in places like Buenos Aires and Sao Paulo. This 600 sq. foot recycled cabin by Brazilian designer Fabio Galeazzo presented at the last edition of Casa Cor Sao Paulo is another one of such spaces, and presents some very cool features. Asked to make use of an old cabin that was already at the city's Jockey Club --venue of the event--, Galeazzo decided to retrofit the place adding a new, visible bamboo structure both inside and outside the place (photo above). He then sought to create a space that had the simplicity of traditional cabins with some of the comforts of modern living. Named 'Urban cabin', the space has only 600 sq. foot, but thanks to a clever blending of outdoor and indoor space, it looks bigger. Photo: Marco Antonio. Photo: Courtesy of Fabio Galeazzo. Google
Cobbold Du&Pont Pages Search Jo on Instagram Kim on Instagram Kim's twin sister's blogKim's fav decor shops in Ottawa Bedsos for Leather beds & Mattresses Get contemporary lighting at a discount with a Euro Style Lighting Coupon from CouponTrunk.com Eames Lounge Chair, Barcelona Chair, Marble Tulip Tables - Exclusive at Rove Concepts Order custom holiday cards for your small business Colorado real estate and homes « WINKS | Main | Max Kim-Bee » Friday Sep242010 Cobbold Du Pont Posted on Fri, 24 Sep 2010 by kim 13 Comments Rebecca Du Pont De Bie and Caroline Cobbold, the lovely ladies behind London-based Cobbold Du Pont Interiors, emailed us recently and shared some photos from their absolutely incredible portfolio. Reader Comments (13) OMG... do these places exist!! 24 Sep 2010 | Shoppingaholic HUGH wow factor - of course it is all in the architecture so my love must remain unrequited... Tricia Rose Wow I love how rustic and gorgeous this is! ChickAdvisor i love every picture. beautiful! anita @ a dreamer's den Adriana Leone
Inner Child: Colorful Home has Trap Doors & Secret Slides | Designs &am... If kids could design and build whole homes, what would they look like? This so-called Rainbow House is filled with secret doors, slides that bridge between floors and multi-colored spiral staircases to wind you back up. Chutes and ladders, anyone? Dubbed a “magical oasis’ by its creators (AB Rogers and DA Studio, the busy and noisy road next to the building is matched by equally rambunctious and interactive interior decor. Stepping in off the street is a lot like walking into a fantasy looking glass or wardrobe portal. An over-sized sofa on the main floor ? Amidst the gleeful madness, though, there is much reason alongside rhyme – minimalist fixtures and functional cooking spaces are animated by their surroundings, but remain modern and somehow adult despite their setting.
A Tiny Apartment in Hong Kong Transforms into 24 Rooms | HomeDSGN, a daily... By Eric • May 7, 2011 • Selected Work Gary Chang, an architect, designed his 344 square foot apartment in Hong Kong to be able to change into 24 different designs, all by just sliding panels and walls. He calls this the “Domestic Transformer.” Check out the video of Chang in his apartment below. Chang has been living in this apartment since he was 14 years old. Source: NYTimes, ArchDaily Photos courtesy of Gary Chang Click any photo to see a larger image - Use buttons or j/k/arrow keys to navigate through the articles Luxury LA Property With Stunning Views | Luxury Property, Interior Design,... Luxury LA Property With Stunning Views This contemporary LA property, currently for sale with LA Classic Estates, with its clean lines and modern interior design, also features jetliner views over LA`s Sunset Strip. The property is built using a combination of steel, glass and stone intertwined with state-of-the-art lighting and electronic finishes. About Richard Barker Love Interior Design & Exotic Travel? April 17, 2010 | Property | View comments Contemporary Hewlett House with views across Bronte Beach, Sydney, Australia Sydney-based architectural practice MPRDG have completed the Hewlett House project. Monastery To Modern Como Loft, Milan Milan-based design studio JM Architecture have completed the Como Loft project.
Modern Sophistication in New York City's Upper West Side & Design... - StumbleUpon 268StumbleUpon Today we return to the work of Frances Herrera, the inimitable New York interior designer behind Interiors by Francesca, LLC. Working with a young, sophisticated family in the Upper West Side, Herrera transformed a blank slate into a comfortable, kid-friendly home that exudes an unquestionably chic, cozy and polished sense of style. The minimal, contemporary dining room allows the impressive Manhattan skyline to take center stage. The large, unobtrusive glass table and dining chairs that are upholstered in a practical, yet chic faux ostrich vinyl are perfect for everyday use and for young children. Abundant neutral and warm shades enhance the coziness of the living room. The living room design is focused on comfort, luxury and multi-functionality. A chic wingback chair placed in the corner with a bookshelf becomes an intimate reading area in the living room. In the six-year-old boy’s room, a custom window seat with drawer provides even more storage for toys. About Taylor Wilson
Recycling Billboards into Modern Residential Buildings | Designs &Ideas... - StumbleUpon As more and more advertising goes online and transportation conservation becomes an increasing economic and ecological concern, what is the future fate of the infamous billboard? One proposal by Front Architects suggests turning these into lofted homes – small houses to be sure, but located in some potentially fascinating places. Some of these unusually thin homes could be built in place from scratch, others could be transported to new locations or even left where they are in the urban environment. As with so many good design projects the feasibility of this specific idea as such is not of singular or even primary importance – the concept provides a foundation for rethinking everyday urban structures, artifacts of the built environment, that we might find new and different uses for as times change. Alas, the above image is only a computer-generated overlay in a real situation.
Kitchen&inspiration I thought those of you looking for a little kitchen inspiration might enjoy the following kitchens from the folks at Dovetail~Workers in Wood. They are based in Hampshire, UK, and obviously take pride in their work and create dream kitchens for each one of their clients. I love the details they've included in some of their kitchens - from a compost drawer to a little niche for trays. Check those out after the jump. Bedroom Designs: Modern Interior Design Ideas & Photos | Designs &Ideas on Dornob - StumbleUpon Do you prefer plush padding a minimalist pillow, a decked-out design or toned-down interior? From dazzling abstract designs to humorously offbeat sleeping spaces here are seven brilliant bedroom designs to inspire your imagination. Who knows, with a few decorative adjusts you might be able to remodel your own bedrooms to similar effect. If you love soft illumination and hate to sacrifice privacy, this bedroom interior has a brilliant combination of strategies from uplighting around the bed itself to wall panels that block direct views and sunlight but let light in around them. If you are more of a minimalist, this simple bedroom space has a rhythmic modularity and combines soft white walls and ceiling with variegated wood furniture and furnishings for a pleasantly mixed aesthetic experience. At the opposite end of the spectrum, how would you like to have your bedroom be in the middle of your pool room?